Where has the time gone??? I can answer that - I have made about 50 cards in the last 2 weeks - that is where!
I spent some time last week with a Crafty Girls friend, Barbara, helping some of the residents of the home where my mother now lives to make cards. It was a fun afternoon and the time just flew by. Below are a couple of photos of people who made cards and were so excited by the finished products.
I had made a whole lot of flowers and other embellishments before the workshop so that people could use them to put cards together. Most of the people had never done anything like this before and there was a real buzz through the room.
Everyone went away with at least one card that they had made - either on their own or with a little help.
Barbara was a real help too - I think she enjoyed herself and we have been asked to go back again in a month or so to do another session for them.
Of course, my mother had to come and supervise! She said she didn't need to make a card as she could get me to make any that she wanted!!!
Over the last few years, my interests have changed a little. I have developed an interest in patchwork and quilt making which seems to have overtaken my interest in card making! I still make cards, but not as much as I used to. Hence the change name for this blog.
Tuesday, August 2, 2011
Friday, July 15, 2011
Using my Tanda Stamps
I was having a play with some of my Tanda stamps a while ago when I bought a lovely white chalk inkpad. I hadn't used this stamp from the Retro Men Set 1 before and I wanted to try it out with the white on black card. Was quite pleased with the result.
The oval was embossed onto the card using the silicon mat and B plates through the Cuttlebug. The tag is one of the Spellbinders Grommet tags.
The sentiment stamp is from Montarga. I added some little corner peeloffs just to finish it off.
When I had finished this one, I decided to try the same stamp using black on white card.
I cut the ovals using the oval nestabilities. The swirly ends are made from one of the fancy tags (Spellbinders) which I cut in half and attached at the ends of the ovals.
The background layer was run through the Cuttlebug using the Swiss dots folder (which is starting to get a little worn across the fold from all the use it is getting!). Added a black spotted ribbon across the centre.
I thought about adding a sentiment but couldn't decide where it should go so left it off. This way the card could be used as a wedding card or an anniversary card.
The oval was embossed onto the card using the silicon mat and B plates through the Cuttlebug. The tag is one of the Spellbinders Grommet tags.
The sentiment stamp is from Montarga. I added some little corner peeloffs just to finish it off.
When I had finished this one, I decided to try the same stamp using black on white card.
I cut the ovals using the oval nestabilities. The swirly ends are made from one of the fancy tags (Spellbinders) which I cut in half and attached at the ends of the ovals.
The background layer was run through the Cuttlebug using the Swiss dots folder (which is starting to get a little worn across the fold from all the use it is getting!). Added a black spotted ribbon across the centre.
I thought about adding a sentiment but couldn't decide where it should go so left it off. This way the card could be used as a wedding card or an anniversary card.
New Techniques
Was looking at the StampTV video this week and was very interested in the techniques demonstrated by Gina K for the Happy Day Card project.
I didn't have the stamps she used in the video but I did have a lovely stamp from Tanda that I thought would be lovely with this technique. I used Wild Honey and Brushed Corduroy Distress Inks. Stamped the first colour - wild honey over the whole stamp then put Brushed Corduroy around the edges. Had to clean the stamp between re-inking so that the darker ink did not contaminate the lighter ink.

This closeup show the detail of the two colours on the stamp.
The image on the sentiment was stamped as a second go - stamped on waste paper first to remove some of the ink, then stamped on the oval sentiment. Used Brushed Corduroy for the sentiment.
The swirly bits on the end of the oval shape was made from a fancy tag die cut (from Spellbinders) - cut in half then attached to the ends of the oval.
This example is similar to that demonstrated by Gina in her video except that I used a wax resist technique (also from StampTV) for the background.
I love the CAS designs that Gina comes up with! While I don't have any of her stamps, there are a lot in my stash that I can substitute.
Enjoy.
I didn't have the stamps she used in the video but I did have a lovely stamp from Tanda that I thought would be lovely with this technique. I used Wild Honey and Brushed Corduroy Distress Inks. Stamped the first colour - wild honey over the whole stamp then put Brushed Corduroy around the edges. Had to clean the stamp between re-inking so that the darker ink did not contaminate the lighter ink.

This closeup show the detail of the two colours on the stamp.
The image on the sentiment was stamped as a second go - stamped on waste paper first to remove some of the ink, then stamped on the oval sentiment. Used Brushed Corduroy for the sentiment.
The swirly bits on the end of the oval shape was made from a fancy tag die cut (from Spellbinders) - cut in half then attached to the ends of the oval.
This example is similar to that demonstrated by Gina in her video except that I used a wax resist technique (also from StampTV) for the background.
I love the CAS designs that Gina comes up with! While I don't have any of her stamps, there are a lot in my stash that I can substitute.
Enjoy.
Monday, July 11, 2011
Butterflies
This week the Craft Room Challenge and the Stamp Something challenge both have Butterflies as the theme and I had a card that suits this well. The card is made with a box base and the back part stands through the centre of the base.
I used the CB to emboss the layer on the background. The stamp was embossed with gold and cut out before attaching it to the sentiment at the front.
I did a video on making these box cards last year and you can see it here.
I used the CB to emboss the layer on the background. The stamp was embossed with gold and cut out before attaching it to the sentiment at the front.
I did a video on making these box cards last year and you can see it here.
Friday, July 8, 2011
Experiments
Over the last week or so, I have been experimenting with some different ideas.
This card is made from acetate that was folded then embossed using a textiles folder in the Cuttlebug.
The flower is a Montarga stamp that I coloured using my Copic markers. (They have been having a rest lately!) The shapes for the front of the card were cut with the Cricut. I added some pearl dots at the top of the frame to add a little something!
The sentiment was stamped on a Spelbinders Tag die then attached with foam dots to the bottom of the frame.
The card was finished off with a narrow red ribbon that I attached to the inside of the card with DS tape then covered it with the ribbon on the outside.
This card I made after watching a neat video from stampTV on double embossing.
The blue layer on the left side of the card was embossed with the Alterations Gridlock folder. I then brayered Versamark ink on the top of the embossing and added clear embossing powder. After heating, it came up with the really cool pattern. It really makes the embossing stand out.
Added some paper from my stash to the other side of the card, a black ribbon down the centre and topped it with one of my favourite gentleman stamps from Hero Arts. The Happy Birthday stamp is from Montarga.
I like this technique and will try it out on more cards over the next few weeks.
This card is made from acetate that was folded then embossed using a textiles folder in the Cuttlebug.
The flower is a Montarga stamp that I coloured using my Copic markers. (They have been having a rest lately!) The shapes for the front of the card were cut with the Cricut. I added some pearl dots at the top of the frame to add a little something!
The sentiment was stamped on a Spelbinders Tag die then attached with foam dots to the bottom of the frame.
The card was finished off with a narrow red ribbon that I attached to the inside of the card with DS tape then covered it with the ribbon on the outside.
This card I made after watching a neat video from stampTV on double embossing.
The blue layer on the left side of the card was embossed with the Alterations Gridlock folder. I then brayered Versamark ink on the top of the embossing and added clear embossing powder. After heating, it came up with the really cool pattern. It really makes the embossing stand out.
Added some paper from my stash to the other side of the card, a black ribbon down the centre and topped it with one of my favourite gentleman stamps from Hero Arts. The Happy Birthday stamp is from Montarga.
I like this technique and will try it out on more cards over the next few weeks.
CMW July Challenge
The challenge this month was to use a sketch. This was the sketch we used for the challenge and it was open to interpretation! You could use it as a rectangular card or a square one.
For this card, I used a really nice golden yellow ochre coloured card. I used the same card to make the top layer and embossed it in the CB large script folder. The corners were made using a Martha Stewart photo corner punch. The ribbon across the centre is a brown velvet ribbon - narrow so it does not detract from the central embellishment. I made the embellishment from a square memory glass that I coloured (on the back) with alcohol inks then stamped a leaf image on the front with Staz On ink. I attached a yellow card to the back of the glass using copper tape to edge the glass and hold the card in place at the same time. I layered this onto a piece of bronzed card - the same as that used for the corners. I used foam pads to attach the embellishment so it sits above the ribbon. The top layer was attached to the card using strips of board. This gives the whole card more of a 3-D effect.
For this card, I started with the centre - I was playing with one of my Lace templates and decided it would make a good centre for a square card. I used an Ezcut die to cut the corner embellishments from the same paper as the circle. The flowers were punched from 2 shades of pink paper and layered with pearl dimensional for the centres. The leaves were punched from a green card.
The sentiment is from a Darkroom Door flowers set and I stamped it onto a white card cut with a Spellbinders scalloped circle die.
I didn't put a ribbon across the centre (as in the sketch) because I forgot!!!!
For this card, I used a really nice golden yellow ochre coloured card. I used the same card to make the top layer and embossed it in the CB large script folder. The corners were made using a Martha Stewart photo corner punch. The ribbon across the centre is a brown velvet ribbon - narrow so it does not detract from the central embellishment. I made the embellishment from a square memory glass that I coloured (on the back) with alcohol inks then stamped a leaf image on the front with Staz On ink. I attached a yellow card to the back of the glass using copper tape to edge the glass and hold the card in place at the same time. I layered this onto a piece of bronzed card - the same as that used for the corners. I used foam pads to attach the embellishment so it sits above the ribbon. The top layer was attached to the card using strips of board. This gives the whole card more of a 3-D effect.
For this card, I started with the centre - I was playing with one of my Lace templates and decided it would make a good centre for a square card. I used an Ezcut die to cut the corner embellishments from the same paper as the circle. The flowers were punched from 2 shades of pink paper and layered with pearl dimensional for the centres. The leaves were punched from a green card.
The sentiment is from a Darkroom Door flowers set and I stamped it onto a white card cut with a Spellbinders scalloped circle die.
I didn't put a ribbon across the centre (as in the sketch) because I forgot!!!!
Baby Boy
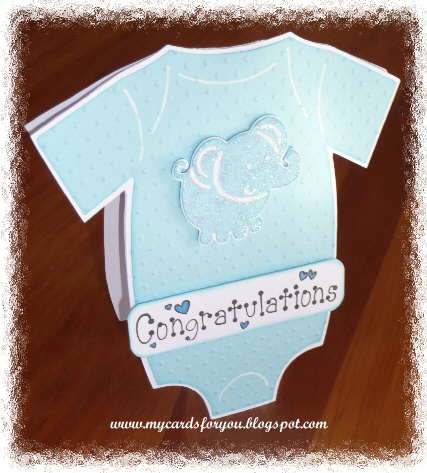
One of my daughter's friends had a baby boy recently and because my daughter does not knit or anything, she asked me to make some booties. I knitted some cute little blue booties and made this card to go with them.
I used the onesie file from the New Arrivals Cartridge to make the card base on my cricut. I used Design Studio to weld the shadow file together at the shoulders, then cut that and the topper. I ran the top layer through the Cuttlebug Swiss Dots folder to give it some texture and highlighted the seams with a white pen. The elephant was also cut from the same cartridge and layered. I used Kindiglitz on the elephant to make him sparkle a bit. The sentiment is from a baby stamp set that I have had for ages. I coloured the hearts with a blue glitter pen.
Welcome Lukas! Hope Ali and Vicki are enjoying their new addition to the family!
CAS-ual Fridays challenge this week is a shaped card - this fits the bill I think!
I used the onesie file from the New Arrivals Cartridge to make the card base on my cricut. I used Design Studio to weld the shadow file together at the shoulders, then cut that and the topper. I ran the top layer through the Cuttlebug Swiss Dots folder to give it some texture and highlighted the seams with a white pen. The elephant was also cut from the same cartridge and layered. I used Kindiglitz on the elephant to make him sparkle a bit. The sentiment is from a baby stamp set that I have had for ages. I coloured the hearts with a blue glitter pen.
Welcome Lukas! Hope Ali and Vicki are enjoying their new addition to the family!
CAS-ual Fridays challenge this week is a shaped card - this fits the bill I think!
Subscribe to:
Posts (Atom)