Over the last few years, my interests have changed a little. I have developed an interest in patchwork and quilt making which seems to have overtaken my interest in card making! I still make cards, but not as much as I used to. Hence the change name for this blog.
Recently, Kathy Files ( Paper Phenomenon) and Kathryn Krieger (Kathryn Scraps) had a special deal for design and making instructions for two sets of folios. I was most impressed with the styles they have produced for these folios and have made several since I bought the design instructions.
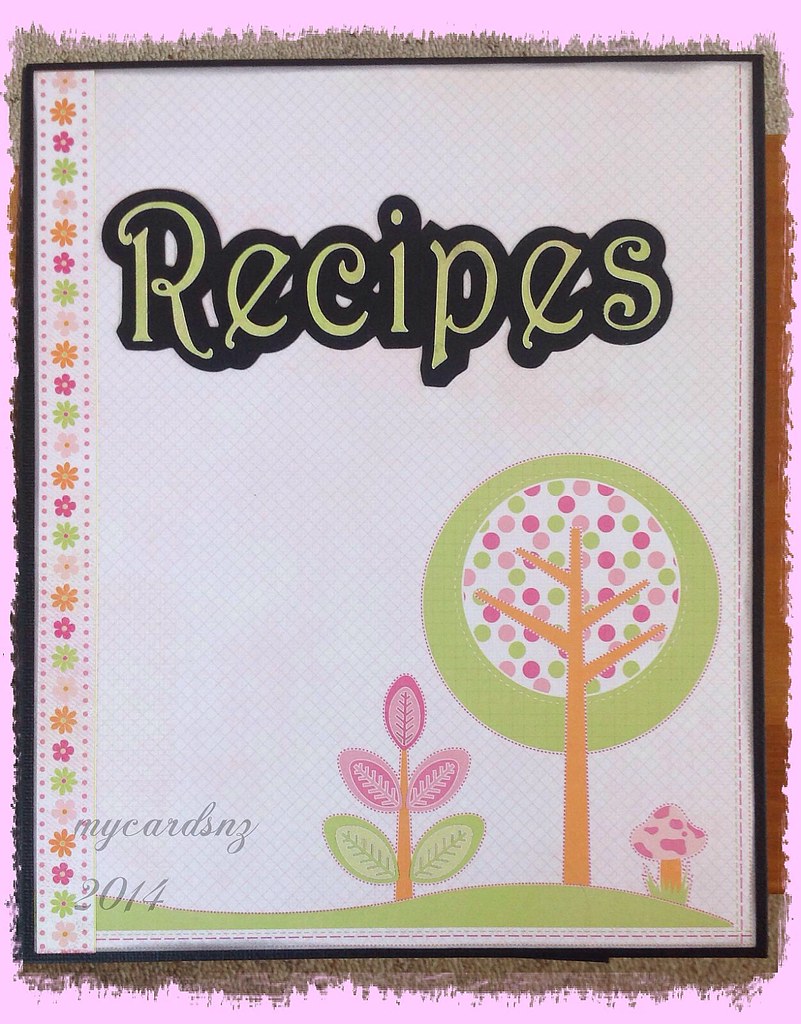
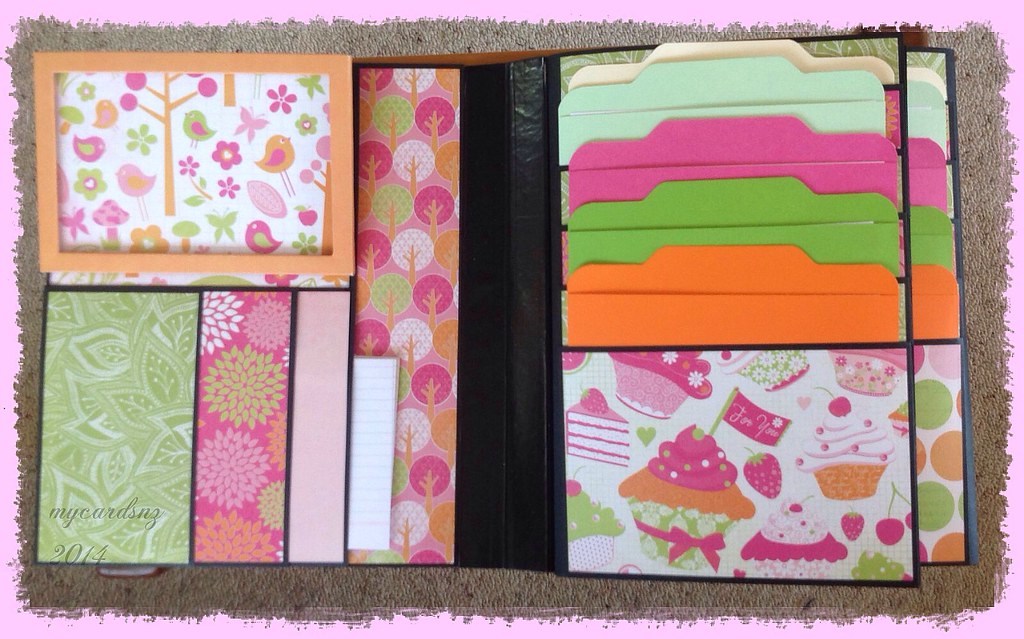
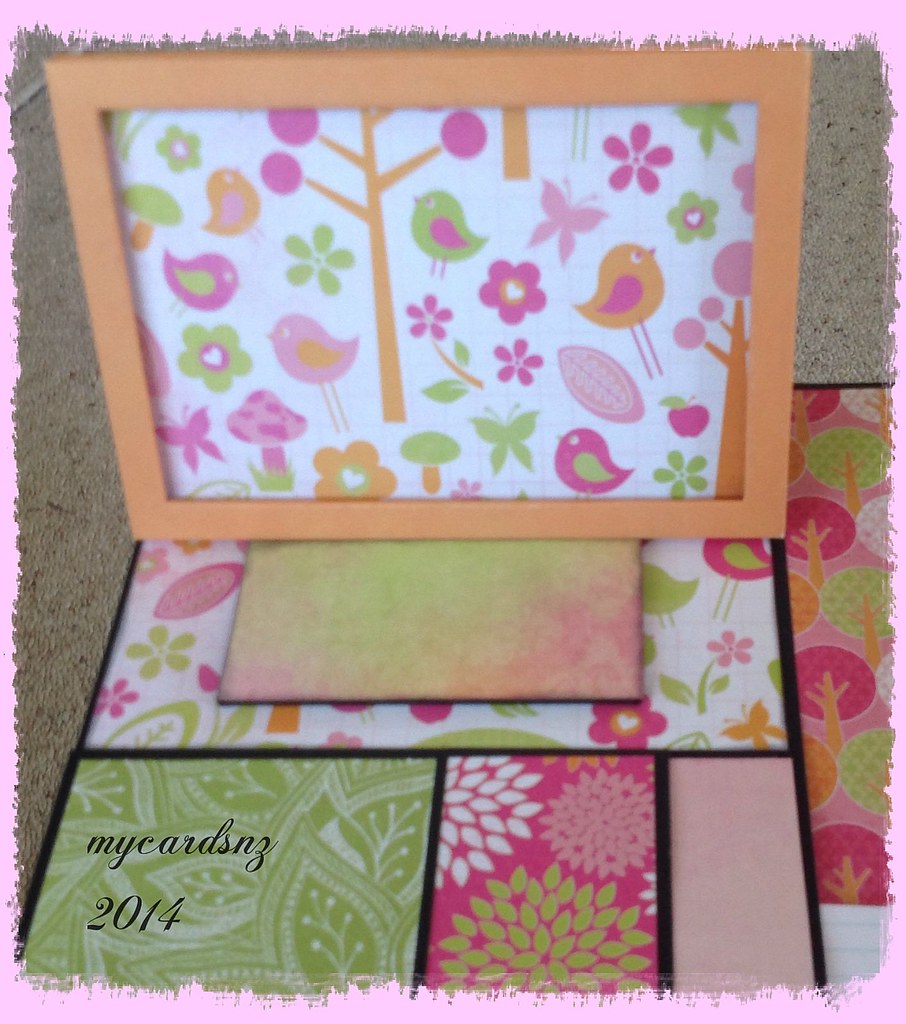
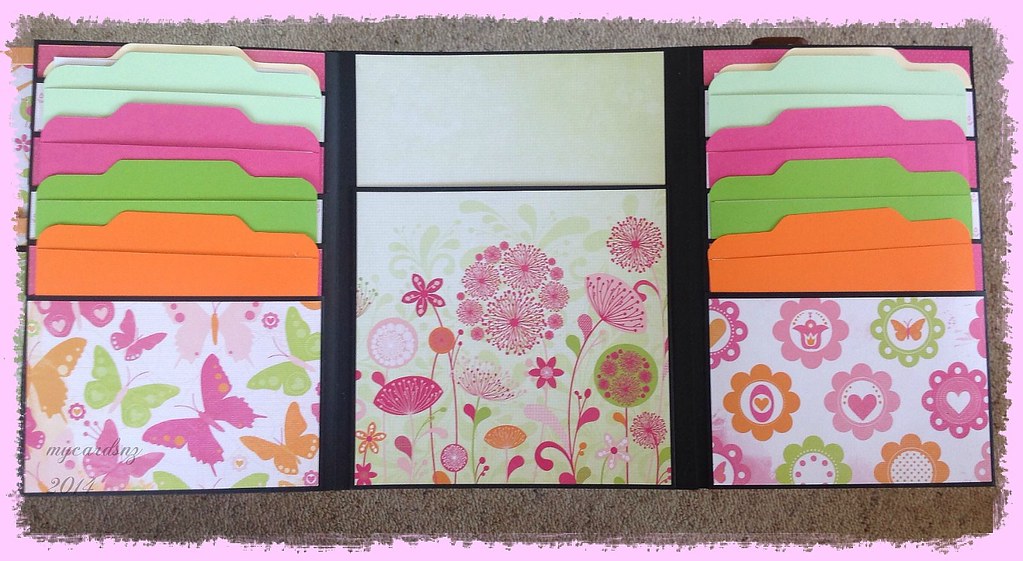
The folio in this post is one I made for a family member as a Christmas gift. It is the Recipe folio from Kathy Files.
It has an easel stand for putting recipe cards into so you can see the recipe easily. The pockets contain little folders with recipe cards for writing down favourite recipes.
Originally, I included four sets of fold out pockets, but the folio would not close well with all the folders and cards in the pockets, so I removed two of the pocket sets. There are still 20 pockets with folders and cards in the folio.
It has been a very long time since I posted anything here, so as I had made a few cards at the weekend, I decided I should post them to show I have been doing something!
This is a design I made using an article from a recent Craft Stamper magazine. I realised I had the stamp set used so gave the technique a try. It is a masking technique and worked out really well. I take no credit for the design whatsoever!
It does look lovely though!
This is a card made using some background paper from my stash, which I have decided that I need to start using up. I have so much paper for scrapbooking and card making that it is really time to use it all. I do love keeping it to look at though! The stamp is from a Kaisercraft set.
Again, another card using background paper from my stash. These papers are so nice, they need very little further embellishment.
The technique used in this card is also from a Craft Stamper recent edition. I used distress paints and sponge to swipe the paint across the card, then embellished it with a stamped image from the CS magazine. The words are another freebie stamp set from an Australian card making magazine.
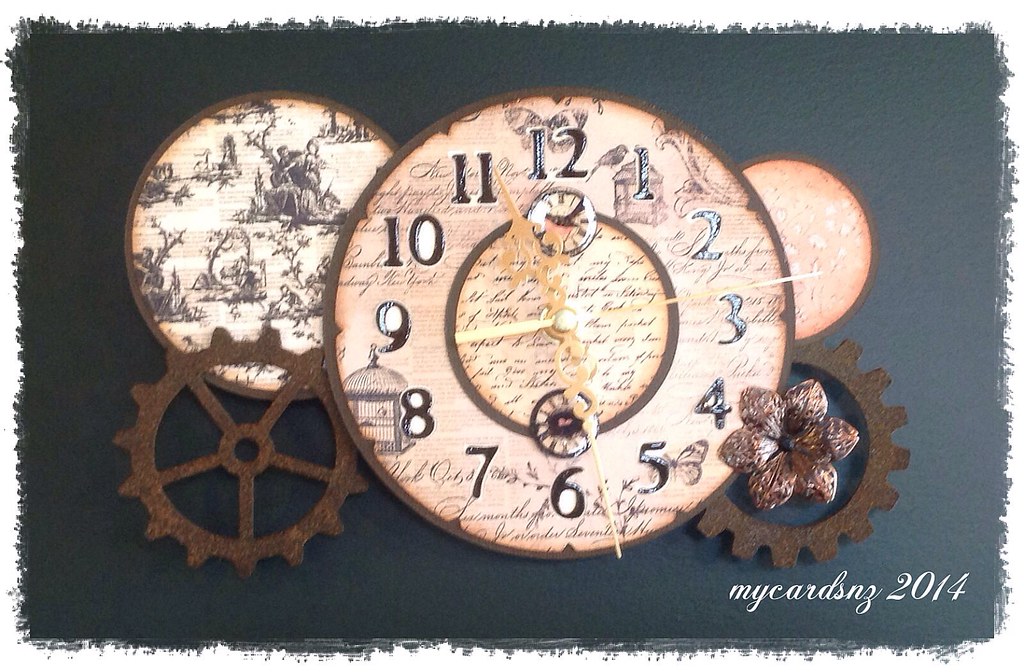
Recently, I bought some files from SVG Cuts including the set Maison de Madelaine. One of the files in the set was for this clock.
I cut the files on my trusty Cricut expression machine using a 6x6" paper pad (Almanac Collection by Prima) for the clock face and other pieces. The cogs were cut from lightweight chipboard and I layered several layers to make them reasonably stable and to stop them from bending. I used vintage photo distress embossing powder on the cogs to give them a slightly rusted look.
I used a clock movement I bought from Spotlight to complete the clock. It now rests very nicely on the wall in our dining room!
If you want to check out the wonderful cutting files and sets from SVG Cuts, please use the direct link on the top right hand side of my blog.
I found the design to be easy to make and decorate, but found that I had to reduce the size of the pictures so they would fit onto the mats. Also, the folded mats for the narrow pockets - when they had photos attached, they were a tight fit in the slots. However, the end result was pleasing and Mum liked it a lot!
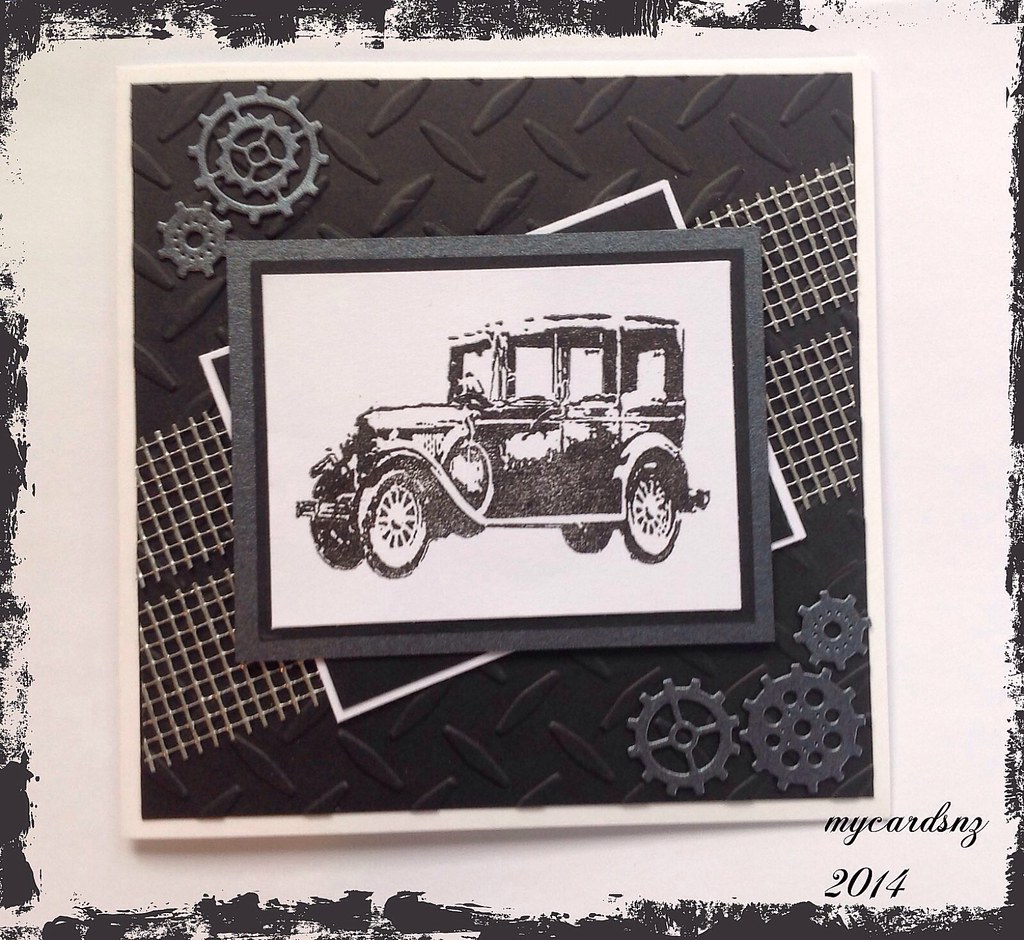
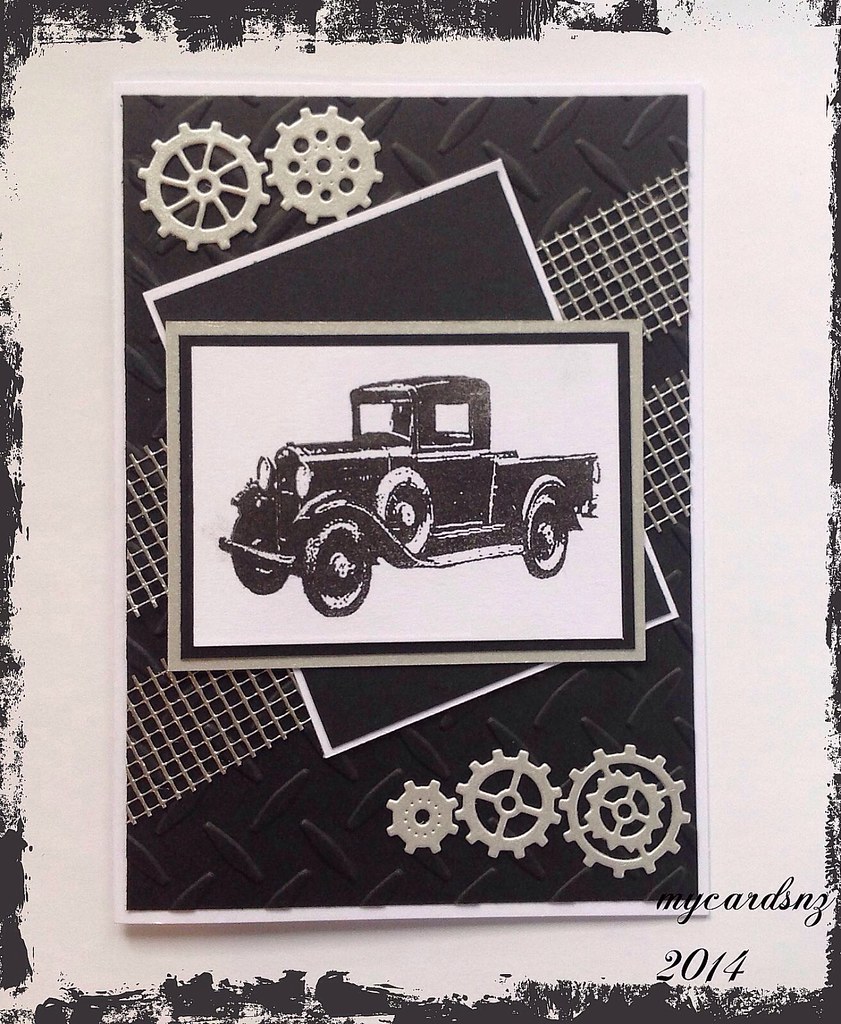
Over the last few days I have been making a few cards, many of which have been inspired by articles in recent Craft Stamper magazines.
Both of these cards are based on a sample of a man's card. I used mesh tape (from the local hardware store) for the centre part of the cards. I covered it with embossing ink then heat embossed it with silver embossing powder. The backgrounds were embossed using a Cuttlebug folder. The cogs were cut from dark silver/grey metallic card. The base cards used were both white.
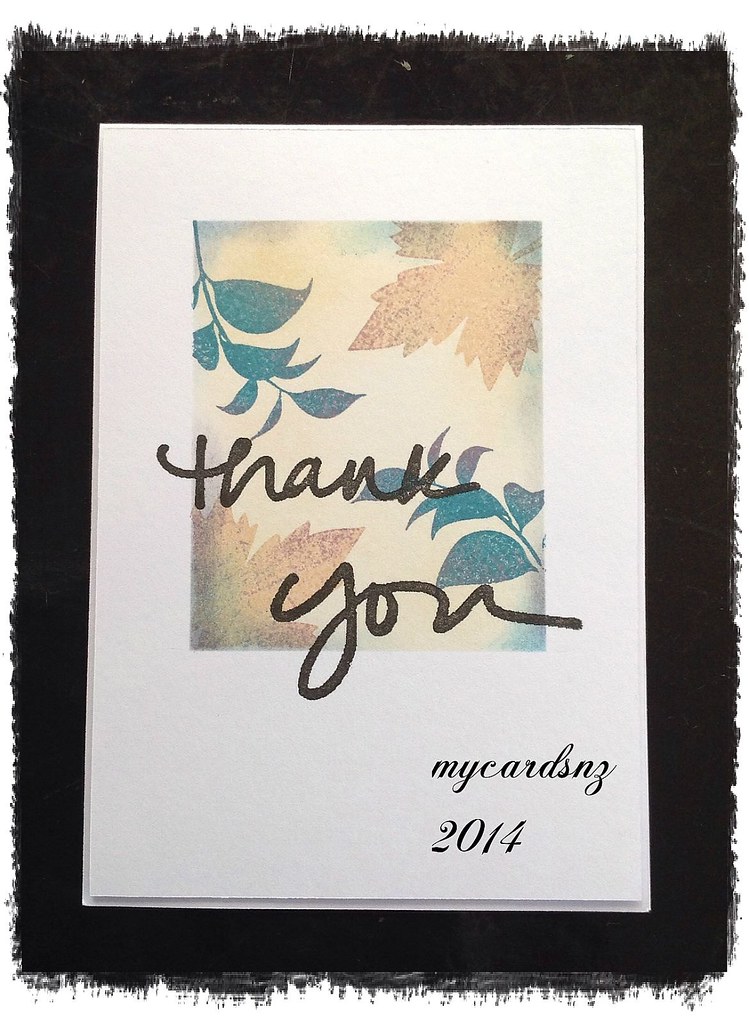
The next card was a nice CAS card using distress inks to create a rectangular background then stamped with contrasting colours of Memento inks. The same inks were used to highlight the edges of the background area. The leaf stamps were from Gina K and Tanda.
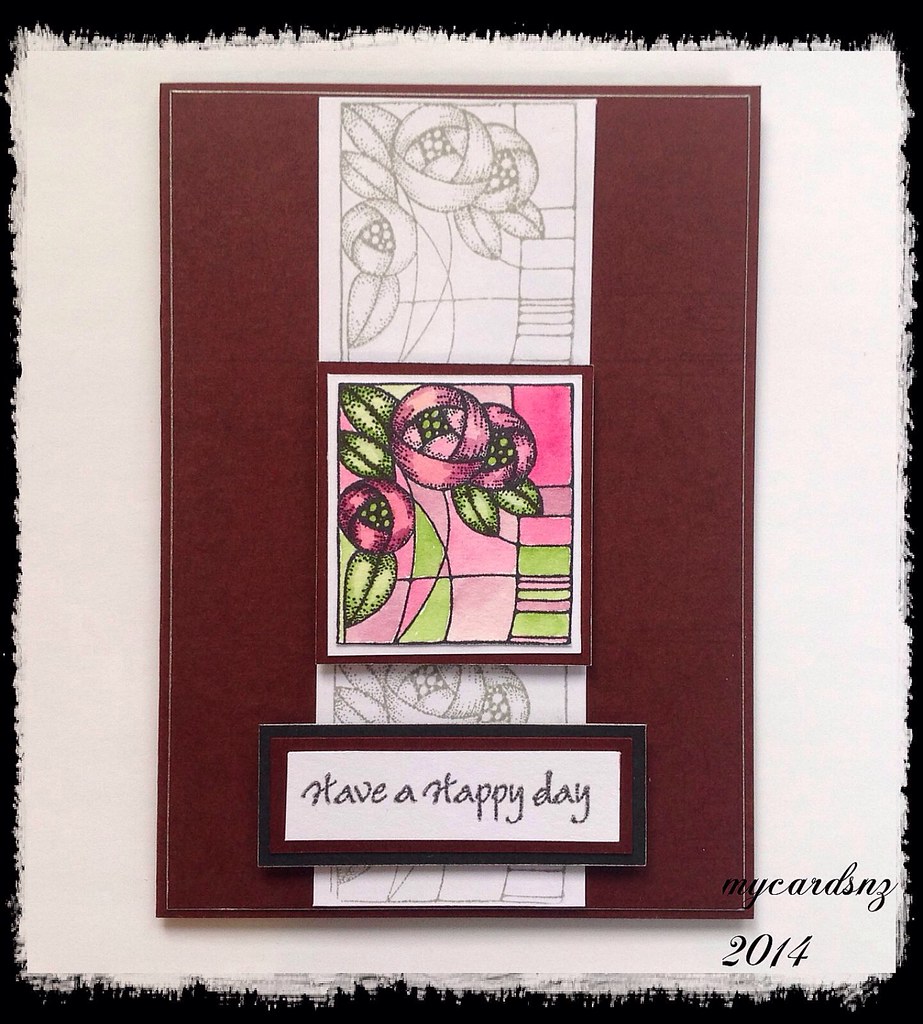
The final card is one for which I used the cover stamp from the latest magazine. I just love Rennie-Mackintosh style designs and was very pleased to get this stamp! I used the stamp with London Fog Memento ink to stamp the background images and coloured the focal image with distress inks.
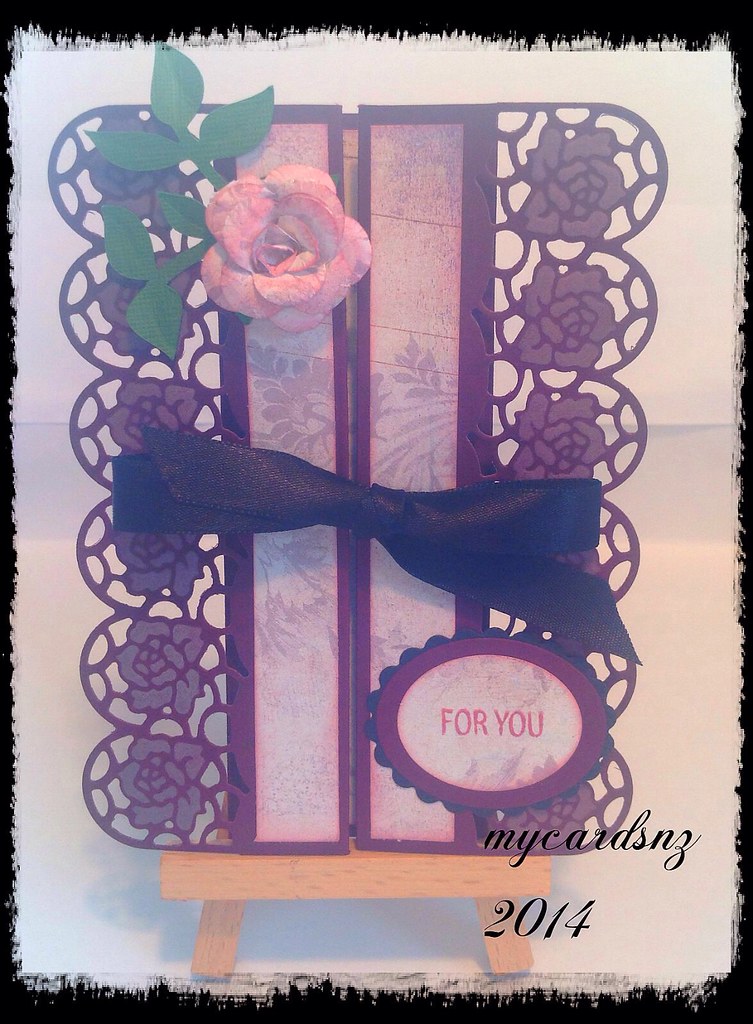
Recently I found a You Tube video demonstrating a double fold card that looked really nice so tried the technique out after playing with the measurements to suit the size of cards that i usually make.
For this card, I used a wine coloured base card and used an edge punch to shape the sides. I cut the label shapes from the wine card and a contrasting card and stamped with Memento Rhubarb ink. The labels were attached to the belly band around the centre of the card. This comes off to open the cards.
I used an edge die to shape the sides of this card and embossed it using white chalk ink. The flower was hand made using paper punched with a large flower punch. The ribbon is threaded through the sides of the die cut part of the card and tied into a bow.
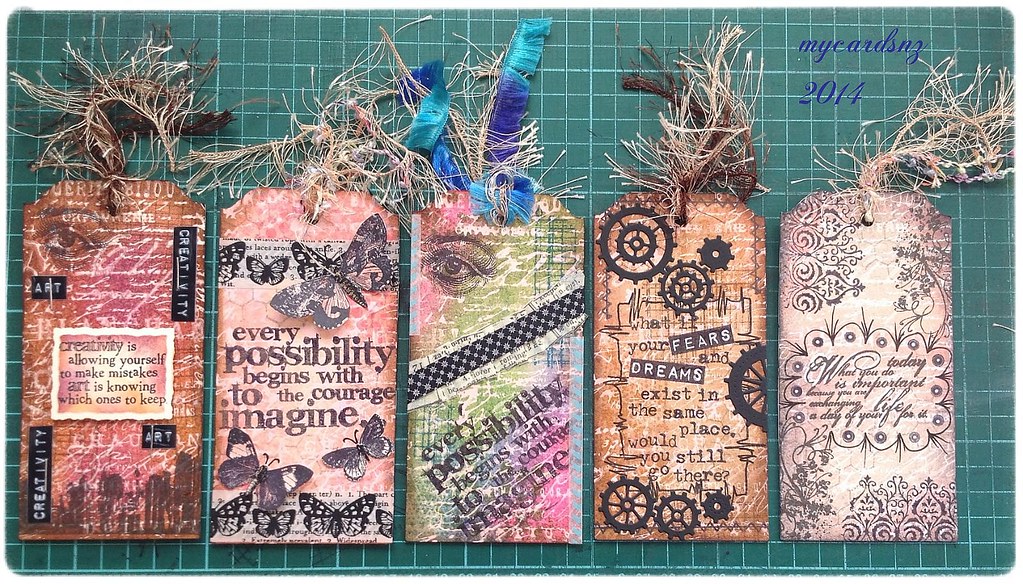
Recently a small group from the Card Making World NZ Crafters forum had a tag swap with the theme of Quotes.
These are the five tags I made for the swap. The techniques used are all from Tim Holtz On Line workshop I did last year. Many of the stamps used are also from Tim Holtz.
Finally I have finished the third video in the series on making the mini album.
There will be at least 2 more in this series because of the limited length I can make them!
This video is focussed on adding the layers to the basic pages.
The instructions for cutting the layers to the correct size follow.
These instructions cover only the basics of adding layers to
each section of your album. The finishing touches are yours to imagine and
implement! If you wish, you can add distress ink of appropriate tones to the
top layers. It is suggested you do this before attaching to the pages!
I use glue to attach my layers as it allows for a bit of
“wiggle time” to make sure the layer is in the right place before finally
firming it down.
Page 1
Note: all pieces are 4 ¾” wide to fit onto a 5” wide page.
The instructions given are for the length of each piece. It is suggested that
you cut 12” by 12” paper into strips of 4 ¾” and cut the lengths according to
the directions.
These will attach to the 3 panels on this page. Tuck the
bottom of the two smaller pieces underneath the top of the panel just below the
one you are attaching it to.
Page 2
All pieces are 4 ¾” wide to fit onto a 5” wide page.
Cut: 1 piece @ 2 ½”; 1 piece @ 4 ⅛”
These two attach to the 2 panels on this page.
Page 3
Cut the same pieces as for page 2 and attach.
Page 4
Cut 1 piece @ 6 ¾” and attach to the page before adding the
smaller folder piece. Measure the folder piece for the size of the top layer
and attach.
For all other pages and inserts, measure the size of the
page or insert and reduce the size by ¼” on the width and ¼” on the length.
This will allow a ⅛” margin all around the page.
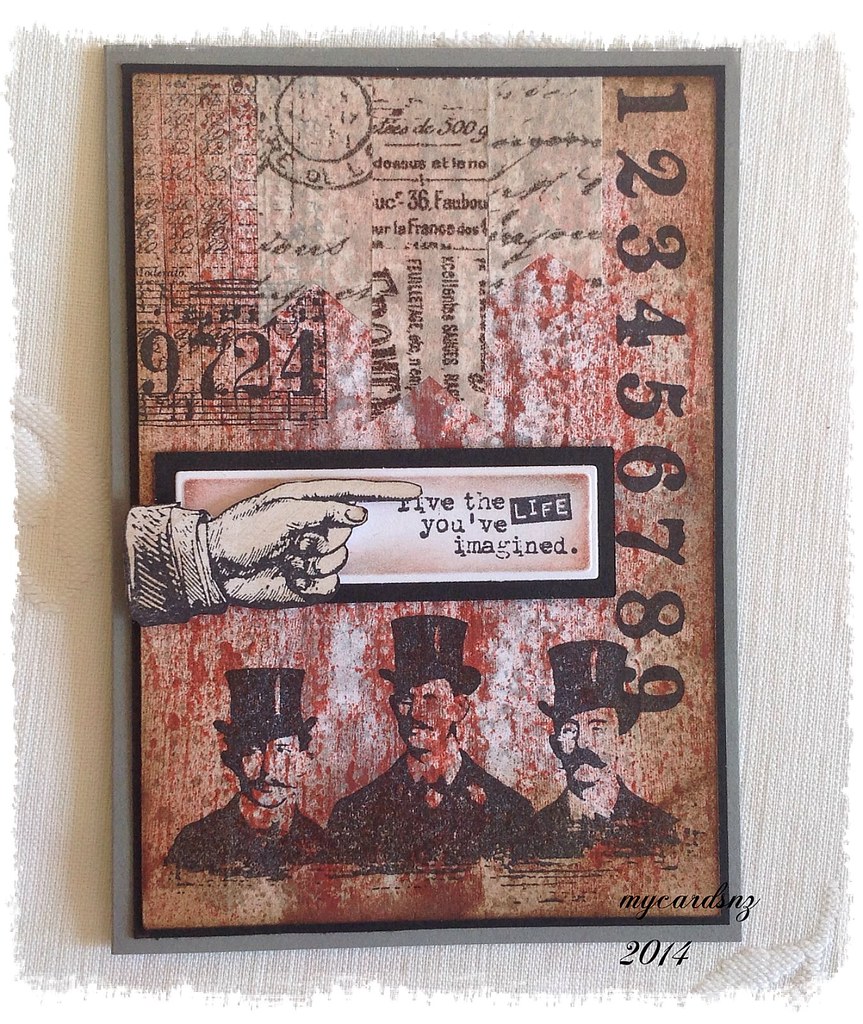
This card was made using the brayered distress stain technique described in the Craft Stamper magazine recently.
I used Fired Brick and Weathered Wood distress stains to layer the stain onto the background. I then used Tim Holtz stamps and archival ink on the background. The background was edged with Vintage Photo distress ink.
I stamped the hand and cut it out then attached it to the sentiment which I layered onto the background card.
The card was finished off with some tissue tape attached to the top of the card.
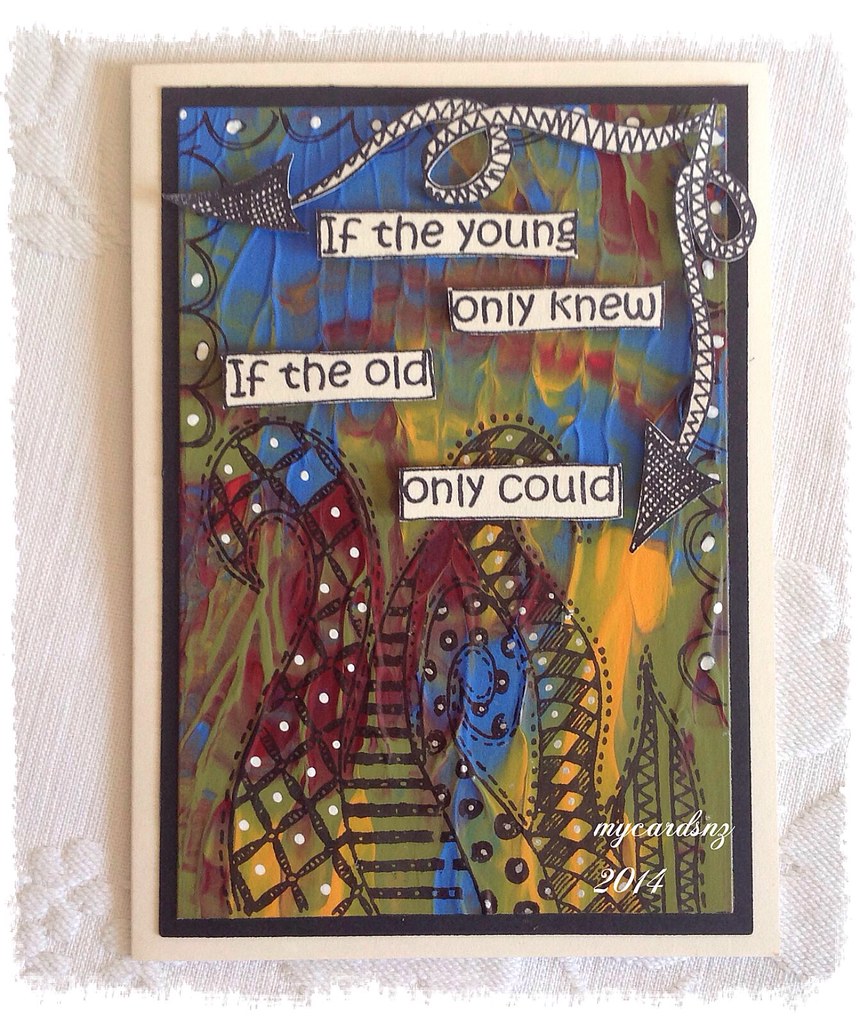
This card was made using the inspirational article on mono printing in the latest Craft Stamper magazine. I have entered it into the latest competition over at their blog here.
I used one of my larger acrylic stamping blocks and put the paint onto that. I smoothed the paint around a bit then placed the card on top of the paint. Gave it a good rub then peeled it off. I left it to dry for a day before going back and making up the card.
For the card, I cut the painted card to size then stamped on it using archival ink and Dyan Reaveley stamps. Added a few bits with pens and cut out the curly arrows and the text then added them with foam squares.
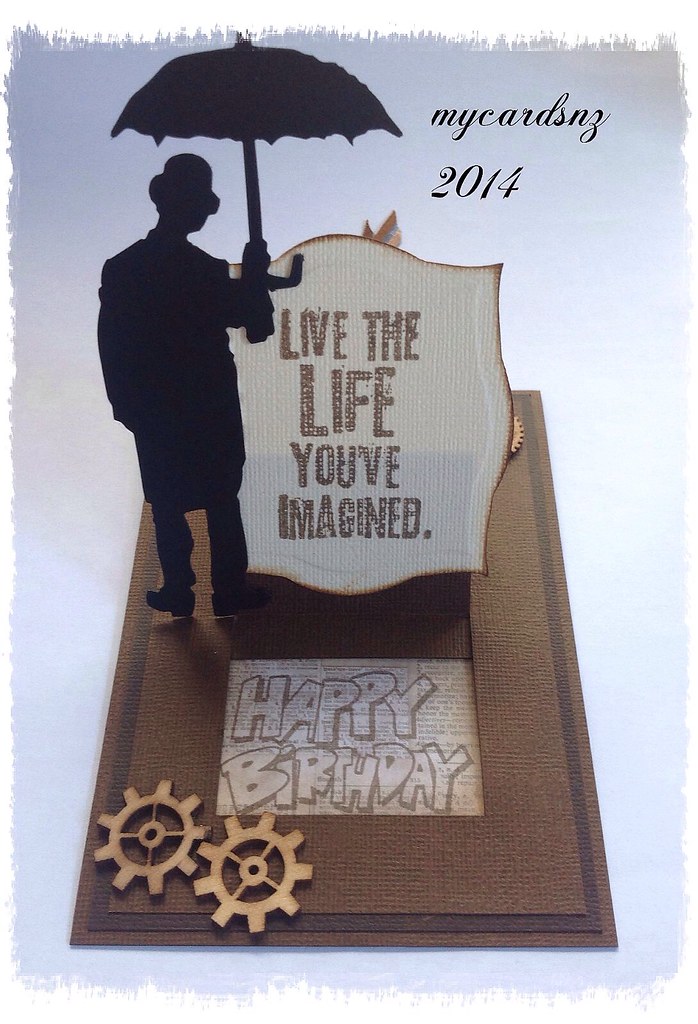
This week saw another birthday for my son and daughter. They were born on the same day two years apart!
I made this card for my son. We had bought a gift card for him and wanted a special card to put it into. The design is from Splitcoast Stampers http://www.splitcoaststampers.com/resources/tutorials/surprise_pop_up_card/
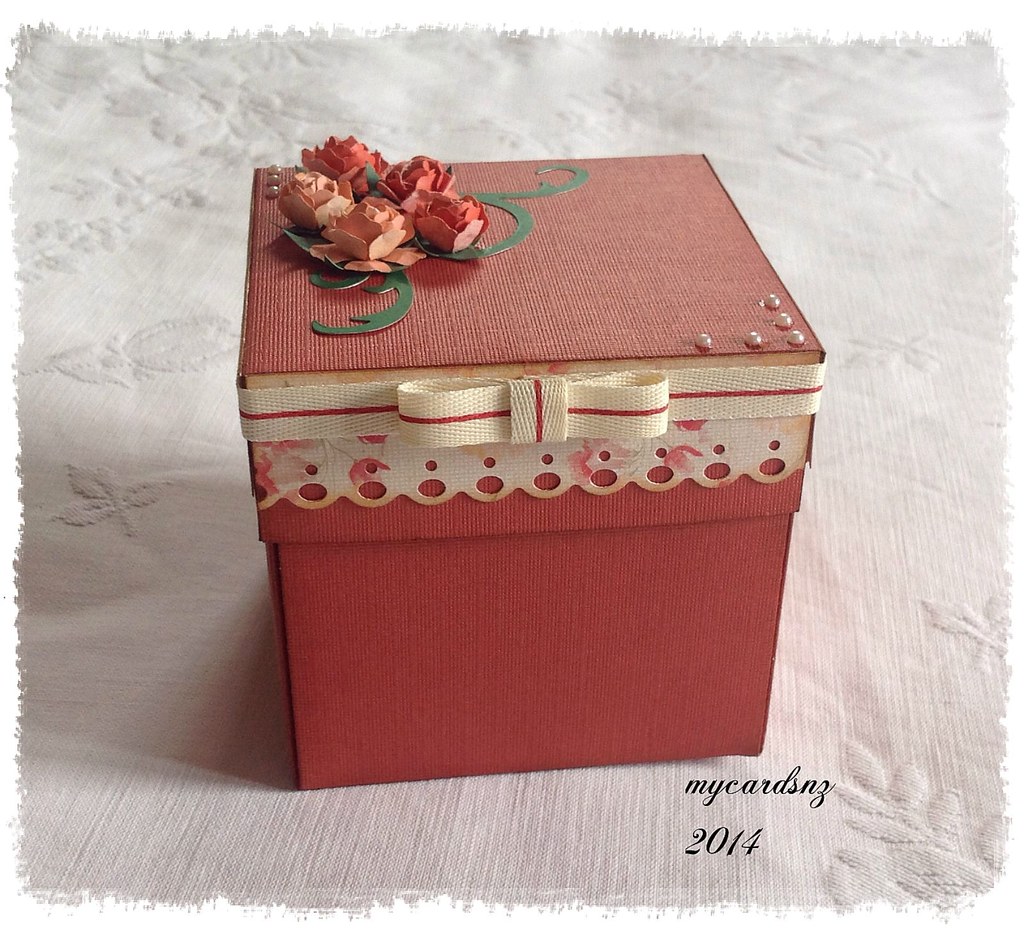
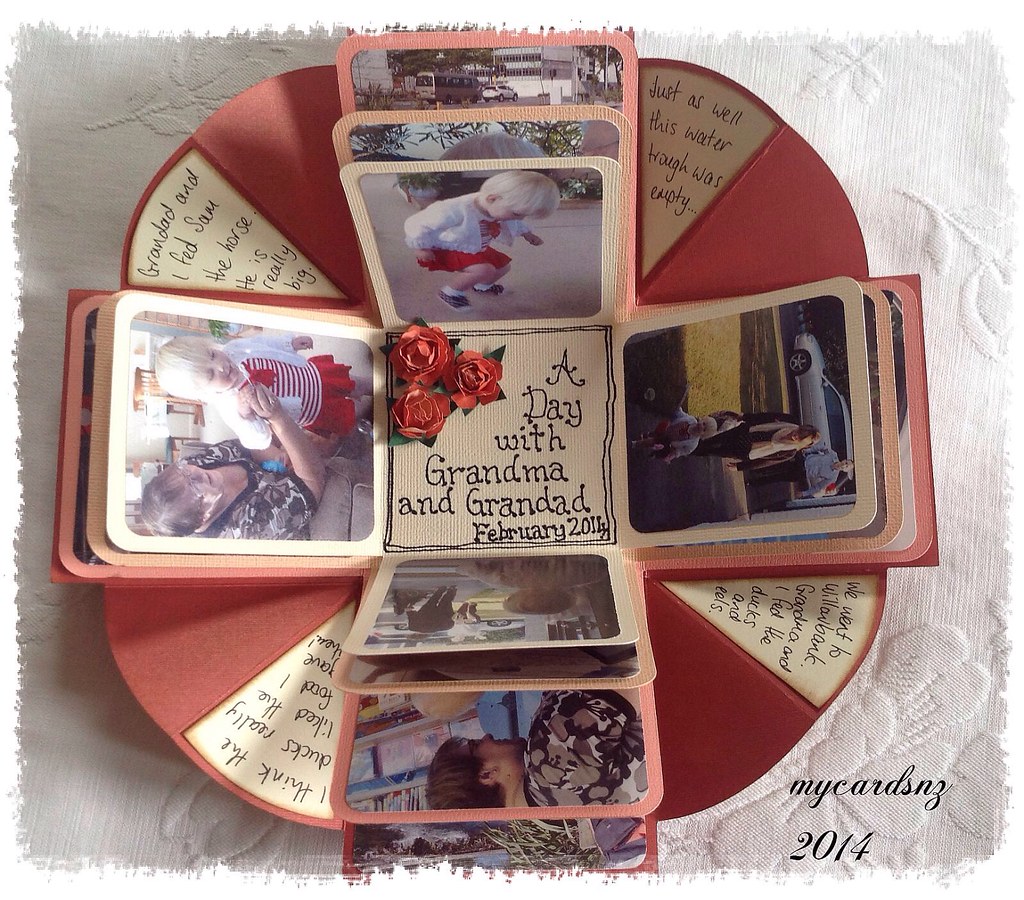
I had also put together a box album featuring our cute wee grand daughter. I called it A Day with Grandma and Grandad and we had taken the photos all on a day when we were doing lots of things with her.
I used the Cricut Mini Albums cartridge to cut the box pieces and sized the pictures to fit on the pages. I also added tiny magnets on the folding corners of the box to help the box stay together when it did not have the top on it.
The roses on the lid were all hand made using punched flowers and a glue gun!
I have been busy over the last couple of days editing a couple of videos for You Tube. They show how I put together the mini album with the travel theme that I made for my daughter recently.
I have posted them on the Videos page here on my blog so please take a look at them and hopefully you may get some ideas!
I will be putting up detailed instructions for the album as well.
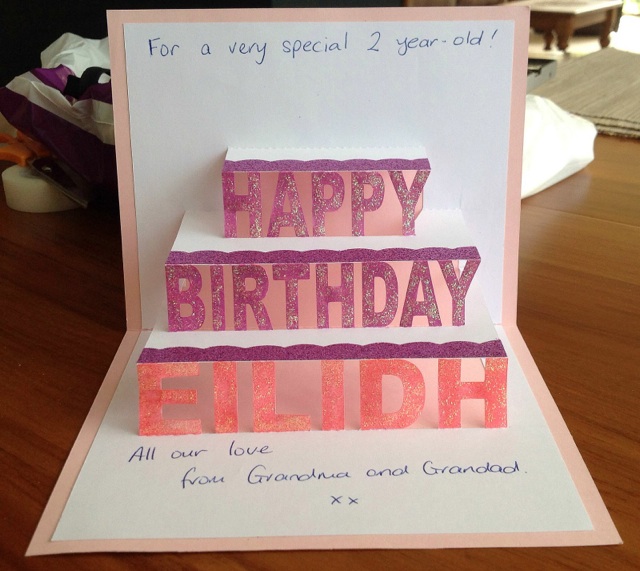
Last week was our granddaughter's second birthday. We had a lovely family party with four generations present, including both sets of grandparents. Not often that happens as the other grandparents live in Scotland!
I made a couple of cards for the occasion.
For the first one, I used the new Pop Up Card Studio software to design a simple inner. The front of the card used a series of labels cut using Spellbinders dies and embossed them before layering on the card. The corner pieces are also from a Spellbinders die set. The image is from Paper Crafting World and I coloured it using copic markers and added glossy accents and kindiglitz to highlight certain things in the image.
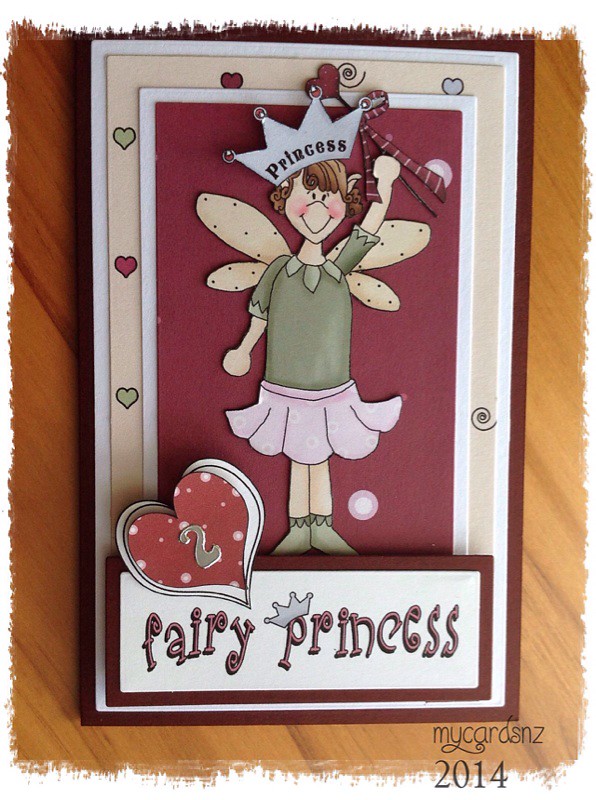
- For the second card, I used a printable set from The Printable Craft shop at Card Making World. The set is Fairies and Dragons. I used some background papers and one of the fairy images cut out along with the hearts, which I layered.
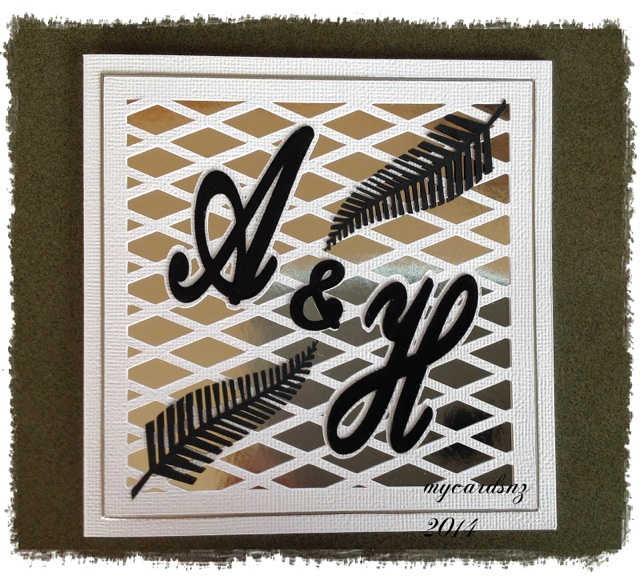
We had a family wedding at the weekend and I made these two cards for the brides! One was for my daughter to give to them.
This card was made using the Black Cat. I designed the lattice in SCAL3 and added the shadows for the letters and welded them in the lattice background. I cut the top layers of the letters in black then used glossy accents to add shine. Both the girls have been members of the NZ Women's Rugby team called the Black Ferns so I cut the ferns as well to add some detail. Was really pleased with the fine cut on the ferns. Finished the card using some silver foil paper under the lattice on the front of the card.
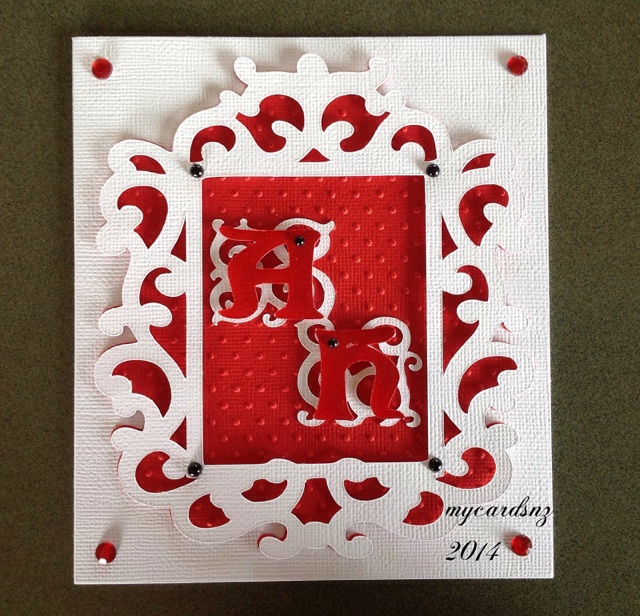
This card was done with the Cricut and used Fancy Frames and Art Nouveau cartridges.
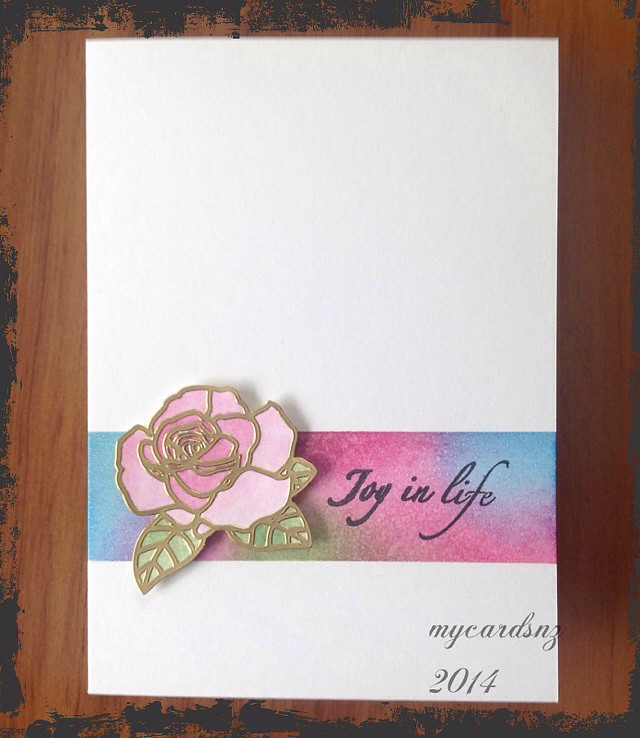
Have been doing a few cards recently and for a change, I made a couple of clean and simple ones.
I have had a sheet of peel off stickers for ages that I did not know what to do with. I found it again when I had a clean out and decided to try this. I stuck the peel off rose onto a piece of card then coloured it using distress markers (Picked Raspberry and Mowed Lawn) and a water brush. It is easy to get the shading when you use the water brush, picking up the colour from the craft sheet, rather than using the distress marker direct to paper.
To make the coloured strip, I used wide post it notes to block off a strip on the front of the card, then used distress inks (Picked Raspberry, Salty Ocean and Mowed Lawn) to put the colour down. When I finished that I gave it a light spray with water to change the flat look of the colour.
The sentiment is from a freebie set in a magazine I got recently.
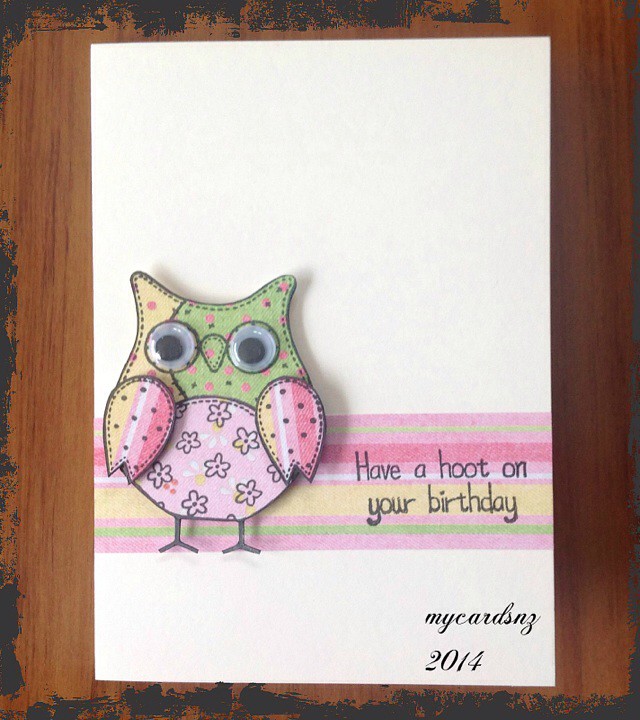
The second card, slightly less simple, but effective, used paper piecing for the image - something I have not done a lot of for some reason. I stamped the owl image on several different coloured sheets of paper and cut out the components, before attaching them to a stamped image on a piece of card. I cut out the owl and added eyes then attached the wings with foam squares.
For the sentiment strip, I cut a piece of the coloured paper used for the paper piecing and stamped the sentiment on that.
The owl is attached to the card with foam squares to give it some dimension. Both the owl stamp and the sentiment were freebies from a magazine I bought last year.
Over at http://simplylessismoore.blogspot.co.uk they are having a Clean and Simple challenge this week, so I thought these might be just the thing. Have not entered any challenges for a very long time, so what better time to start than in a new year!
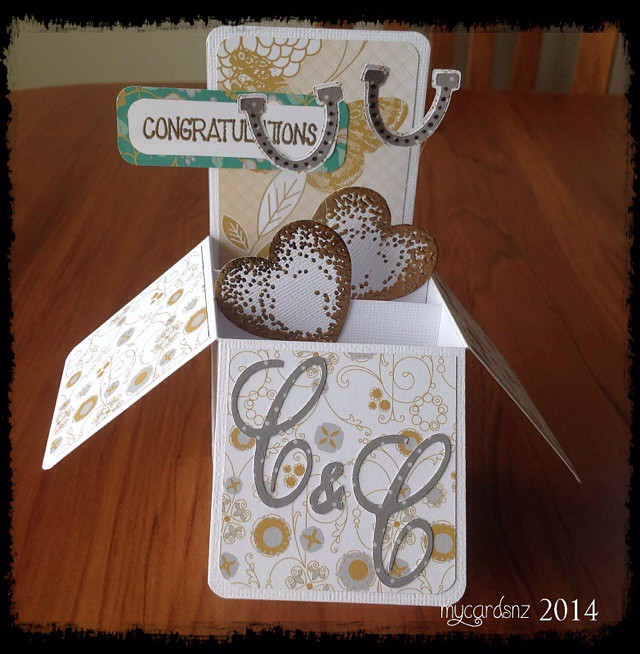
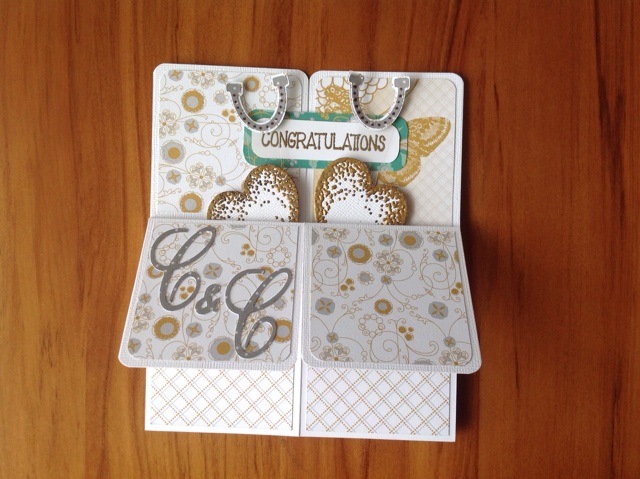
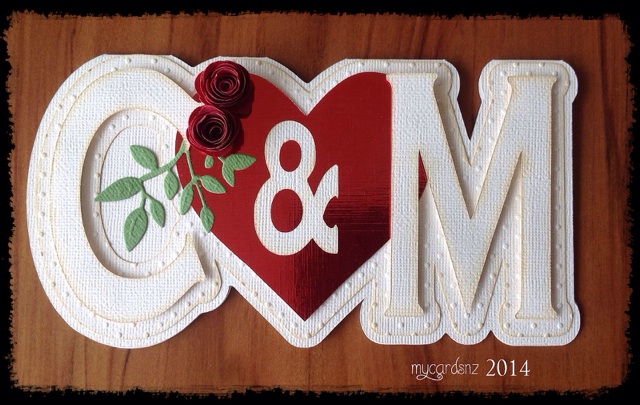
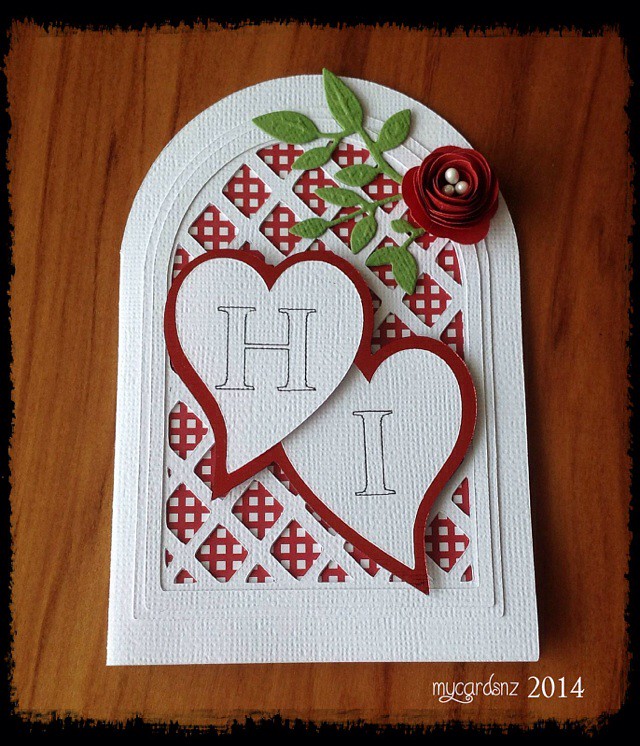
Recently, I had to make some wedding cards for friends and these are the designs that I came up with.
This box card was based on an idea from a recent SplitCoast Stampers tutorial. It is a great card for a special occasion as it folds down flat for posting, then opens up and sits like a box for display!
This card was designed using SCAL2 and cut with the Cricut. I chose the font for the letters then made the background using the shadow feature. The card itself was designed by joining two identical pieces (one flipped to join its corresponding letter) and welding the pieces together in the software. I then made various layers for the letters. They are all cut from the same card and I used antique linen distress ink on the edges to make them stand out. I embossed the background layer with the swiss dots embossing folder. Added flowers and the die cut leaves for added interest.
For this card, I used a design from Penny Duncan Creations for the base card. The hearts were done using SCAL2 and cut with the Cricut. I used the pen tool in the Cricut to write the initials on the hearts.
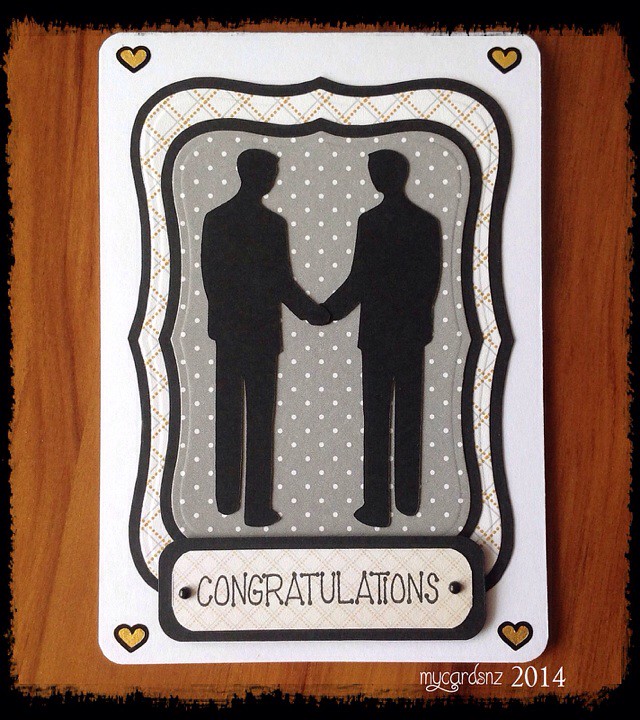
My daughter was invited to the wedding of her next door neighbours recently and I did this card for her to give them. I used the Weddings cartridge and the Cricut Craft Room to cut the figures out. The backgrounds are die cut and layered onto a base card. The hearts in the corners were peel off stickers and I added some gold Smooch to highlight them.
I recently completed this mini album for my daughter, who is on a month-long trip to India. She will have taken lots of wonderful photos and hopefully she will find this album useful to put them into.
I put together a short video of the finished product and will be posting a more detailed tutorial soon.