Tuesday, July 31, 2012

All about parents

The challenge over at Cooking with Cricut this week is All about Parents.

I decided to do a scrapbook layout for this one as we have a new grand daughter and I though it would be nice to start a scrapbook for her.

I got the Bear with Baby digital stamp, using the already coloured version and cut it out using the BCC. I also made a couple of mattes for the photo and the writing using the Funtime oftware and the BCC. I added the words New Parents to the top of one of the mattes and welded them together then cut them out. I also cut the letters separately and glued them to the base layer.

The words on the lower part were also done using the Funtime software and a black gel pen. It did the writing before I cut the shape!

The flowers were cut using the Cricut and SCAL2 software.

Check out the other lovely projects done by the other members of the DT here.

Tuesday, July 24, 2012

Christmas in July Challenge

The challenge over at Cooking with Cricut today is Christmas in July but the catch is that you need to use scraps! Great - I have a large box of scraps underneath my desk that I could use.

I downloaded a nice little Christmas digi stamp from Papercrafting World. It is a gingerbread house that I coloured with copic markers then cut out - by hand this time.

I then die cut a scalloped square from a piece of card that I found in my scraps box, stamped it with the dotty dunes background stamp using London Fog Memento ink, added some glitter pen dots to it to make the snow sparkle and added the sky using Stormy Sky distress ink. The edges of the scalloped square were embossed too.

The background layers were cut from scraps in a box under my computer desk, where I use my electronic cutting machines. I added some white pen decorations to the little red corner squares before attaching them all to the white base card.

I stamped the sentiment in London Fog ink and added glitter pen to the letters to make them sparkle before cutting out with the smaller scalloped square die.

Hop on over to Cooking With Cricut to check out the other lovely ideas from the design team this week.
There are some lovely freebies from Melin here also.

Friday, July 20, 2012

A couple of projects

After tidying up my craft room this week, I got inspired to use a couple of canvases that I found hidden away.

The first one was a Tim Holtz inspired canvas using several dies and stamps in my growing collection.


The second canvas was inspired by an article in the July 2012 Craft Stamper magazine.
I had already painted the canvas so I added some of the new seasonal distress inks to colour the background using a sponge.

I added stamped images that I had cut out and coloured. I stamped a word stamp around the edge of the canvas and backed it with a page torn out of a book. The frame was cut with my Cricut and decorated with a white pen freehand.

The wheels on the bottom of the canvas were made from small wooden cotton reels that I coloured in red using copic marker then wrapped with a red dotted ribbon. The outer parts of the wheels were made from metal bottle tops that I flattened using my Cuttlebug. I added circles and flowers punched from paper and a little dot of pearl Stickles. The top of the canvas was finished with the addition of a pencil held up with twist wires attached to the frame.


Posted using BlogPress from my iPad

Tuesday, July 17, 2012

Going to the beach


The challenge for this week over at Cooking with Cricut is themed - Let's go to the beach. Well, here in New Zealand, it is not really going to the beach weather but I still managed to do a wee card for this week's challenge.


Melin has done some more lovely digi stamps and cutting files relating to the Beach theme and you can access them here.


For my card this week, I layered a blue spotted background paper onto cardstock then added a layer of "sand" - card that I coloured with Antique Linen Distress ink, then stamped with the Dotty Dunes stamp in scattered straw DI.

I printed and cut the image of the Bear boy with a sand castle and layered it on top of the sand. The shells are small stamps that I stamped then cut from shrink plastic then shrunk the plastic - perfect size for this card.

The sun is a double layer of a flower stamp which was a freebie from the Craft Stamper Magazine some time ago. For the sentiment, I stamped the letters onto card then cut them out and attached to the background layer.

Really enjoying working with these digi files, especially now that I have worked out how to get a good print and cut image!

My Clean Craftroom!


Yesterday, I tidied up my craftroom (or at least half of it!) I managed to find places for a lot of the stuff that was on my desk and uncovered a whole lot of space! I can see twice as much of my non-stick craft sheet now and more on my cutting mat as well!


I also uncovered most of my other table in the craft room. Normally it is covered with half finished projects and books that I have been browsing to get inspiration.

I even vacuumed the floor and tidied the boxes on top of the cupboard!


Now I can have a friend over to play with my inky stuff!

Friday, July 13, 2012

Wall Hanging

Yesterday I was clearing up my desk and found 4 little canvas' that I had prepared for making something with, so decided I had better do something about them!

Since going to the class with Tim Holtz in Sydney, I have been thinking about other projects along similar lines so decided this would be a good use for these panels.

I didn't have any tissue paper that was printed (as we used in the Fanciful Flight project) so I found some tissue that I could stamp onto. I used several different TH stamps to provide nice backgrounds and attached them to the canvas panels using glue stick. Then I edged them with vintage photo distress ink to give them a slightly grungy look.

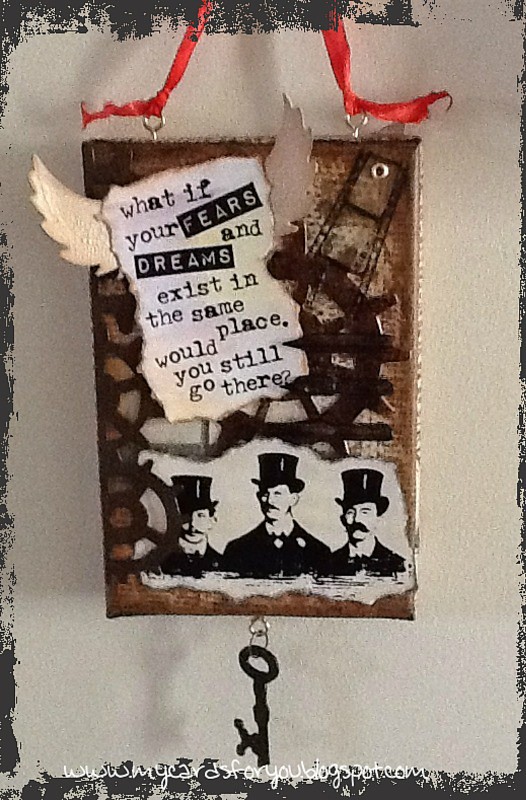
I stamped the sentiment onto a glossy card then gave it a background wash with tea bag distress marker then broken china. It does not show up much in the picture, but I wanted subtle colour here. I then took a tab holder and coloured it with vintage photo and walnut stain DI before adding a light layer of rock candy distress crackle paint. This gives a nice rusty look. Added the sentiment to the frame then attached to the canvas. Added ART beads that I coloured using Copic marker, then a fancy button.


I die cut the heart and wings then painted the wings with picket fence crackle paint and edged with vintage photo DI. The heart was done using the faux enamel and tied with some jute twine. Added some colour to the background using distress ink and sequin waste as a mask. Pleated some tissue tape and attached that then added a mini bottle top that I had embellished with a tiny clock face and glossy accents.


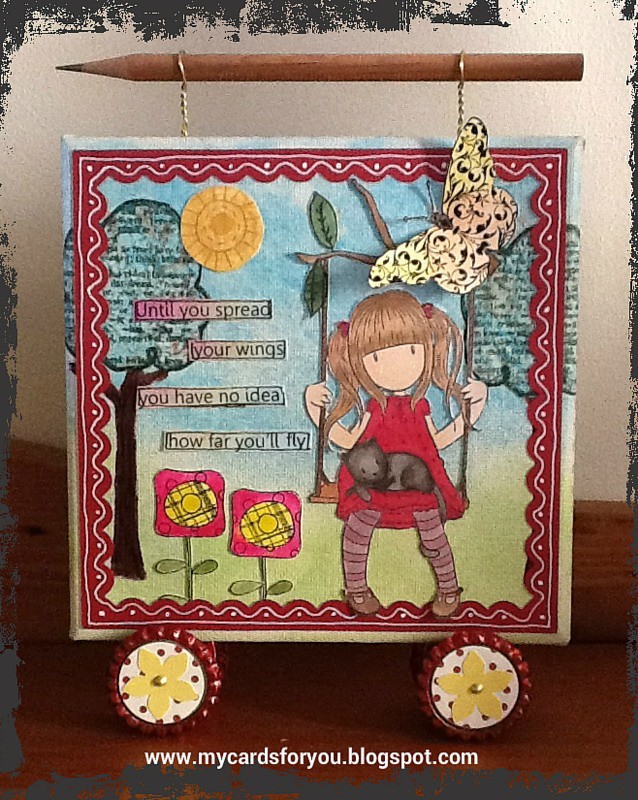
I stamped the butterflies onto glossy card then added a wash of spiced marmalade. Tore the edges then attached with a piece of filmstrip tape at the top. Added two tiny washers and a pen nib that I coloured using alcohol inks.


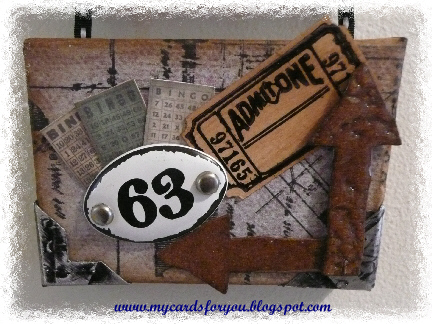
For the final panel, I cut some tiny BINGO card pictures from TH paper, attached then behind the number plaque that I fixed on with Glossy Accents and the two brads. Added a tiny ticket and two arrows die cut then inked and embossed.

The corners were made from metal foil attached to cardstock, embossed with found items then inked with black alcohol ink and sanded down before punching with a MS photo corner punch.

I really enjoyed making this.

Tuesday, July 10, 2012

Grin and Bear It

The challenge over at Cooking with Cricut today is titled Grin and Bear it - maker a project that includes a Bear! Melin has some great cutting files and digi stamps over at the PCW on-line shop for you to choose a bear image from too.

For my project, I used the Princess bear digi image. It was pre-coloured so I did a print and cut using my Black Cat Cougar and Make the Cut software.
I cut a base layer from a pink glossy cardstock and embossed it with the Swiss Dots folder. The heart die cut was given to me by a friend from the UK and I coloured the frame with white distress stain then used one of the new seasonal distress inks (Picked Raspberry) to colour it in a slightly distressed looking pink! The white heart was stamped with the sentiment (from Gina K) then overstamped with versamark ink with a dotty stamp (like the swiss dots folder) then brushed with pearl powder in a white shade.

The Princess bear was layered on top with foam dots and some sparkle added to her tiara, wand and ribbon on the dress with Kindiglitz. The entire layer was then attached to a white base card.

Look forward to seeing your take on this challenge for the week.