Showing posts with label Tanda stamps. Show all posts

Saturday, May 19, 2012

Mothers Day

This is the card I made for my Mum for Mother's Day last Sunday. It is a double sliding card and took ages to sort out the mechanism. I got the idea from a You Tube video here

The flowers and leaves were cut using the Cricut Expression and I cut the base card using the Black Cat after I did the cutting design on the Funtime software.

The butterfly image is a Tanda stamp and the sentiment is a Darkroom Door stamp.

This is the card when it is opened out.
I stamped swirls on the edges of the card and used a stamp from Montarga for the sentiment on the inside.

Note that the butterfly moves from one side to the other when it is opened out!


Had great fun making the card, so must do some more so I don't forget how to do it!!!

Wednesday, November 2, 2011

Other stuff

This week it is my daughter-in-law's birthday. They came for dinner last night and we gave her this card to celebrate.

The card is made from brown card. The top layer was stamped with a couple of darkroom Door stamps using sepia ink. Used distress inks in pinks to colour the card then edged with vintage Photo. The underneath layer is pink stamped with a word stamp from the same set in sepia, as is the sentiment, but this was stamped with a Gina K Best Wishes sentiment.

The roses are made from cream paper and spritzed with glimmer mist.

Finished off with the cream ribbon and a bow.


This frame was made for Mum. I had a wooden frame from IKEA that I painted black then did a crackled effect using PVA glue and a creamy coloured paint.

The flowers were made from pale pink paper then spritzed with a pale pink glimmer mist. The leaves were cut with a Cheery Lynn die from pale green paper, then spritzed with green, which also made the curl a little.

The frame was just the right size for the photo of the great grandchildren in Australia!


I saw this idea for a tealight candle holder in a magazine recently and thought I would try it out. I had some memory glass that I stamped with embossing ink using a crackle stamp from Tanda Stamps, then embossed with gold and heat set.

I used copper tape to edge the top of the glass sides then used the tape to fix the sides together in a square. I glued the sides to the bottom, then covered with the copper tape.

It looks very effective with a tealight candle in it! I have entered this in Crafty Hazelnut's C hristcmas Challenge. - Whatever lights your candle!

Friday, July 15, 2011

Using my Tanda Stamps

I was having a play with some of my Tanda stamps a while ago when I bought a lovely white chalk inkpad. I hadn't used this stamp from the Retro Men Set 1 before and I wanted to try it out with the white on black card. Was quite pleased with the result.

The oval was embossed onto the card using the silicon mat and B plates through the Cuttlebug. The tag is one of the Spellbinders Grommet tags.

The sentiment stamp is from Montarga. I added some little corner peeloffs just to finish it off.


When I had finished this one, I decided to try the same stamp using black on white card.

I cut the ovals using the oval nestabilities. The swirly ends are made from one of the fancy tags (Spellbinders) which I cut in half and attached at the ends of the ovals.

The background layer was run through the Cuttlebug using the Swiss dots folder (which is starting to get a little worn across the fold from all the use it is getting!). Added a black spotted ribbon across the centre.

I thought about adding a sentiment but couldn't decide where it should go so left it off. This way the card could be used as a wedding card or an anniversary card.

New Techniques

Was looking at the StampTV video this week and was very interested in the techniques demonstrated by Gina K for the Happy Day Card project.

I didn't have the stamps she used in the video but I did have a lovely stamp from Tanda that I thought would be lovely with this technique. I used Wild Honey and Brushed Corduroy Distress Inks. Stamped the first colour - wild honey over the whole stamp then put Brushed Corduroy around the edges. Had to clean the stamp between re-inking so that the darker ink did not contaminate the lighter ink.

This closeup show the detail of the two colours on the stamp.

The image on the sentiment was stamped as a second go - stamped on waste paper first to remove some of the ink, then stamped on the oval sentiment. Used Brushed Corduroy for the sentiment.


The swirly bits on the end of the oval shape was made from a fancy tag die cut (from Spellbinders) - cut in half then attached to the ends of the oval.

This example is similar to that demonstrated by Gina in her video except that I used a wax resist technique (also from StampTV) for the background.

I love the CAS designs that Gina comes up with! While I don't have any of her stamps, there are a lot in my stash that I can substitute.

Enjoy.

Monday, June 13, 2011

Y and Z ATCs

This month sees the end of our Alphabet Themed ATC swap over at the CMW NZ Crafters ATC Swap. For over a year, a group of about 8 people have been swapping ATCs with an alphabet theme and we have seen some really interesting ATCs.

For the Yin Yang ATC, I made the symbol using a MTC file on the Cricut. I cut it in both black and white and layered onto a circle.

The background is made from heavy card off cut which was coloured a jade green. I stamped it with Pumice Stone distress ink and a nice Grunge stamp from Kaiser then overstamped with an oriental lettering stamp (also from Kaiser) which I embossed with detail silver.

I then edged the ATC with Black Soot DI.


My Z ATC used a zebra stripe stamp from Tanda Stamps. I have had it for ages and had not used it before!

I stamped the zebra strip on the whote card then embossed it with black. I used Crushed Olive, Bundled Sage and Forest Moss to stamp the grassy backgrounds - again a Tanda grass stamp for the bottom and a "sticks and balls" stamp that I got from The Stamp Attic last year.

The sky is stamped with Faded Jeans and Stormy Sky DI. I used the dotty background stamp designed by Sue Law for this.
It will be interesting to see what other people come up with for the swap! 

Monday, January 31, 2011

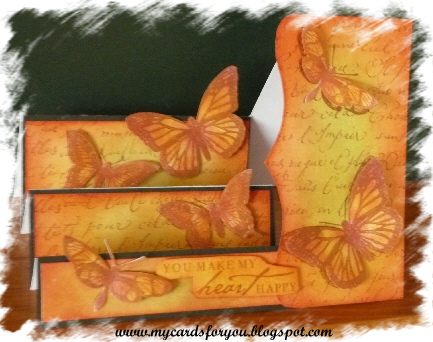
Butterflies

I was going through some of my Craft Stamper magazines the other day and found this card. I thought I would try it out because I liked the idea of using the different colours of distress inks together, but needed to do something with it.
I cut the base card (step card), then cut the layers. The layer on the side was cut with a Tim Holtz Edge die.
I used Bundled Sage DI to colour the centre of each of the layer pieces, then Wild Honey and Rusty Hinge, followed by Fired Brick on the edges. I love the way the colours blend so well and the red on the edges makes the rest of the colour really stand out.
I stamped the layers with a word background stamp and Rusty Hinge DI. The butterflies were from a Tanda Stamp set I bought last year. I stamped them on the layers then on another sheet and cut them out and coloured them with the same inks. The sentiment is from  Hero Arts.
I layered the coloured card with black before attaching to the base card.

Friday, September 10, 2010

Back to creating again!

After all the trauma of the last week, I had to get back to making things again, so went to the craft room today to make some cards and have a play with my Cricut again.

A friend asked me to make her a birthday card for her partner, who is a speed boat fanatic. I found this little boat and waves on the Going Places cartridge and thought it might be OK.

I also noticed that a couple of challenges this week called for layers and Happy Birthday, so decided that this card could fit all three "criteria".

Papertake Weekly Challenge #47 was a sketch, which I used for the design of the card. I had a square card that I used for the base then layered with a Cuttlebugged layer in blue, then a printed paper. The red piece was put through a crimper and the top layer was cut with the Cricut. The boat was cut from a square with rounded corners. I also cut the same from red and white card to provide the different colours and these were layered on the cutout. All the pieces were edged with distress ink  with the top layer being edged with white. The Happy Birthday stamp was from a Tanda stamp set (Art Deco) designed by my friend Sue!


The Cuttlebug Challenge this week was for a birthday card with at least 2 layers because it is their second birthday!