Showing posts with label Nestabilities. Show all posts

Tuesday, August 2, 2011

Clean and Simple

The theme for the Card Making World Monthly Challenge for August is Clean and Simple. As one of the DT I had to make 2 sample cards.

I bought some new stamps from Gina K Designs a couple of weeks ago and they arrived on Thursday last week. Of course I had to use them for this challenge and I was quite pleased with the results.

The first card was so simple but very effective. I made a mask using a scalloped oval nestabilities die and laid it on top of my base card. I then inked it with Spun Sugar and Victorian Velvet Distress Inks. The stamp used is from the Garden Silhouettes Set (Gina K Designs) and I used Versafine Onyx Black for this image. The sentiment is from the Bold and Beautiful set.

This card uses stamps from the Garden Silhouettes set as well.

The layer card is from a matte set I bought years ago and had not really used many of the colours. I trimmed it to fit the base card with a little left over to back the sentiment piece.

I stamped the image using a Memento Rhubarb ink pad then cut the shape with an oval nestabilities die. I backed this with the scalloped oval die cut and layered it on the card.

The sentiment was from the same set stamped in Onyx Black (Versafine) and layered on the red and black layers.

I was so pleased with the effect of this card, I made another three in the same style but in different colours.

Tuesday, May 17, 2011

Digital Stamping

I recently bought this digital stamp designed by Daisy Doodles from Card Making World. I loved the little toadstool house! I printed it out and coloured it with Copic markers then stamped the edges with Sue Law's cute dots stamp using Pumice Stone distress ink. I cut the shape with a nesties die and cut a backing piece to mount it on.

The backing paper is from Docrafts Daisy and Dandelion collection. I layered it on black then attached the ribbon. The sentiment is edged with Pumice Stone and cut from another nesties die.

The Tanda Teaser this week is Get Well Soon, so I think I will link it into the challenge there.

Monday, May 16, 2011

Another Challenge!

Ok I have been busy over the weekend - finally got into some of the challenge blogs and got busy! This one is for the Whimsie Doodles Challange this week. The challange was to use an image that is not coloured! I really like this stamp from Montarga which I stamped on glossy card with Versafine ink. It took ages to dry properly too!

I cut the image with a Nestabilities die and embossed the edge. I used the small die from the same set to cut the shape for the sentiment and embossed it then  coloured it with distress ink - Barn Door. The flowers were coloured with distress ink and I attached tiny buttons threaded with embroidery floss to the centres.

Do have a  look at the lovely sale Whimsie Doodles are having at the moment too. They have some beautiful digi stamps!

Card Sketch Challenge Card

This week, the Card Patterns Sketch challenge is a stunner. I loved the idea of the circular card with the pennants!

So I checked out my stamp collection and found something that might be very good with this sketch. The stamp I used is from Montarga - our very own Christchurch-based stamp manufacturing company which has relocated twice since the earthquake on September 4th 2010!

I cut the base card with the largest Spellbinders Nestabilities scalloped circle die - about 10cm across. The fold of the card is at the top and has been covered by a single piece cut from the same die. I also embossed the edges but not easy to see in the picture.
I then cut a 9.5cm circle which I stamped with Scattered Straw DI with a lovely dotty background stamp designed by Sue Law. Makes a perfect beach scene! I then masked it and brayered the sky with a multicoloured blue Versacolour ink.
The image was stamped then coloured with my copic markers and cut out. I layered it on the card with pop dots to give it some depth. The sentiment was cut with a nestabilities tag die and stamped. The pennants were attached to a ribbon then placed on the card.
A nice piece of fun for a cool autumn day!

Wednesday, April 6, 2011

Crafty Girls Samples

Last week, we had a crafty girls get together and we did some wax resist and inked toppers for cards.

I saw the technique on Gina K's Stamp TV a couple of weeks ago and loved the idea, so thought we could have a play with it.This card was made with a digital stamp from Background Fairy. A piece of wax paper was embossed using an oriental lantern folder then laid on top of the image and pressed between newsprint with a hot iron. Distress ink applied over the wax resist image then cut with a nestie and layered on another card also cut with a nestie and embossed with the CB. The sentiment (from Tanda) was stamped then cut with a Spellbinders die.


Birthday card made using the wax resist technique. The backing layer was embossed with the same folder as that used to emboss the wax paper.

Close up of image on birthday card showing the resist.


I am loving this technique.
It can produce some very interesting results.

Wednesday, March 16, 2011

Long time, no blog!

Hello again after a very long break. Things have been hectic since early February. First, we had a trip to Auckland with my mum to attend the dinner for the New Zealander of the Year Awards. Mum had been nominated for the Senior NZ'er of the Year and she was very keen to go to the dinner. Then 5 days later, she fell and broke her leg and ankle and was admitted to hospital in Christchurch. After some time there, she was assessed as requiring high level care, so we had to find a rest home for her to live in. Fortunately, a place was found that is very close to our home and she is now settled there. Much of the last three weeks has been spent getting her clothes organised and buying things that she will need there!

You are probably aware that we have had another very severe earthquake in Christchurch on Feb 22 which has devastated the central city and many suburbs on the eastern side of the city. This again has taken a toll - not just in buildings but also, many lives - to date about 165 people have been named as casualties with many thousands injured - some very seriously.

With all that has been happening, it is not surprising that I have not had a lot of time or inclination to be creative (apart from having to sort out my craft room after the earthquake!) so I have not had a lot to blog about. However, yesterday afternoon, a friend came over and we spent some time in the craft room, so hopefully, I will now get back into being creative.

This is a card I made for a friend on Card Making World NZ Crafters Group. The base was cut from the Cricut using an svg file from Make the Cut and the top layer was also included with the same file.
I stamped a Happy Birthday stamp from Rubbadubbadoo onto white card then cut with a nestie scalloped circle. The red and black shapes backing the top were also cut with the scalloped circle and embossed on the edges.
I cut red, black and white ribbon and attached that underneath the scalloped sentiment to add a little more interest.

Monday, January 31, 2011

Wedding Anniversary

We celebrated our 38th Wedding Anniversary last week. Wow! Where have the years gone?
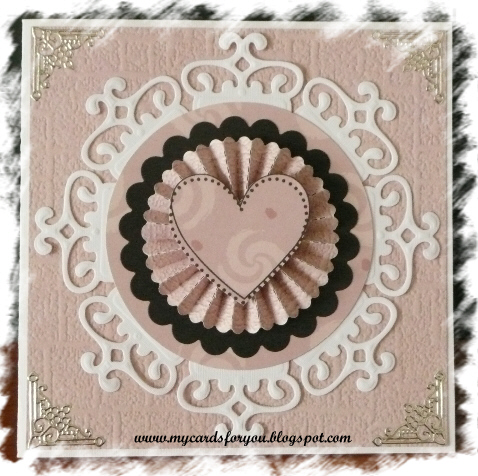
I saw Gina K demonstrating this great idea using nestabilities die cuts to make a frame for an image and decided to try it out.
I cut and embossed 4 shapes with the nestabilities tags die and cut each one in half. These were then placed around the edge of a circle that I cut with a circle cutter.
I made a rosette using Tim Holtz rosette die and topped that with a heart that I stamped and cut out. I placed this on a black scalloped circle that I had cut with a nestabilities die. To finish off the top layer, I added some silver peel-offs to the corners.

We celebrated by going to a nice restaurant for a lovely dinner!
Postscript (added 14th May 2011):
I also entered this card in the Papertake Weekly Challenge which was to use die cuts! All the embellishments on the card are cut with dies except the heart in the centre!

Friends

Friends need to be valued! Our theme for the CMW Monthly Challenge for February is Friendship/Love with a red and black colour scheme.


I made the embellishments for this card using my Cricut. The heart image was from the Make the Cut Gallery. I cut the red layer, then made a shadow for the bottom layer then off-centred the layers when I put them together to show a narrow band of black beneath the heart. I used Kindiglitz to highlight the swirls cut from the heart. The key was from SCAL and I added the word to it, welding it so that it cut together with the key. I added a shadow layer for the key as well.

The base card is white and I added a black layer then overlaid a red layer, half of the rectangle cut on the diagonal with  fancy scissors. I then ran it through the Cuttlebug with the Swiss dots folder. The ribbon was added just below the edge of the top layer. To finish, I added some bling to the top right corner.

The second card was made from a black base to which I added a red layer, run through the Cuttlebug (Swiss Dots again!) and overlaid with a black spotted ribbon.
The image is from Montarga, stamped with Versafine Black ink. I cut the image with a Nestabilities die, embossed it then inked the edges with weathered wood distress ink while it was still in the die cutter. This produced a nice clean edge to the image which stands out against the black background.
I used the same technique with the die cut for the sentiment. The sentiment tag was attached with square brads.

Thursday, December 2, 2010

Monthly Challenge for December

Over at Card Making World, we are having a monthly challenge. This month the theme is A Christmas Carol and cards entered must reflect  a Christmas Carol in some way.
My first sample card for the challenge was based on the carol, O Little Town of Bethlehem. I copied the music for the carol and reduced it to fit on the card. Then I distressed it using the wrinkle method and coloured it with antique linen DI. I then spritzed it with gold perfect pearls and water in a mister. It I also inked the torn edges of the paper. The stamped image is by Montarga which I embossed with gold and added gold beads to the bottom of it to make it look a bit like sand! I stamped and embossed the image twice and cut some of the buildings out, which I added to the image to give a bit of depth. The sentiment is from a Hero Arts Christmas set. Finished it off with some blue and gold ribbon across the card and gold star brads in the corners.

The second card was made using a Nestabilities die set. I folded the base card the cut it with the largest die, leaving a bit of the die over the folded edge to create a fold.

I cut another single layer the same size to add to the base card, then embossed it in the Cuttlebug. I cut two other layers, one in the same colour and another in silver to provide layers. On the smallest one, I stamped the Partridge in a Pear Tree stamp (again from Montarga) and embossed it with silver. I stitched round the silver layer with the sewing machine (no thread) to provide a little bit more detail. A Christmas greeting is stamped inside the card.

Thanks for looking!

Thursday, October 7, 2010

CMW Monthly Challenge

Carol and I decided to try to revive the Card Making World Monthly Challenge group recently, so we chose the theme SPORT for October. Given that the Commonwealth Games are on in India at the moment and the Ryder Cup for golf has just finished, it seemed appropriate.

As part of the DT for this group, I made a couple of sporty cards to get ideas stimulated for the group. The first card is a golf inspired one. I have had this cutting file for some time (from SCAL) and have not had the inspiration to use it, so this was a perfect opportunity.

The golf bag was cut in the various parts using the Cricut Expression.

The oval backgrounds cut from a Nestabilities oval set. The top oval was run through one of my Cuttlebug folders and the edges of both ovals were inked.

The photo corners were punched using a Martha Stewart punch.


The surfer card was inspired by the digital image - hang ten Kody - (from Some Odd Girl) coloured with Copic markers.

The top layer of the card was cut with a Nestabilities Oval die and the "waste" used as the background. The lines around the edge are peel-offs which I coloured using a felt pen. Attached the lines then masked them and the outside edges before stamping the swirly stamp around the edges of the layer.

The digital image was attached to the back of the top layer then all attached to the card. The sentiment was stamped on a separate card and attached with foam squares, after inking the edges to make it stand out a little more.
This card was also a good one for this week's Tanda Teaser!
Really enjoying my Copics!

Thursday, March 25, 2010

Demonstration cards and more

We had a very good meeting of interested card makers (and one scrapbooker!) on Tuesday night. It was great to meet a couple of the NZ Cardmakers from the Card Making World Forum too. We talked about designing cards. The first two cards here are ones that I made to show some of the elements of design and the use of a sketch as a plan.

This card was a very simple one using a wide green strip layered with a lemon based patterned paper. The scalloped circles were cut with Nestabilities from green and lemon card.

The stamp on the circle was a Tanda stamp which I coloured using Tombow markers. I edged the circle with yellow ink to provide a little more contrast.

The sentiment is from my favourite Hero Arts set.


The second card was based on the same sketch but has more decoration. The green strip layer was embossed with the swiss dots folder (CB) and the lemon layer edged with a Fiskars edge punch.
I overlaid that with a purple ribbon.

The edge of the card was topped with the lemon background paper which has touches of the green and purple. The sentiment was stamped on the leftover bits of the edge punched card and layered on a piece of the embossed green. To finish the card off, I added three purple brads.

Next time we are going to look at step cards.

Wednesday, February 24, 2010

More play!

Last night a friend came over and I showed her how to make a stair step card. She had never made one of these before so it was fun teaching her how to do it. She immediately saw a good use for the ScorPal she bought recently too!

The instructions for this card can be found at Split Coast Stampers .

I used a nice light green scrapbooking paper for the fronts of the "stairs". I punched borders in white card for the lace effect and layered with the green paper.

I cut the scalloped circles with my Cuttlebug - (nestabilities dies). Because the lower one was 1/4 inch wider than the smaller one, I decided to minimise the effect of too much white by edging it with an aqua coloured ink pad, which turned out quite well. The flower was one I picked up (as a bag of 10 ) from one of the local $2 shops. Sometimes they have some great bargains for crafting!

The ribbon was added to provide a little contrast.

Enjoy! Please leave a comment when you look at my blog. It is nice to know who is visiting...

Cheers