Thursday, March 29, 2012

Homework for THCC101 Day 7

The class for Day 7 was fun! It was all about embossing - heat embossing and it made me realise that I had not done much of that for quite a long time.


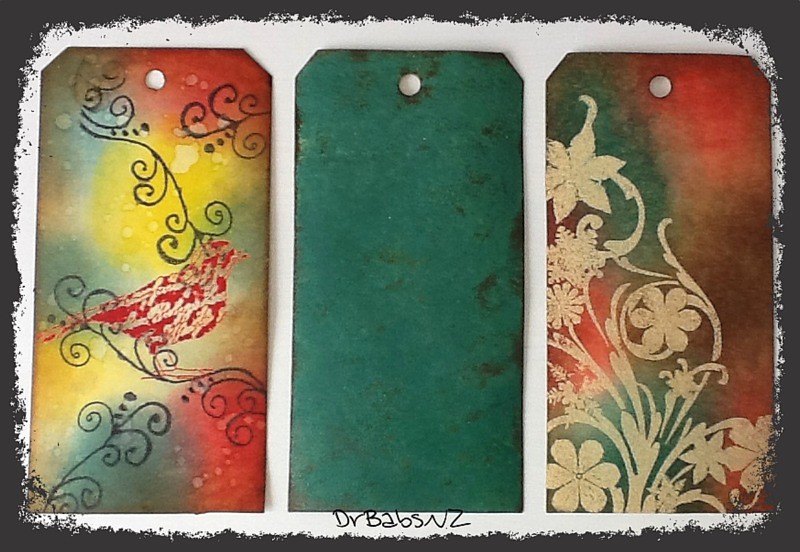
The combination of heat embossing and distress inking is such a dynamic one as you can get some amazing results - evidenced particularly by the tag on the right. The distress embossing powder gives a stunning result - I must use it more often!

Still haven't done my homework for day 6 as I am waiting impatiently for my distress markers to arrive...

Now off to do my homework for Day 8 - using paints!

Posted using BlogPress from my iPad

Wednesday, March 28, 2012

More homework!

This is my homework for the Day 4 class of Tim Holtz Creative Chemistry 101!

The tags are coloured using distress inks and re-inkers providing a nice watercolour effect!


Enjoying the course very much. Tim makes everything look so easy!

- Posted using BlogPress from my iPad

Thursday, March 22, 2012

Tiptoe through the Tulips

Over at the Cooking with Cricut challenge this week, the theme is a Spring song, and I found this sentiment on my Cricut Lite Bloom cartridge.

I cut the bottom layer in black and the top layers in red, yellow and cream.

The flowers are from the Walk in my Garden cartridge and I welded two of the border layers together to fit across the front of the card.

The card is a centre step one which I cut using the Black Cat Cougar, designing the file on the Funtime Software package that came with the machine. The software makes it really easy to make these cards that require measuring, cutting and scoring in different places.

I have entered this in the Fantabulous Cricut Challenge Challenge me Monday 103.


Swap Book

Hilda, over at the Lots to Do forum, organised a book page swap, and because I was going to be in the UK when the pages were due, I thought I could save some postage by delivering them  by hand - hopefully!

The pages here are (clockwise from top left): In a tangle (zentangle), My love of art, Take flight, and She loves to dress up.

The zentangle is done in pen on white paper and shaded with pencil.

For the background to My love of art, I created a pastel abstract design over which I stamped some arty stamps and added the word.

Take flight depicts a bird escaping from a cage and surrounded by butterflies.

I was really stumped for the last one of these, then I had the idea of getting a downloaded paper doll image with clothes that you can dress her in. I remember playing with these paper dolls in my childhood - many years ago!LOL

The final four pages are Smell the Flowers, All sewn up, Bricks and Mortar and The Wheels go round.
For the flowers, I stamped a Hero Arts poppy  stamp, masked it then stamped a background script stamp. Coloured with copic markers and added the title.

Enjoyed doing the sewn up page as I had lots of sewing themed stamps to choose from. Used Toodles and Binks stamps on a sewing pattern background paper, then  added the dress form stamps from Claudine Helmuth. I stitched a piece of cream linen on the page along with some lace, ric rak and an edging.

For the Bricks and Mortar page, I stamped the buildings onto cardstock and coloured them using copic markers, then cut them out to attach to the page. The background was embossed with a texture fades embossing folder which was then inked up with fired brick distress ink. Cut the title out using the Cricut and attached to the page with foam squares.

The clock page represents the wheels of time going round. The background was embossed with a clocks embossing folder from Sizzix, then distressed with my favourite bundled sage, wild honey and rusty hinge distress inks. Added the weather clock die cut and a time sentiment from Tim Holtz.

I can't wait to see what the others have come up with for the swap!

Zentangles

Over at the NZ Crafters group on Card Making World, a few of us got together to have an ATC swap. The theme was Zentangles and these are the ATCs I made for the swap.

Enjoyed doing the zentangles as it was really relaxing and I didn't need to be in the craft room to do it!! This was another first for me!

Creative Chemistry 101 Day 2

Yes, I signed up to Tim Holtz' Creative Chemistry 101 on-line classes and they started this week. So excited!

Day 1 was all about the inks - learning about the different types of inks used in making ink pads and how they act and react with each other. Really good information and so helpful.

Blended Distress/Spritz and flick technique
Day 2 was so distressing - using distress inks in different ways.

My first tags show the blended distress technique and spritz and flick. Fun to do. Love both colour combinations I used here.


Brushless Water Colour
 This sample is just so cute - used a Gina K stamp with different distress inks.

I also used water colour paper to stamp this on and it comes out so well - just looks like a water colour picture!


Wrinkle free distressing is something I have never been particularly happy with, but I know that once you layer up the tag with stamps and embellishments, it becomes a background.

I liked the effect that I got with the seasonal distress inks I used for the middle tag and the effects on the RH tag are good too.

Enjoyed doing the homework for day 2 - now off to do the homework for day 3!

Wednesday, March 21, 2012

Spring Song


He remembers the first time he met ‘er 
He remembers the first thing she said 
He remembers the first time he held her 
And the night that she came to his bed 
He remembers her sweet way of singin’ 
Honey has somethin’ gone wrong? 
He remembers the fun and the teasin’ 
And the reason he wrote ‘er this song 
I’ll give you a daisy a day, dear 
I’ll give you a daisy a day 
I’ll love you until the rivers run still 
And the four winds we know blow away
(Written by Jud Strunk)

Today's Terrific Tuesday Die Cut or StampChallenge theme is "inspired by a spring song".

Well, I am not sure that the song the sprang to mind when I saw this cutting file is specifically related to spring, but daisies always seem so spring-like to me.

Melin created this daisies file which can be purchased here. I cut the diaies from white cardstock, then blended Tumbled Glass distress ink on the edges of the petals and curled them up slightly so they stand out from the card. I layered the daisies onto the green stems and leaves that I edged with crushed olive distress ink and placed the centres of the daisies (cut from yellow card and edged with wild honey distress ink) on top of the white petals.

The sentiment is from Gina K special occasion tags set designed by Tami Mayberry. I layered the sentiment and the daisies onto blue cardstock (cut with Spellbinders Deckled Rectanlges dies) which I then edged with white chalk ink.  Attached the sentiment onto the blue gingham ribbon that I taped to the bottom of the card.

I hope you find time to enter this challenge - Melin has created some lovely die cuts and digi stamps that are very suitable for the theme.


Wednesday, March 14, 2012

Terrific Tuesday Die Cut and Stamp Challenge Reminder

Just a reminder that the Terrific Tuesday Die Cut and Stamp Challenge over at PCW ends next week.
The theme for the fortnight has been Dr Suess and Reading and Melin has created some wonderful digital stamps and cutting files that you can get here.

I made this cute pop-up box card using a Sam I Am digital stamp that had been pre-coloured (you can download them coloured). I cut the image out and attached it to the pop-up piece of the card.

I cut the card using a cutting file I designed using Funtime 2010 software and cut it out using the Black Cat. I also cut the layers on the cut with the Black Cat then embossed them using the Cuttlebug. Added some dimension with distress inks.

The top layer on the pop-up piece was stamped with a bubble wrap stamp from Kaisercraft that I bought on Saturday. Edged the piece with distress inks before attaching it to the back.

I printed the sentiment using word art then cut it with a circle die and cut a backing using a scalloped circle. Embossed the edges of both before adding a bit of distress ink.


The card folds down flat for posting, as shown in the picture to the left. To open it up, simply pull the stand up piece out from the centre of the box.

I have done a video on making the pop-up box card and you can see it here.

I really encourage you to pop over to Paper Crafting World to have a look at the lovely files (and a freebie as well) that Melin has created to celebrate Reading and Dr Suess' birthday. She has also done some great St Patrick's day files.

Wednesday, March 7, 2012

Terrific Tuesday Die Cut or Stamp Challenge

I have just heard that I have been selected for the Design Team for the Terrific Tuesday Die Cut or Stamp Challenge over at Paper Crafting World . Very exciting news as it is my first DT role, so I am looking forward to the next few months as I join the team and create for Melin and the other very talented designers.

The theme for the first challenge is Dr Seuss and Melin created a set of wonderful Dr Seuss cutting files and digi stamps to celebrate!

I chose to make a mobile using several of the characters from the cutting file set - Cat with Hat, which will be available from the website here.

Given that this project was going to be hanging, I needed to cut twice as many of each file so I could back-to-back them, and the backing parts needed to be flipped so they were a mirror image. Thank goodness for SCAL2 - I managed to cut everything in no time at all using my Cricut Expression!


The frame for this was also part of the set. I cut the book pieces out at 2.5 inches and the frame at 5". For all of the pieces in the mobile, I made one side first, then attached the pieces for the other side, sandwiching a long piece of thread that would be used to link all the pieces together.


The Cat in the Hat was the most challenging part to put together, but after two of them, the next 2 went together very quickly. I was very impressed at how well the little details like the whiskers cut out too.

I inked the edges of all the pieces with distress ink or Versamagic Chalk ink (cloud white)  before putting them together. This provides a little dimension for each one


I liked the Fish out of Water and used another of the frames in the set to border this with. Again, the edges were all inked with distress ink and I added little features like the mouth with a black pen.


The trees were fun to do. I welded the three trees together then cut a base to which I added the tree trunks and the tops. I embossed the red and orange tree tops using the swiss dots folder and the Cuttlebug, which added another dimension to the trees.

I linked the pieces together using the thread that I had added as I put the pieces together and tied them to some bamboo skewers. Taking a photo of this project was the most challenging thing to do as it keeps moving when you hang it up!


Green Eggs and Ham
 For this card, I used the digi stamp from PCW - Sam Bear and coloured it using Copic Markers (R14, R17, E25,G05,G07,  Y17). I then cut out the image as I wanted to layer it using some dimension.

To make the easel card, I used a piece of A5 blue cardstock, folded to create the easel. Added a die cut label which was distressed using Faded Jeans Distress ink and printed the excerpt from Green Eggs and Ham by Dr Suess. The sentiment was also printed using the same font and attached underneath the image.

The book shape used to stand the easel on, was cut from the Cat with Hat cutting file set and layered on the inner part of the card.
Tuesday, March 6, 2012

An Award!

I had a very pleasant surprise yesterday when I read the comments on my last post. The beautiful Sharon made me a recipient of the Liebster Blog award! Thank you so much Sharon - I am honoured!


The LIEBSTER BLOG AWARD is used to show appreciation of smaller blogs (under 200 followers) and to help spread readership and joy. It comes from the German meaning Dearest or Beloved, but can also mean Favourite. As part of the tradition, the award is to be passed along to five other blogs that have motivated and inspired me.

The other rules are:
The blogs I choose must have less than 200 followers.
I must comment on their blog, so that they know about it.
I must link back to the person who gave me the award and thank them, and post the award on my blog.
These are the five inspiring people that I would like to give this award to:

Sue Law, who I first met on the Tanda forum, is a wonderfully creative person who often underestimates the influence she has on other cardmakers! Sue's inspirational blog is here.

Jackie Walker, who I met on another forum - Lots to Do. Jackie is such a busy person, yet still finds the time to create some really interesting projects. She is also one of those people who is always on the lookout for yet another craft to try out. Jackie's lovely blog is here.

Hilda Moffett, the leading light behind the Lots to Do forum, who manages to combine a busy life with crafting and copes admirably with the challenges that are facing her at the moment. Hilda's blog is here.

Shairon Jones is another of my LTD forum buddies who visits my blog regularly and always leaves lovely comments. Shairon is another who likes to try out different things and has recently been doing some classes in cartonnage, the results of which look just fascinating. Shairon's blog is here.

Sam, who was also another LTD buddy, has recently established a forum called Paperplay, another forum to meet people and share ideas. Her blog is here.

Happy Crafting!

Another Egg

Here is the latest egg I made from the wonderful Poplar St set from SVG Cuts. It was a gift to thank a lovely person who has been working at the residential home where my Mum lives now. I filled it with yummy fudge!

The base was cut from wine coloured card and I used cardstock from the Love Letters set (First Edition Papers) for the outside of the egg. I edged the top layer pieces with Victorian Velvet Distress ink to add some depth.

To finish it off, I added some cream lace around the bottom of the lid and attached a string of pearl beads along the top of it with Glossy Accents. The bow was attached with a glue dot.

To "top it off", I added a large pearl brad to the centre of the lid.

The table it is sitting on is also from the same svg set.