Sunday, December 23, 2012

Day 23 Angels


 Today is Day 23 of the 25 Days crafting showcase and the theme is Angels.


I used my Cricut again today and cut this lovely angel card using the Christmas Cards cartridge for the base card and Joys of the Season for the angel.

I used the Cricut Craft Room to size my images and to cut the scalloped circles for the layers.

I embossed the angel's wings and dress and added some sparkle to her wings and trumpet with Kindiglitz.

I embossed the front of the card using the swiss dots folder then layered the images on top.

The words are peeloffs as I did not have any stamp sentiments that would have fitted where I needed them to go.

Please do check out the rest of the projects from the team over here. While you are there, you can pick up the freebie files for today. The cutting file and the digi image are just so cute!


This is my last post in this 25 Days Year Round and Christmas Showcase. What an amazing journey it has been with the very talented team over at My Paper Crafting. Melin has designed some awesome cutting files and digi files and they are so easy to use as well.
Thanks for having me Melin!




Saturday, December 22, 2012

Day 22 Fast 'n Fabulous

 Today's project for the 25 Days Christmas and Year Round Crafting Showcase over at My Paper Crafting is based on the theme - Fast 'n Fabulous.

I wanted to use a Cricut cartridge for this one so I chose the Tags, Bags, Boxes and More 2 cartridge.
This is one I have used a lot lately and each time I look at the book I see some different ideas.


My project really was fast! It is a holder for a gift card - such a handy present these days when you don't know what to get for that person who has everything.

I cut the shape using the Cricut Craft Room program to size it properly to fit the gift card.

After cutting it, I ran it through the Cuttlebug using a holly leaves embossing folder. I added a digi image from MPC layered on a Spellbinders scalloped circle.


The gift card holder is closed with a ribbon.

It really was Fast 'n Fabulous! I guess it took me all of 10 minutes to make it...

Please go over to the blog at MPC to take a look at the other gorgeous projects made  by the very talented team and leave a comment. You can also get the freebie digital image shown below.


Friday, December 21, 2012

Day 21 MPC 25 Days Crafting Showcase


Sounds of the Season is the theme for today's post. Melin has created a beautiful harp digital stamp and cutting file for today's freebie and I have used the cutting file for my project.


I cut the base card from kraft card and the top layers from gold coloured card. There are two layers on the top, one with the "strings" of the harp.

The holly leaves and berries are from the Candle cutting file which was one of the earlier files offered in the 25 Days Showcase.

The flourish is from the Frame 'n Flourish cutting file available from My Paper Crafting. 

I printed the words using the computer then cut the banner using the tattered banners die from Tim Holtz (Sizzix).

Pop on over to MPC to pick up today's free files - the harp digi and cutting files.


Thursday, December 20, 2012

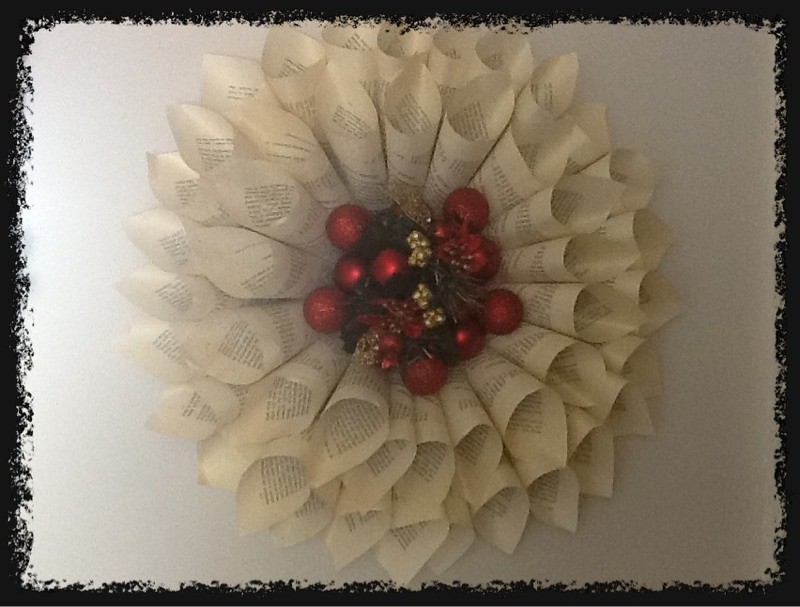
Christmas Wreath

I saw this gorgeous Christmas Wreath on a You Tube video recently and wanted to try it out. Check it out at www.JennaDeAngeles.com. Mine is a slightly simpler version as I didn't go back and check the one she did before I made mine!
I used an old book and some cheap ornaments from K Mart to make the wreath and it took only a couple of hours to put it all together.


I gave it a spritz with some gold glimmer spray just to give it a bit of sparkle.
It does look lovely on the wall!
- Posted using BlogPress from my iPad

Saturday, December 15, 2012

Day 15 MPC 25 Days Showcase

Rudolf and friends is the theme for today's 25 Days showcase and I have used my Cricut and a lovely cartridge of Christmas Cards.


I used the card design featuring the sleigh from the Christmas Cards cartridge, but instead of the sleigh, I used the reindeer from the Teresa Collins December 25 cartridge. To get the image facing the way I needed, I had to flip it before cutting it out.

The card base was cut from light green cardstock and the background layer from white. The green layer formed the border and the houses, and I cut the tree and reindeer from brown cardstock.

The greeting is a peel off applied to the bottom of the card.


Please visit the rest of today's design team over at My Paper Crafting and while you are there, check out the lovely freebie files for today!

There is a cutting file and a digi file of Rudy!

Saturday, December 8, 2012

Day 8 25 Days MPC Showcase

 Today's projects are all about Candles and Lights and Melin has created a beautiful cutting file as a freebie for today. You can get it over at My Paper Crafting and while you are there, please check out all the other beautiful projects created by some of the 30 designers on the team for this showcase.

I used the freebie cutting file to create my project today.

First, I imported the cutting file into SCAL2 and created a shadow layer for the cutting file by leaving all the layers grouped.  This is quite useful as it enables you to get the different pieces in the right place to produce your project.

I will post a tutorial on how to create a shadow layer using Melin's cutting files and SCAL2.


I embossed the top layers of the candles and edged them with weathered wood distress ink.

For the leaves, I created veins on then using an embossing tool and I added glossy accents to the holly berries to give them some shine.

This project is about 8" high and is currently hanging on the edge of my mantlepiece as part of my Christmas decorations.

Friday, December 7, 2012

Day 7 MPC 25 Days Showcase

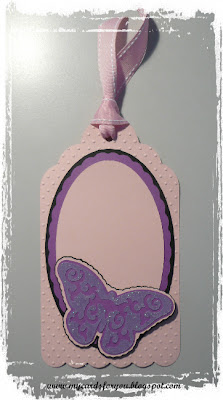
Today's theme for the 25 Days Showcase over at Paper Crafting World is April - Flowers and Showers.

The free cutting file for today is such a lovely tag that I just had to use it.


I used the cutting file and my Cricut to cut the layers for the tag.

I embossed the tag with the Swiss Dots embossing folder then layered the various coloured layers on top.

For the butterfly, I added some dimensional sparkle to the patterned layer to make it stand out.

To finish this tag off, I intend to add a photo to the centre oval as it is part of a project I am working on. But I am not adding the picture until the project is nearling completion. Check back in a month or so to see the finished project!

To get this free cutting file, head over to My Paper Crafting and check it out. Do take a look at the other beautiful projects for today as well.

Thursday, December 6, 2012

25 Days Christmas and Year Round Crafting Showcase

 Welcome to my first post for the 25 Days Christmas and Year Round Crafting Showcase hosted by My Paper Crafting.com.

The theme for today is March - Easter - Passover and I chose to use the free digi file on offer today.


I made a side step card for this project and covered the base card with a spotted lilac paper.

I printed out the digi several times and cut the grass layer along with the bow, eggs and basket. I layered them up with foam pads then attached to the card.

I added some die cut swirls with a triple loop bow.

The little easter eggs scattered in the grass and along the step of the card were punched from different coloured papers and attached to the card.  I stamped the sentiment on a square card and punched the corners with a butterfly corner punch.

Do go over to My Paper Crafting to check out all the other beautiful projects for today.
This is the digi file I used and you can get it from PCW. There is also a cutting file of the same image available.

Tuesday, December 4, 2012

Tutorial: Adding a shadow layer to a cutting file


Adding a Shadow Layer to a cutting file using SCAL2
The cutting file used in this example is from www.mypapercraft.com. The files are shown as they are imported into the program and in the final layout format. This is what the file should look like once it has been put together.

  1. Open SCAL2 and import the svg (File: Import or Ctrl+Shift+I). Size it to the final size you want to cut. Make a copy of the image by clicking Ctrl+C and paste this onto another page. It is important to do this so that the shadow layer you are going to create and the cutting file are the same size. You can then cut your project using the original file on the next page.


2. Ungroup the image. (Object: Ungroup or Ctrl+Shift+G) Now select all of the pieces by “drawing” a square around all of the pieces.


3. Making sure the image is selected, you now need to weld the pieces together. (Path: Union) This is what your image will look like now.

      4. The next step is to make this image into a shadow layer. Go to the Appearance box which will be displayed when you click on the image on the mat. Choose the drop down box beside style and select one of the three shadow styles.
Click on each one in turn to see which will be the best for your shadow layer.

5.  This is your final shadow layer.

      6. The resulting layer will give you a background that is slightly larger than the original cutting file and can be cut in a contrasting colour. If you don’t want a shadow layer, you can cut the image before changing it to a shadow and use this as the base for your cutting file.


Day 3 25 Days Showcase

 Here it is, Day 3 of the 25 Days Christmas and Year Round Crafting Showcase from My Paper Crafting. The theme for today is Pretty Poinsettias, Pinecones and Presents.

Melin has created this beautiful cutting file of a poinsettia that I have used to make Christmas decorations for my house.


I  created a shadow layer for the poinsettia using SCAL2. Then I cut the parts of the flower.

After cutting, I embossed all the parts of the flower using the swiss dots embossing folder.

In the centre of the flower, I added gold pearl dots.

The file is a freebie over at MPC today so head on over there to get it.

Sunday, December 2, 2012

CMW Monthly Challenge

 This month, the DT at the CMW Monthly Challenge set the task of using digi papers, images and clip art from the CMW Printable Craft Shop.

I made two cards to set the tone for the challenge. The first one used a clip art image of an angel (from the Angels Collection) and the background paper from the Painted Birdhouses Collection.

I love these images!


I got the idea for this tent fold card from a Split Coast Stampers tutorial.

The papers and image I used were from the Valentines Collection.  I printed everything onto 160gsm cardstock, then attached to heavier card. The front part of the card was die cut with a Spellbinders labels die and I kept the negative part of the die cut.

The image was carefully cut out then attached to the front of the card using jump rings.
I die cut the heart then stamped it (both Tim Holtz products), edged with distress ink then attached to the front with die cut vines and some small flowers.


The front and back of the card were attached to a folded piece that acts as the base of the card, then they were joined at the top using heart shaped brads.

The picture at the right shows how the card stands up. It folds flat for posting!