This is the second part of the making of the ATC book. It shows a couple of ways of putting the book together.
Enjoy!
Please leave a comment when you have tried making a book and a link to your blog or a picture!
Sunday, July 11, 2010


Friday, July 9, 2010
Hats

The theme was Hats or Crowns.
I used alcohol inks to colour the backgrounds, added some lace, stamped some hats and handbags, then added peeloffs that I had attached to other papers then cut out. To finish, added some bling on 2 corners and peel of corners on the others.
ATC Book Video
The idea for this came from my friend Carol, in Hamilton, who sent me the instructions for folding the pages. A few weeks ago, I made a little book to keep ATC swaps in. Since then, I have thought a little more about this, redesigned the pages a little and produced another book.
Part 1 of the video describes how to fold the pages for the book. Each page is made from a sheet of A4 paper and folds into a mini-book of 4 pages, each with a pocket that will hold an ATC.
The second part show some ways to put the pages together to make a book. This will be uploaded in the next day or so.
Thanks for looking - please feel free to leave comments.
Part 1 of the video describes how to fold the pages for the book. Each page is made from a sheet of A4 paper and folds into a mini-book of 4 pages, each with a pocket that will hold an ATC.
The second part show some ways to put the pages together to make a book. This will be uploaded in the next day or so.
Thanks for looking - please feel free to leave comments.
Thursday, July 8, 2010
Tag Challenge

Monday, July 5, 2010
In Stitches
Papertake Weekly Challenge this week was In Stitches. Had to have some sort of stitching on the card - real or fake!
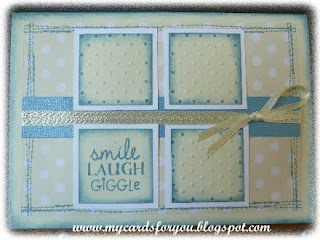 This card has stitching stamped around the edges of the layer. Used the Cuttlebug to emboss the small squares on the front, and added ink to the edges to provide some depth.
Narrow ribbon wrapped twice around the centre and finished with a half bow.

Narrow ribbon wrapped twice around the centre and finished with a half bow.
Missed all the challenge dates!
Over the last week, have been diligently doing lots of challenges, then I missed most of the submission dates for one reason or another, but decided to post them anyway as I have used a few new stamps!


These two skinnies were inspired by the SCD challenge, which was a skinny with a theme of flora and fauna. I used my blobs on sticks stamp (courtesy of Wendy at the Stamp attic) on both, the butterfly and cat were from Tanda sets, the flowers were from a set I had bought ages ago and the little birds were from a little set designed by Sue Law. 5 more new stamps used!
 This box ( top measures about 4.5" square) was inspired by a tutorial that I received by email recently. The top and bottom are supposed to be cut from Nestabilities dies, but I used a similar shape on a Cricut cartridge - Songbird. The box has sides 2" high and I stamped the new CS stamp around the outside of the box. I coloured 3 of the flower stamps and layered on the top of the box, adding leaves, again cut using the Cricut.
Added some distress ink around the edges of the top and bottom to give a bit of depth and hide the card sandwiched between the papers on the top and bottom. Sparkle on the flowers and leaves added with Kindyglitz.

This card was made with a sunflower stamp that I bought (as part of a set) in the UK. I coloured the flowers with copics and distressed the edges of the layer and the card with Scattered Straw DI.


These two skinnies were inspired by the SCD challenge, which was a skinny with a theme of flora and fauna. I used my blobs on sticks stamp (courtesy of Wendy at the Stamp attic) on both, the butterfly and cat were from Tanda sets, the flowers were from a set I had bought ages ago and the little birds were from a little set designed by Sue Law. 5 more new stamps used!

Added some distress ink around the edges of the top and bottom to give a bit of depth and hide the card sandwiched between the papers on the top and bottom. Sparkle on the flowers and leaves added with Kindyglitz.

This card was made with a sunflower stamp that I bought (as part of a set) in the UK. I coloured the flowers with copics and distressed the edges of the layer and the card with Scattered Straw DI.
Thursday, July 1, 2010
The Last Wantage Challenge
At last I have finished my altered tin. Sue Law provided us with a lovely stash of fibres, buttons and beads, stamps and a yeast tin with the challenge to do something with it. Well, it sat on my desk for ages before I finally gained some inspiration from an article in the CS magazine.
 This is the tin that Sue provided in the stash. It is not that big, but provided a big headache for me in knowing what to do with it.
So, I had some sheet metal that I cut to fit around the tin in two pieces. Punched holes down both sides of the metal then embossed it in the Cuttlebug using the Swirls folder. I then painted the tin and the metal with a couple of coats of gold paint. When that dried, I attached it to the tin by using some of the fibres that Sue had included in the lovely box and lacing both sides around the tin.
Then I had to decide how to decorate the tin. I stamped some Tanda flowers onto card, embossed with gold,, cut them out then used coloured Kindyglitz to provide some colour on the petals. It needed something else as well, so I cut some swirly leaves with the Cricut and the Home Accents cartridge, glitzed them with sparkly Kindiglitz and attached to the tin. Added the flowers and hey, presto..... This is the result:

The photo does not really do it justice, unfortunately. However, it is finished just in time to enter into another challenge - the Allsorts Challenge for this week is Embossing, so it fits!
So, Sue, I finally did it!!

So, I had some sheet metal that I cut to fit around the tin in two pieces. Punched holes down both sides of the metal then embossed it in the Cuttlebug using the Swirls folder. I then painted the tin and the metal with a couple of coats of gold paint. When that dried, I attached it to the tin by using some of the fibres that Sue had included in the lovely box and lacing both sides around the tin.
Then I had to decide how to decorate the tin. I stamped some Tanda flowers onto card, embossed with gold,, cut them out then used coloured Kindyglitz to provide some colour on the petals. It needed something else as well, so I cut some swirly leaves with the Cricut and the Home Accents cartridge, glitzed them with sparkly Kindiglitz and attached to the tin. Added the flowers and hey, presto..... This is the result:

The photo does not really do it justice, unfortunately. However, it is finished just in time to enter into another challenge - the Allsorts Challenge for this week is Embossing, so it fits!
So, Sue, I finally did it!!
Subscribe to:
Posts (Atom)