Hi there. Back again with another post for the PCW Design Team.
Today, I would like to showcase the True Classic car file
designed by Melinda at Paper Crafting World. I think the file is more
designed as a scrapbooking file, but I decided to try to make a card
with it and I am quite pleased with the end result.
I
first took the file into SCAL4 and made a shadow layer with the
original image. The shadow layer is almost 1/2" bigger than the image.
I
then duplicated the shadow image and flipped one of the shadow layers,
centred both shadow layers then joined the two by overlapping the images
and welding together.
I then imported both images into
Design Space and sized both to the desired width. As it is not a tall
card, you can size it to be a wider card - as wide as you like depending
on the suzed envelope you want to use!
I added the Dad
layer by typing Dad and creating a shadow layer for that - using a font
that has a shadow layer. I offset the top layer to create more
dimension for the word.
Creating a card using a file
such as this is very easy, but you do need to have another program to
help create the shadow layer. I use SCAL4 most of the time to do this,
but you can use MTC or a free program such as Inkscape. All of these
programs will create an svg file that can then be imported into Design
Space for cutting with the Cricut Explore.
Over the last few years, my interests have changed a little. I have developed an interest in patchwork and quilt making which seems to have overtaken my interest in card making! I still make cards, but not as much as I used to. Hence the change name for this blog.
Sunday, June 26, 2016
Thursday, June 16, 2016
Number One Dad
Hi again, I am back with another design from Paper Crafting World.
Today, I am showcasing the chevron tag cutting file available here.
I loved the simplicity of this card - I don't really do fancy!
To make the card, I used a tent fold base and layered it with Juniper card (from Close to my Heart) then one of the papers from the Jackson Collection (now retired).
The base for the tag and the stars was cut from Cocoa cardstock and the top layer of the tag and the stars were cut from Colonial White cardstock. I used Juniper again for the rectangles on which I placed the Cocoa letters.
It is hard to see in this photo but I have used foam dots for the stars so they stand away from the tag.
A wonderfully easy card to make using another great cutting file from PCW!
Tuesday, June 7, 2016
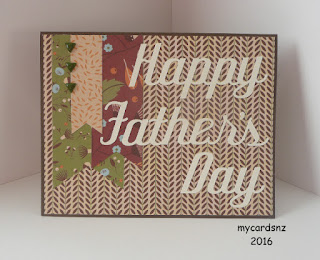
Father's Day
Somewhere in the world, Father's Day is looming! In New Zealand, Father's Day is celebrated in September, so this is an early Father's Day reminder.
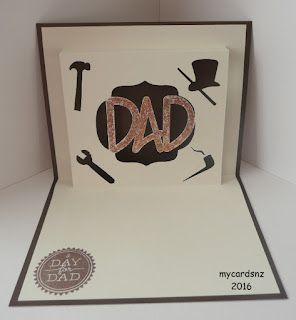
The Printable Craft Shop has some wonderful cutting files for those of you who own an electronic cutting machine. There are also cutting options for those who do not have a cutting machine, so everyone is covered here. Today, I have chosen to showcase the Fathers Day insert cutting file, available here. This cutting file is the inside of the card, which is great because it will allow you to make your own design for the outside of the card.
For the front of my card, I chose papers from a CTMH collection called Pathfinding. I designed and cut the lettering in Cricut Design Space and with my Cricut Explore.
The cutting file is the inner part of the card and I sized it to approximately 5.5 inches wide.
I then brought in a rectangle for the base card and sized that so the inner fitted with about 1/4 inch around all sides. I included a fold line on the base card and centred it.
In the cutting file that you download, the fold lines are made with small cuts. Because the card I was using is not too heavy, I decided to change the fold lines to scored instead of cut, which actually resulted in a better card as there were no perforations on the end result.
To finish off the card, I added some bronze Stickles to the Dad in the centre of the card and stamped an image on the bottom part of the card.
The cutting files available from the Printable Craft Shop are really good and I do recommend them. To get the best results though, I would definitely change the perforated fold lines to scored lines instead of cut lines as it does give a much better finish to the card.
Do check out the other posts from the talented Design Team.
Subscribe to:
Comments (Atom)


