Showing posts with label Copic markers. Show all posts

Sunday, December 6, 2015

Pink Angel

Hello everyone
This week, for the Papaer Crafting World blog, I decided to do a print to cut using a gorgeous angel digital image from here at PCW.

There was an option to use the coloured version or a black line version and I decided to do the black line version as I needed to get out my Copic markers again!

I used a  5" x 5" square card for this one and cut some music paper for the background. I then used the Cuttlebug and a scalloped square die to cut the top layer. I embossed it using the Cuttlebug then applied Spun Sugar Distress Ink to the card while it was still in the die so the white edge would show.

When I had printed the image, I put it back into my Cricut Explore to cut it out - and a beautiful job it did too! Saved a lot of fussy cutting by hand!

I coloured the image with copic markers then applied glitter glue to the top wings so they sparkle. I used foam tape to attach the angel to the scalloped layer and attached the greeting with foam tape.

My granddaughter loves anything pink so she will love this card.

Friday, July 13, 2012

Wall Hanging

Yesterday I was clearing up my desk and found 4 little canvas' that I had prepared for making something with, so decided I had better do something about them!

Since going to the class with Tim Holtz in Sydney, I have been thinking about other projects along similar lines so decided this would be a good use for these panels.

I didn't have any tissue paper that was printed (as we used in the Fanciful Flight project) so I found some tissue that I could stamp onto. I used several different TH stamps to provide nice backgrounds and attached them to the canvas panels using glue stick. Then I edged them with vintage photo distress ink to give them a slightly grungy look.

I stamped the sentiment onto a glossy card then gave it a background wash with tea bag distress marker then broken china. It does not show up much in the picture, but I wanted subtle colour here. I then took a tab holder and coloured it with vintage photo and walnut stain DI before adding a light layer of rock candy distress crackle paint. This gives a nice rusty look. Added the sentiment to the frame then attached to the canvas. Added ART beads that I coloured using Copic marker, then a fancy button.


I die cut the heart and wings then painted the wings with picket fence crackle paint and edged with vintage photo DI. The heart was done using the faux enamel and tied with some jute twine. Added some colour to the background using distress ink and sequin waste as a mask. Pleated some tissue tape and attached that then added a mini bottle top that I had embellished with a tiny clock face and glossy accents.


I stamped the butterflies onto glossy card then added a wash of spiced marmalade. Tore the edges then attached with a piece of filmstrip tape at the top. Added two tiny washers and a pen nib that I coloured using alcohol inks.


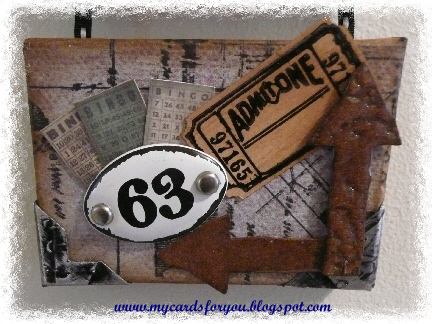
For the final panel, I cut some tiny BINGO card pictures from TH paper, attached then behind the number plaque that I fixed on with Glossy Accents and the two brads. Added a tiny ticket and two arrows die cut then inked and embossed.

The corners were made from metal foil attached to cardstock, embossed with found items then inked with black alcohol ink and sanded down before punching with a MS photo corner punch.

I really enjoyed making this.

Wednesday, May 30, 2012

Paper Crafting World Weekly Challenge

At this time of the year in the Northern Hemisphere, schools are finishing their academic year, and it is time to say thank you to the teacher!

For my project, I used the Bookworm and apple digi stamp from PCW here to make the image. I printed it twice then coloured it with Copic markers. I cut selected parts of the image to layer - the head part of the bookworm and the leaf on the apple. I added glossy accents to the eye glasses of the bookworm to make the eyes stand out a little.

For the words, I used the wording that came with the image and made it into a cutting file using SCAL2, welded the letters then cut them from green card. I embossed the words using embossing ink and clear embossing powder. The image and words were then layered onto white card that I had embossed with the Swiss Dots folder in the Cuttlebug then rounded the corners. This was then layered onto a red card.

Pop on over to the challenge at Cooking with Cricut and see what the other great designers have come up with for this week. Look forward to seeing your entries too!

Tuesday, May 22, 2012

Pearls

Welcome to Paper Crafting World and Cooking With Cricut's 2nd Blog-Aversary and our week long celebration! Each day for a whole week (May 19-26) we will be bringing you fabulous projects made by our Design Team members. We have some GREAT blog candy as well as some daily file and graphic give-aways -- so you will definitely want to make PCW-CWC your daily stop every day this week!

Our theme for today is Pearls and this is how I interpreted the theme!

I downloaded the lovely QT Patootie Tweenz Tori image from PCW and coloured her with Copic markers. I stamped around the image with the Dune Dots stamp designed by my friend Sue, available from The Treasury . I cut the image with a labels die and mounted it on a larger die cut that I embossed with my Cuttlebug.

On the card base, I folded half the front back (outwards) to create a more 3D looking card. I stamped the folded part with Perfect Medium using a flower background stamp, then brushed it with perfect pearls to create a flowery, shimmery background.

The sentiment is from a Gina K stamp set and I cut it with a small labels die and backed it with a slightly bigger die cut from black card. I attached this with foam dots to the front of the card.

For the inside, I cut another labels die from white paper and stamped it with another sentiment stamp from Gina K.

Thanks for stopping by and make sure you head on over to Cooking With Cricut to check out the rest of the projects by our amazing Design Teams!

Wednesday, May 9, 2012

PCW Mothers Day Challenge Reminder

This is a little reminder post for the PCW Mother's Day Challenge that is currently running here.

For this card, I made a side-opening base card and layered it with white cardstock that I embossed with the Swiss Dots folder in the Cuttlebug and made a fancy edge with scissors.  I wrapped this with a fancy ribbon and attached to the card base.

The image is the Cristel Bear holding flowers digi image from Paper Crafting World and I coloured her using copic markers.

The sentiment is stamped on cardstock then cut and embossed using a Spellbinders Labels die using Vintage Photo Distress ink, which I also used around the edge of the die cut before removing it from the die. I layered this on a larger labels die cut and embossed from a bronze coloured cardstock.

The sentiment stamp is by Montarga.

Please go over to the Challenge to see some of the beautiful cards that our other DT members have made.

Wednesday, April 25, 2012

Reminder April Showers Challenge

This reminder card for the current challenge over at Paper Crafting World was made using the Bears under Umbrella digi stamp which I coloured using copic markers.

I cut the image using a circle die and layered it on a yellow circle.

The card was made using a scalloped circle die and topped with a black scalloped circle to which I attached the layered image.

The sentiment is from the same image which can be found here at PCW. I cut this with a fancy tag die from Spellbinders and attached it at the bottom of the card.

I entered this one at the Paper Creations Ink Blog as well because their theme related to April Showers!

Wednesday, April 18, 2012

April Showers

This is my take on the April showers theme for the PCW challenge this fortnight.

The image is a digi stamp (Bears under umbrealla)  from PCW which I coloured using copic markers.

I cut the image using a spellbinders labels die and layered it on a larger black card cut with a die from the same set.

The sentiment is from the same digi image which I cut using a tags die from Spellbinders.

The background layer was cut from red card and embossed using the cuttlebug.

Wednesday, March 7, 2012

Terrific Tuesday Die Cut or Stamp Challenge

I have just heard that I have been selected for the Design Team for the Terrific Tuesday Die Cut or Stamp Challenge over at Paper Crafting World . Very exciting news as it is my first DT role, so I am looking forward to the next few months as I join the team and create for Melin and the other very talented designers.

The theme for the first challenge is Dr Seuss and Melin created a set of wonderful Dr Seuss cutting files and digi stamps to celebrate!

I chose to make a mobile using several of the characters from the cutting file set - Cat with Hat, which will be available from the website here.

Given that this project was going to be hanging, I needed to cut twice as many of each file so I could back-to-back them, and the backing parts needed to be flipped so they were a mirror image. Thank goodness for SCAL2 - I managed to cut everything in no time at all using my Cricut Expression!


The frame for this was also part of the set. I cut the book pieces out at 2.5 inches and the frame at 5". For all of the pieces in the mobile, I made one side first, then attached the pieces for the other side, sandwiching a long piece of thread that would be used to link all the pieces together.


The Cat in the Hat was the most challenging part to put together, but after two of them, the next 2 went together very quickly. I was very impressed at how well the little details like the whiskers cut out too.

I inked the edges of all the pieces with distress ink or Versamagic Chalk ink (cloud white)  before putting them together. This provides a little dimension for each one


I liked the Fish out of Water and used another of the frames in the set to border this with. Again, the edges were all inked with distress ink and I added little features like the mouth with a black pen.


The trees were fun to do. I welded the three trees together then cut a base to which I added the tree trunks and the tops. I embossed the red and orange tree tops using the swiss dots folder and the Cuttlebug, which added another dimension to the trees.

I linked the pieces together using the thread that I had added as I put the pieces together and tied them to some bamboo skewers. Taking a photo of this project was the most challenging thing to do as it keeps moving when you hang it up!


Green Eggs and Ham
 For this card, I used the digi stamp from PCW - Sam Bear and coloured it using Copic Markers (R14, R17, E25,G05,G07,  Y17). I then cut out the image as I wanted to layer it using some dimension.

To make the easel card, I used a piece of A5 blue cardstock, folded to create the easel. Added a die cut label which was distressed using Faded Jeans Distress ink and printed the excerpt from Green Eggs and Ham by Dr Suess. The sentiment was also printed using the same font and attached underneath the image.

The book shape used to stand the easel on, was cut from the Cat with Hat cutting file set and layered on the inner part of the card.

Friday, December 2, 2011

Final Calendar Challenge

Well, Week 12 of the Craft Barn Calendar Challenge is here and almost done. The theme this week was Red and Green with some sparkle and a pine tree!

To make this tag, I used a Tim Holtz Sizzix embossing folder to emboss the pine trees onto the tag. I then coloured them using copic markers. colouring over the embossed areas gives the tag more dimension. I used Faded Jeans and Stormy Sky distress inks to colour the sky. I stamped a background of hills using weathered wood distress ink then covered it with white flocking to make it look like snow. I added some silver glitter to the "snow" to make it sparkle. I also added kindiglitz to the pine trees so they looked frosty.

I added some red baubles and an embellishing fragment that I glued onto a piece of Christmas paper with holy leaves and berries. The stamp is one of Tim Holtz Ticket stamps and I used Tombow markers to colour it before stamping it onto a ticket. I used Fired brick distress ink to colour my ribbon that is attached to the top of the tag.

The calendar is layered onto black card then attached to the tag. I now need to attach the tags to my canvas that I have prepared. I might have time to get that done tomorrow!

Saturday, August 27, 2011

Father's Day

It is Father's day here in New Zealand next weekend and I thought I would make a few cards.

For this card I used some patterned card that I made using alcohol inks and wiping the colours onto glossy card using a folded tissue. I wiped the tissue up and down as well as side-to-side to produce a plaid effect.

I stamped the ties onto white card and onto the glossy card that I had coloured, cut out the tie from the coloured card and attached them to the white card.

The stamps used for this card both came from Montarga.


For this card, I used a number of stamps to make the scene. The golfing stamps are from a set I purchased recently. The grass and the trees are Montarga stamps and the hills in the background are a stamp designed by Sue Law which I use for a lot of backgrounds.

To make the card, I stamped the golfball on the tee, then masked it and stamped the golfer. The background was stamped successively starting with the grass, the hills and the trees. Each was masked before stamping the next layer. Finally, I added the sentiment.

I coloured the golfer with Copic markers, then layered the card onto a red base card.
I have entered this card in the Craft Room Challenge this week as the theme is Masking! Thanks Zoe!!


I used the same technique of stamping and masking for this card as well.

The fisherman and the fish stamps are from the same set as the golfer.

The background stamp is the same as used in the above card.

Friday, July 8, 2011

Experiments

Over the last week or so, I have been experimenting with some different ideas.

This card is made from acetate that was folded then embossed using a textiles folder in the Cuttlebug.

The flower is a Montarga stamp that I coloured using my Copic markers. (They have been having a rest lately!) The shapes for the front of the card were cut with the Cricut. I added some pearl dots at the top of the frame to add a little something!
The sentiment was stamped on a Spelbinders Tag die then attached with foam dots to the bottom of the frame.

The card was finished off with a narrow red ribbon that I attached to the inside of the card with DS tape then covered it with the ribbon on the outside.

This card I made after watching a neat video from stampTV on double embossing.
The blue layer on the left side of the card was embossed with the Alterations Gridlock folder. I then brayered Versamark ink on the top of the embossing and added clear embossing powder. After heating, it came up with the really cool pattern. It really makes the embossing stand out.

Added some paper from my stash to the other side of the card, a black ribbon down the centre and topped it with one of my favourite gentleman stamps from Hero Arts. The Happy Birthday stamp is from Montarga.

I like this technique and will try it out on more cards over the next few weeks.

Tuesday, May 17, 2011

Digital Stamping

I recently bought this digital stamp designed by Daisy Doodles from Card Making World. I loved the little toadstool house! I printed it out and coloured it with Copic markers then stamped the edges with Sue Law's cute dots stamp using Pumice Stone distress ink. I cut the shape with a nesties die and cut a backing piece to mount it on.

The backing paper is from Docrafts Daisy and Dandelion collection. I layered it on black then attached the ribbon. The sentiment is edged with Pumice Stone and cut from another nesties die.

The Tanda Teaser this week is Get Well Soon, so I think I will link it into the challenge there.

Monday, May 16, 2011

Card Sketch Challenge Card

This week, the Card Patterns Sketch challenge is a stunner. I loved the idea of the circular card with the pennants!

So I checked out my stamp collection and found something that might be very good with this sketch. The stamp I used is from Montarga - our very own Christchurch-based stamp manufacturing company which has relocated twice since the earthquake on September 4th 2010!

I cut the base card with the largest Spellbinders Nestabilities scalloped circle die - about 10cm across. The fold of the card is at the top and has been covered by a single piece cut from the same die. I also embossed the edges but not easy to see in the picture.
I then cut a 9.5cm circle which I stamped with Scattered Straw DI with a lovely dotty background stamp designed by Sue Law. Makes a perfect beach scene! I then masked it and brayered the sky with a multicoloured blue Versacolour ink.
The image was stamped then coloured with my copic markers and cut out. I layered it on the card with pop dots to give it some depth. The sentiment was cut with a nestabilities tag die and stamped. The pennants were attached to a ribbon then placed on the card.
A nice piece of fun for a cool autumn day!

Wednesday, April 6, 2011

Yes, I am back again!!

At last I have taken some pictures of some of the things I have been doing over the last week or so. Actually, the first is a picture frame I did ages ago after I came back from a few days in Melbourne. I got the wooden frame at IKEA. I covered the frame with TH tissue tape (what an amazing product), distressed it slightly with vintage photo distress ink to give it a little more depth of colour then coated it with mod podge to seal the tissue tape.
The flowers were made from music paper cut with the tattered florals die (again TH) and shaped into paper roses. I sprayed them with shimmer mist - red and gold, then layered them onto little branches punched from green card and sprayed with gold mist. The flourishes are cut with the TH flourishes die and layered onto the bottom of the frame along with sitcky pearls.

I had to make some Easter cards for the Card Making World Monthly Challenge.

The first one was done mainly using the Cricut. I used Make the Cut to do the egg shape, the shadow and the lattice topper. The letters were welded then cut and a shadow made as well.

 The corners were cut with a Martha Stewart Photo corner punch and the centre strip was cut using a Fiskars scalloped edge punch.

The background paper is from my stash!


 The second Easter card has a digital image from Tilly - Just Jenny with Easter egg and coloured using my copics. The background speckle stamp was one designed by Sue Law for a shop in the UK and I am loving it a lot! Thanks Zoe for sending it to me!!
 The background paper is by Kaiser Craft and the edge shape was cut using a TH edge die. I topped it with a green ribbon. The sentiment and the card were edged with rusty hinge distress ink.

Thursday, January 13, 2011

Another Challenge

Card Patterns has a neat sketch for this week's challenge.
I chose a digital image from Tiffany Doodles for this one. I just loved the cute ladybug with the shoes and a cute face!
I coloured the image with copic markers and used a spellbinders scalloped circle die to cut it out. The edged shadowing was done with Bundled Sage distress ink, which I also used on the edges of the card. I layered the image onto a piece of red card that had also been cut with the Spellbinders scalloped circle die.
The background paper was a marbled paper that I found in my stash - not sure where it actually came from! I cut that into 4 squares and rounded the corners, then attached to a green background card. I then layered this onto a piece of red card.  The sentiment is from a Hero Arts set. 

A New Year

I can't believe it is 13 January already and this is my first blog for the year!  Happy New Year to my followers - hope it is a good one for you and I look forward to sharing more of my creations throughout the year.
Over at Stamp Something Challenge this week, the theme is Digital - stamps and backgrounds. For this card, I used a digital image from Joanna Sheen's Vintage Birthdays for the background paper and an image from Cuddly Buddly (Liliboo Girlies12) which I coloured using my Copic markers.
The sentiment is  from Stampers Anonymous and is one of Tim Holtz Odds and Ends.

The design for the card is a sketch from Tiffany Doodles Sketch Challenge for this month.

Tuesday, November 23, 2010

Back to being busy again!

The last week has been a busy one and I have got something to show for it!
Found a neat gift card holder demonstration over at Gina K's website - stamptv. So I spent a bit of time making some and was very pleased with the results!
I made the holders slightly narrower than the dimensions given in the demonstration because the A4 card is slightly narrower than the card available in the USA. But it doesn't matter because you can still fit a gift card comfortably in the holder.

Have also been busy with Christmas cards as it seems to be the season again! I did manage to get the cards for overseas into the mail by the closing date for economy post for the first time ever, I think! Here is one of the cards I made this year.

I have been using the Joanna Sheen Vintage Birthdays CD again and printed off some lovely images and backing papers. This card uses an image and background paper. I cut the image using a Nellie Snellen die in the cuttlebug. I then threaded narrow ribbon through the holes in the edges and tied a little bow at the bottom. I thought it was quite effective. The image was printed on textured paper which provided a slightly more vintage look.

And I couldn't help doing a card with a coloured image. This image is called Rain but I am not sure where I got it from - I must catalogue my digital stamps properly!! Anyway - coloured it with copics and layered on dotty card with a dotty ribbon.

Thursday, October 7, 2010

CMW Monthly Challenge

Carol and I decided to try to revive the Card Making World Monthly Challenge group recently, so we chose the theme SPORT for October. Given that the Commonwealth Games are on in India at the moment and the Ryder Cup for golf has just finished, it seemed appropriate.

As part of the DT for this group, I made a couple of sporty cards to get ideas stimulated for the group. The first card is a golf inspired one. I have had this cutting file for some time (from SCAL) and have not had the inspiration to use it, so this was a perfect opportunity.

The golf bag was cut in the various parts using the Cricut Expression.

The oval backgrounds cut from a Nestabilities oval set. The top oval was run through one of my Cuttlebug folders and the edges of both ovals were inked.

The photo corners were punched using a Martha Stewart punch.


The surfer card was inspired by the digital image - hang ten Kody - (from Some Odd Girl) coloured with Copic markers.

The top layer of the card was cut with a Nestabilities Oval die and the "waste" used as the background. The lines around the edge are peel-offs which I coloured using a felt pen. Attached the lines then masked them and the outside edges before stamping the swirly stamp around the edges of the layer.

The digital image was attached to the back of the top layer then all attached to the card. The sentiment was stamped on a separate card and attached with foam squares, after inking the edges to make it stand out a little more.
This card was also a good one for this week's Tanda Teaser!
Really enjoying my Copics!

Wednesday, September 22, 2010

Thank you

I made this card to send to a forum friend who sent a selection of lovely tags as a Hug gift. It was certainly much appreciated after the trauma of earthquakes and aftershocks over the last few weeks.

To make the card, I first coloured the image with copic markers. The image is a digital one from Whimsie Doodles (Swing Leah).

I then cut the oval out of the card using a Nellie Snellen die and the Cuttlebug. The image fitted really well behind the cut out. I carefully cut the feet and legs away from the main image and tucked them outside the lower part of the oval shape.

These are the lovely tags that Hilda sent me. They are from Shairon, Julia, Joy  and someone who didn't sign the back. If it was you, please let me know!! Thank you, my friends on the Lots to Do Revisited forum.

Tuesday, August 24, 2010

Goth Girls

The pictures on these cards are stamps that Sue Law provided for us to have a play with Copic Markers when a group of us met up at Wantage in May. I have had these finished and mounted on card for ages and have just gotten around to blogging them.


All are coloured with copics and finished off with distress inks. The backgrounds are stamped with distress inks and layered on card that has been coloured with the same distress inks as on the top layers.