This week's challenge over at CWC is all about Office Stuff. The office and craft room at my house both have so many pens and pencils around that I am always looking for places to keep them.
So this theme was a perfect opportunity for me to make a pen holder!
I used the Tags, Bags, Boxes and More 2 cart with my Cricut. I chose the coffee mug design and used the Cricut Craft Room to do the design.
I didn't want the handles on the mug so I removed the slots in the cutting file by using the Hide Contour feature of the program. To add some stability to the top of the pen holder, I cut a strip of card that measured slightly longer than the circumference of the holder and folded in half before attaching to the inside of the rim.
I cut the letters at 2" tall from different colours of card, then embossed them with the swiss dots folder and my Cuttlebug.
To finish off, I added some fancy ribbon to the top and bottom.
It would be great to see you over at the CWC challenge at My Paper Crafting this week. You have loads of time to get your entry linked for this challenge too.
Over the last few years, my interests have changed a little. I have developed an interest in patchwork and quilt making which seems to have overtaken my interest in card making! I still make cards, but not as much as I used to. Hence the change name for this blog.
Showing posts with label Cuttlebug. Show all posts
Wednesday, April 24, 2013
Saturday, December 22, 2012
Day 22 Fast 'n Fabulous
I wanted to use a Cricut cartridge for this one so I chose the Tags, Bags, Boxes and More 2 cartridge.
This is one I have used a lot lately and each time I look at the book I see some different ideas.
My project really was fast! It is a holder for a gift card - such a handy present these days when you don't know what to get for that person who has everything.
I cut the shape using the Cricut Craft Room program to size it properly to fit the gift card.
After cutting it, I ran it through the Cuttlebug using a holly leaves embossing folder. I added a digi image from MPC layered on a Spellbinders scalloped circle.
The gift card holder is closed with a ribbon.
It really was Fast 'n Fabulous! I guess it took me all of 10 minutes to make it...
Please go over to the blog at MPC to take a look at the other gorgeous projects made by the very talented team and leave a comment. You can also get the freebie digital image shown below.
Tuesday, November 27, 2012
Holiday Challenge
Today's Paper Crafting World Terrific Tuesday Challenge is all about Holidays using red or green.
I chose to go with red today and used the lovely angel digi stamp to create my topper for the card.
I coloured the image using Photoshop Elements. This was a bit of an experiment but it seemed to work reasonably well. I kept the colours minimal in the image so that it looks a bit more subtle.
The card base was embossed using the Cuttlebug and a Nellie Snellen scalloped oval die. I really like the way it has turned out with the raised bits on the outside of the card.
I added a white layer by cutting a slightly smaller scalloped oval die from the same set. I layered the cut out angel using foam pads to give some depth.
The greeting was stamped onto a die cut oval and the ribbon tags added. The greeting stamp is from Gina K.
To finish the card off, I stamped corner flourishes in each corner and embossed with gold EP.
Do join us over at PCW this week for the final challenge in the Fall series. Next week the fun really begins with the 25 Days Christmas and Year Round Crafting Showcase with new digi and cutting files each day and some wonderful projects created by the superb design team.
I chose to go with red today and used the lovely angel digi stamp to create my topper for the card.
I coloured the image using Photoshop Elements. This was a bit of an experiment but it seemed to work reasonably well. I kept the colours minimal in the image so that it looks a bit more subtle.
The card base was embossed using the Cuttlebug and a Nellie Snellen scalloped oval die. I really like the way it has turned out with the raised bits on the outside of the card.
I added a white layer by cutting a slightly smaller scalloped oval die from the same set. I layered the cut out angel using foam pads to give some depth.
The greeting was stamped onto a die cut oval and the ribbon tags added. The greeting stamp is from Gina K.
To finish the card off, I stamped corner flourishes in each corner and embossed with gold EP.
Do join us over at PCW this week for the final challenge in the Fall series. Next week the fun really begins with the 25 Days Christmas and Year Round Crafting Showcase with new digi and cutting files each day and some wonderful projects created by the superb design team.
Tuesday, August 7, 2012
Black and White Challenge
The challenge this week at Cooking with Cricut and Paper Crafting World is to use black and white and peridot (which is the birthstone for the month of August). Also needed to use a book page somewhere as part of the design.
I cut the oval frame using one of Melin's lovely cutting files available here. I then backed it with an oval of a book page then cut a silhouette to go in the middle using a die.
The background was embossed with the Cuttlebug then the frame attached to it with a peridot coloured ribbon across the bottom, topped off with a double bow.
Please hop on over to the challenge at Cooking with Cricut and see what the other lovelies have done for this week.
I cut the oval frame using one of Melin's lovely cutting files available here. I then backed it with an oval of a book page then cut a silhouette to go in the middle using a die.
The background was embossed with the Cuttlebug then the frame attached to it with a peridot coloured ribbon across the bottom, topped off with a double bow.
Please hop on over to the challenge at Cooking with Cricut and see what the other lovelies have done for this week.
Wednesday, June 6, 2012
PCW Challenge - Wedding theme
The theme for the challenge over at Paper Crafting World this week is Weddings! And wow - this also coincides with my 200th post on my blog!
I found this neat cutting file created by Melin here. I cut the card from white cardstock then cut the layers from pink bazzil cardstock. The decorations on the cake were cut from a deeper shade of pink and I added Kindi glitz to make them sparkle before I attached them to the cake!
I added some pearl strips from Kaiser across the middle layer of the cake to add some extra dimension.
The base of the cake has been embossed with silver embossing powder - I did it a couple of times to add some extra shine. I then added some silver peel-off strips across the very bottom of the base.
The sentiment stamp is from Montarga and I stamped it then cut the fancy tag using a spellbinders die in my Cuttlebug.
Check out some of the other great samples from the rest of the DT over at Cooking With Cricut.
I found this neat cutting file created by Melin here. I cut the card from white cardstock then cut the layers from pink bazzil cardstock. The decorations on the cake were cut from a deeper shade of pink and I added Kindi glitz to make them sparkle before I attached them to the cake!
I added some pearl strips from Kaiser across the middle layer of the cake to add some extra dimension.
The base of the cake has been embossed with silver embossing powder - I did it a couple of times to add some extra shine. I then added some silver peel-off strips across the very bottom of the base.
The sentiment stamp is from Montarga and I stamped it then cut the fancy tag using a spellbinders die in my Cuttlebug.
Check out some of the other great samples from the rest of the DT over at Cooking With Cricut.
Wednesday, May 9, 2012
PCW Mothers Day Challenge Reminder
This is a little reminder post for the PCW Mother's Day Challenge that is currently running here.
For this card, I made a side-opening base card and layered it with white cardstock that I embossed with the Swiss Dots folder in the Cuttlebug and made a fancy edge with scissors. I wrapped this with a fancy ribbon and attached to the card base.
The image is the Cristel Bear holding flowers digi image from Paper Crafting World and I coloured her using copic markers.
The sentiment is stamped on cardstock then cut and embossed using a Spellbinders Labels die using Vintage Photo Distress ink, which I also used around the edge of the die cut before removing it from the die. I layered this on a larger labels die cut and embossed from a bronze coloured cardstock.
The sentiment stamp is by Montarga.
Please go over to the Challenge to see some of the beautiful cards that our other DT members have made.
For this card, I made a side-opening base card and layered it with white cardstock that I embossed with the Swiss Dots folder in the Cuttlebug and made a fancy edge with scissors. I wrapped this with a fancy ribbon and attached to the card base.
The image is the Cristel Bear holding flowers digi image from Paper Crafting World and I coloured her using copic markers.
The sentiment is stamped on cardstock then cut and embossed using a Spellbinders Labels die using Vintage Photo Distress ink, which I also used around the edge of the die cut before removing it from the die. I layered this on a larger labels die cut and embossed from a bronze coloured cardstock.
The sentiment stamp is by Montarga.
Please go over to the Challenge to see some of the beautiful cards that our other DT members have made.
Wednesday, March 7, 2012
Terrific Tuesday Die Cut or Stamp Challenge
I have just heard that I have been selected for the Design Team for the Terrific Tuesday Die Cut or Stamp Challenge over at Paper Crafting World . Very exciting news as it is my first DT role, so I am looking forward to the next few months as I join the team and create for Melin and the other very talented designers.
The theme for the first challenge is Dr Seuss and Melin created a set of wonderful Dr Seuss cutting files and digi stamps to celebrate!
I chose to make a mobile using several of the characters from the cutting file set - Cat with Hat, which will be available from the website here.
Given that this project was going to be hanging, I needed to cut twice as many of each file so I could back-to-back them, and the backing parts needed to be flipped so they were a mirror image. Thank goodness for SCAL2 - I managed to cut everything in no time at all using my Cricut Expression!
The frame for this was also part of the set. I cut the book pieces out at 2.5 inches and the frame at 5". For all of the pieces in the mobile, I made one side first, then attached the pieces for the other side, sandwiching a long piece of thread that would be used to link all the pieces together.
The Cat in the Hat was the most challenging part to put together, but after two of them, the next 2 went together very quickly. I was very impressed at how well the little details like the whiskers cut out too.
I inked the edges of all the pieces with distress ink or Versamagic Chalk ink (cloud white) before putting them together. This provides a little dimension for each one
I liked the Fish out of Water and used another of the frames in the set to border this with. Again, the edges were all inked with distress ink and I added little features like the mouth with a black pen.
The trees were fun to do. I welded the three trees together then cut a base to which I added the tree trunks and the tops. I embossed the red and orange tree tops using the swiss dots folder and the Cuttlebug, which added another dimension to the trees.
I linked the pieces together using the thread that I had added as I put the pieces together and tied them to some bamboo skewers. Taking a photo of this project was the most challenging thing to do as it keeps moving when you hang it up!
Green Eggs and Ham
For this card, I used the digi stamp from PCW - Sam Bear and coloured it using Copic Markers (R14, R17, E25,G05,G07, Y17). I then cut out the image as I wanted to layer it using some dimension.
To make the easel card, I used a piece of A5 blue cardstock, folded to create the easel. Added a die cut label which was distressed using Faded Jeans Distress ink and printed the excerpt from Green Eggs and Ham by Dr Suess. The sentiment was also printed using the same font and attached underneath the image.
The book shape used to stand the easel on, was cut from the Cat with Hat cutting file set and layered on the inner part of the card.
The theme for the first challenge is Dr Seuss and Melin created a set of wonderful Dr Seuss cutting files and digi stamps to celebrate!
I chose to make a mobile using several of the characters from the cutting file set - Cat with Hat, which will be available from the website here.
Given that this project was going to be hanging, I needed to cut twice as many of each file so I could back-to-back them, and the backing parts needed to be flipped so they were a mirror image. Thank goodness for SCAL2 - I managed to cut everything in no time at all using my Cricut Expression!
The frame for this was also part of the set. I cut the book pieces out at 2.5 inches and the frame at 5". For all of the pieces in the mobile, I made one side first, then attached the pieces for the other side, sandwiching a long piece of thread that would be used to link all the pieces together.
The Cat in the Hat was the most challenging part to put together, but after two of them, the next 2 went together very quickly. I was very impressed at how well the little details like the whiskers cut out too.
I inked the edges of all the pieces with distress ink or Versamagic Chalk ink (cloud white) before putting them together. This provides a little dimension for each one
I liked the Fish out of Water and used another of the frames in the set to border this with. Again, the edges were all inked with distress ink and I added little features like the mouth with a black pen.
The trees were fun to do. I welded the three trees together then cut a base to which I added the tree trunks and the tops. I embossed the red and orange tree tops using the swiss dots folder and the Cuttlebug, which added another dimension to the trees.
I linked the pieces together using the thread that I had added as I put the pieces together and tied them to some bamboo skewers. Taking a photo of this project was the most challenging thing to do as it keeps moving when you hang it up!
Green Eggs and Ham
For this card, I used the digi stamp from PCW - Sam Bear and coloured it using Copic Markers (R14, R17, E25,G05,G07, Y17). I then cut out the image as I wanted to layer it using some dimension.
To make the easel card, I used a piece of A5 blue cardstock, folded to create the easel. Added a die cut label which was distressed using Faded Jeans Distress ink and printed the excerpt from Green Eggs and Ham by Dr Suess. The sentiment was also printed using the same font and attached underneath the image.
The book shape used to stand the easel on, was cut from the Cat with Hat cutting file set and layered on the inner part of the card.
Monday, February 27, 2012
More fun stuff from SVG Cuts!
Mary and Leo from SVG Cuts released another new set at the weekend. This is is an Easter set and I just had to have it! I just love the Easter Egg boxes in the set - so much that I bought the files on Sunday morning and by the afternoon had made two of them!
They are so cute - the top comes off and you can put goodies into the bottom...
The files were all cut using the Cricut and SCAL2. For the first one, I used plain card for some of the top layers and embossed it with the Swiss Dots folder in the Cuttlebug.
I added a silver coloured brad to the top of the egg to cover the little hole where the segments all join up.
I also made the little pedestal table in the set and this is what the eggs are sitting on.
For this egg, I used different papers for the top layers, alternating them around the egg shape.
I added some narrow ribbon to four of the segments and put a little pale blue pearl on the top of the lid part.
I can see that I will have to make some more of these - they are so easy and so cute!
Thanks Mary for the brilliant designs!
They are so cute - the top comes off and you can put goodies into the bottom...
The files were all cut using the Cricut and SCAL2. For the first one, I used plain card for some of the top layers and embossed it with the Swiss Dots folder in the Cuttlebug.
I added a silver coloured brad to the top of the egg to cover the little hole where the segments all join up.
I also made the little pedestal table in the set and this is what the eggs are sitting on.
For this egg, I used different papers for the top layers, alternating them around the egg shape.
I added some narrow ribbon to four of the segments and put a little pale blue pearl on the top of the lid part.
I can see that I will have to make some more of these - they are so easy and so cute!
Thanks Mary for the brilliant designs!
Sunday, January 22, 2012
Congratulations!
I had to make a card for a couple who have just become engaged, and this colour scheme seemed to be right for the couple.
I cut all layers out using Spellbinders Nestablilities, except for the sentiment.
I ran the top layer through the Cuttlebug with the Swiss Dots folder and added a ribbon to the top 2 layers.
I stamped the sentiment onto the same card as the base card and layered it onto the brown.
A simple, but quite effective layout.
Entering this in the Craft Room Challenge this week, as the theme is Clean and Simple!
I cut all layers out using Spellbinders Nestablilities, except for the sentiment.
I ran the top layer through the Cuttlebug with the Swiss Dots folder and added a ribbon to the top 2 layers.
I stamped the sentiment onto the same card as the base card and layered it onto the brown.
A simple, but quite effective layout.
Entering this in the Craft Room Challenge this week, as the theme is Clean and Simple!
Friday, July 15, 2011
Using my Tanda Stamps
I was having a play with some of my Tanda stamps a while ago when I bought a lovely white chalk inkpad. I hadn't used this stamp from the Retro Men Set 1 before and I wanted to try it out with the white on black card. Was quite pleased with the result.
The oval was embossed onto the card using the silicon mat and B plates through the Cuttlebug. The tag is one of the Spellbinders Grommet tags.
The sentiment stamp is from Montarga. I added some little corner peeloffs just to finish it off.
When I had finished this one, I decided to try the same stamp using black on white card.
I cut the ovals using the oval nestabilities. The swirly ends are made from one of the fancy tags (Spellbinders) which I cut in half and attached at the ends of the ovals.
The background layer was run through the Cuttlebug using the Swiss dots folder (which is starting to get a little worn across the fold from all the use it is getting!). Added a black spotted ribbon across the centre.
I thought about adding a sentiment but couldn't decide where it should go so left it off. This way the card could be used as a wedding card or an anniversary card.
The oval was embossed onto the card using the silicon mat and B plates through the Cuttlebug. The tag is one of the Spellbinders Grommet tags.
The sentiment stamp is from Montarga. I added some little corner peeloffs just to finish it off.
When I had finished this one, I decided to try the same stamp using black on white card.
I cut the ovals using the oval nestabilities. The swirly ends are made from one of the fancy tags (Spellbinders) which I cut in half and attached at the ends of the ovals.
The background layer was run through the Cuttlebug using the Swiss dots folder (which is starting to get a little worn across the fold from all the use it is getting!). Added a black spotted ribbon across the centre.
I thought about adding a sentiment but couldn't decide where it should go so left it off. This way the card could be used as a wedding card or an anniversary card.
Friday, July 8, 2011
Experiments
Over the last week or so, I have been experimenting with some different ideas.
This card is made from acetate that was folded then embossed using a textiles folder in the Cuttlebug.
The flower is a Montarga stamp that I coloured using my Copic markers. (They have been having a rest lately!) The shapes for the front of the card were cut with the Cricut. I added some pearl dots at the top of the frame to add a little something!
The sentiment was stamped on a Spelbinders Tag die then attached with foam dots to the bottom of the frame.
The card was finished off with a narrow red ribbon that I attached to the inside of the card with DS tape then covered it with the ribbon on the outside.
This card I made after watching a neat video from stampTV on double embossing.
The blue layer on the left side of the card was embossed with the Alterations Gridlock folder. I then brayered Versamark ink on the top of the embossing and added clear embossing powder. After heating, it came up with the really cool pattern. It really makes the embossing stand out.
Added some paper from my stash to the other side of the card, a black ribbon down the centre and topped it with one of my favourite gentleman stamps from Hero Arts. The Happy Birthday stamp is from Montarga.
I like this technique and will try it out on more cards over the next few weeks.
This card is made from acetate that was folded then embossed using a textiles folder in the Cuttlebug.
The flower is a Montarga stamp that I coloured using my Copic markers. (They have been having a rest lately!) The shapes for the front of the card were cut with the Cricut. I added some pearl dots at the top of the frame to add a little something!
The sentiment was stamped on a Spelbinders Tag die then attached with foam dots to the bottom of the frame.
The card was finished off with a narrow red ribbon that I attached to the inside of the card with DS tape then covered it with the ribbon on the outside.
This card I made after watching a neat video from stampTV on double embossing.
The blue layer on the left side of the card was embossed with the Alterations Gridlock folder. I then brayered Versamark ink on the top of the embossing and added clear embossing powder. After heating, it came up with the really cool pattern. It really makes the embossing stand out.
Added some paper from my stash to the other side of the card, a black ribbon down the centre and topped it with one of my favourite gentleman stamps from Hero Arts. The Happy Birthday stamp is from Montarga.
I like this technique and will try it out on more cards over the next few weeks.
Baby Boy
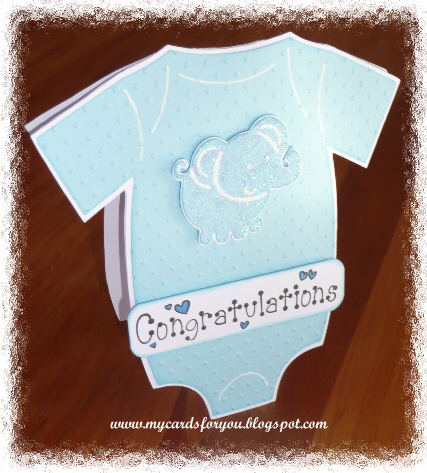
One of my daughter's friends had a baby boy recently and because my daughter does not knit or anything, she asked me to make some booties. I knitted some cute little blue booties and made this card to go with them.
I used the onesie file from the New Arrivals Cartridge to make the card base on my cricut. I used Design Studio to weld the shadow file together at the shoulders, then cut that and the topper. I ran the top layer through the Cuttlebug Swiss Dots folder to give it some texture and highlighted the seams with a white pen. The elephant was also cut from the same cartridge and layered. I used Kindiglitz on the elephant to make him sparkle a bit. The sentiment is from a baby stamp set that I have had for ages. I coloured the hearts with a blue glitter pen.
Welcome Lukas! Hope Ali and Vicki are enjoying their new addition to the family!
CAS-ual Fridays challenge this week is a shaped card - this fits the bill I think!
I used the onesie file from the New Arrivals Cartridge to make the card base on my cricut. I used Design Studio to weld the shadow file together at the shoulders, then cut that and the topper. I ran the top layer through the Cuttlebug Swiss Dots folder to give it some texture and highlighted the seams with a white pen. The elephant was also cut from the same cartridge and layered. I used Kindiglitz on the elephant to make him sparkle a bit. The sentiment is from a baby stamp set that I have had for ages. I coloured the hearts with a blue glitter pen.
Welcome Lukas! Hope Ali and Vicki are enjoying their new addition to the family!
CAS-ual Fridays challenge this week is a shaped card - this fits the bill I think!
Wednesday, June 29, 2011
Peony Cottage
SVG Cuts came out with this gorgeous little cottage (designed by Mary Rudakas) recently and I loved it when I saw it - so I bought the file. Had it sitting on my computer for a few weeks then decided to do something with it - and here it is!
Using my Cricut Expression, I cut the base cottage from kraft card to make it reasonably strong. The wall coverings were cut from paper that I had in my stash for so long - I can't remember where it came from even!! The roof is cut from dark green Bazzil card and the tiles were embossed with the Swiss Dots folder in the Cuttlebug. I embossed the roof facing with the D'vine Swirls folder.
I wanted to add a fence to the house so I found a file on my Songbird cartridge that had a fence with a bird on it. I welded three together and cut them out with the Cricut then removed the birds from the fence. I cut from the same cartridge a sign with a bird on top and inserted the word HOME using George and Basic Shapes.
I coloured the fence with Distress Stain (Vintage Photo) then attached the leaves and flowers to the fence instead of the house - as it was in the original house.
All it needs is lace curtains to finish it off!!
Thanks Mary and Leo for this great design!
Using my Cricut Expression, I cut the base cottage from kraft card to make it reasonably strong. The wall coverings were cut from paper that I had in my stash for so long - I can't remember where it came from even!! The roof is cut from dark green Bazzil card and the tiles were embossed with the Swiss Dots folder in the Cuttlebug. I embossed the roof facing with the D'vine Swirls folder.
I wanted to add a fence to the house so I found a file on my Songbird cartridge that had a fence with a bird on it. I welded three together and cut them out with the Cricut then removed the birds from the fence. I cut from the same cartridge a sign with a bird on top and inserted the word HOME using George and Basic Shapes.
I coloured the fence with Distress Stain (Vintage Photo) then attached the leaves and flowers to the fence instead of the house - as it was in the original house.
All it needs is lace curtains to finish it off!!
Thanks Mary and Leo for this great design!
Tuesday, May 31, 2011
Trying things out!
The ATC swap for the NZ Crafters Group on Card Making World is nearly at the end of the alphabet. This W ATC used the cover stamp from Craft Stamper a couple of months ago for the clock and the sentiment. Stamped and embossed the clock then cut it out. The wings are vellum, cut with a TH alterations die then cuttlebugged with swiss dots folder. I coloured the wings with Pink Pearlescence Brilliance ink and layered them on the back of the clock. The background was coloured with spun sugar, tattered rose and weathered wood distress inks then stamped with a wee cogs stamp from Zoe.
I cut the card for this side opening card from an A4 sheet - one piece makes 2 cards when cut in half down the long side. I used a strip folder to create the dotty strips down each side of the front then embossed a line along the edge of the embossed strip to "hide" the mark left by the folder. I embossed a 5cm strip with the Victorian folder and coloured it with tattered rose distress ink, then attached it to a wine-coloured layer before attaching to the card. I used the same distress ink on the Spellbinders tag and stamped it with a sentiment from Hero Arts. The same set had a lovely flowers stamp and I used that for the central image which I then cut with a scalloped circle die and edged with distress ink. Layered that on the same wine-coloured paper. The butterfly stamp is also from the same Hero Arts set.
I tried the same strip embossing technique with this card too. I really like the embossed look on the white card.
The stamp is from the same Hero Arts set that I used in the previous card. I used Tombow markers to colour the stamp and used Sue Law's dotty stamp for the background to the image. Layered on black scalloped circle and attached a bow made with my bow maker the the lovely DH made for me! The same sentiment was used on this card.
I cut the card for this side opening card from an A4 sheet - one piece makes 2 cards when cut in half down the long side. I used a strip folder to create the dotty strips down each side of the front then embossed a line along the edge of the embossed strip to "hide" the mark left by the folder. I embossed a 5cm strip with the Victorian folder and coloured it with tattered rose distress ink, then attached it to a wine-coloured layer before attaching to the card. I used the same distress ink on the Spellbinders tag and stamped it with a sentiment from Hero Arts. The same set had a lovely flowers stamp and I used that for the central image which I then cut with a scalloped circle die and edged with distress ink. Layered that on the same wine-coloured paper. The butterfly stamp is also from the same Hero Arts set.
I tried the same strip embossing technique with this card too. I really like the embossed look on the white card.The stamp is from the same Hero Arts set that I used in the previous card. I used Tombow markers to colour the stamp and used Sue Law's dotty stamp for the background to the image. Layered on black scalloped circle and attached a bow made with my bow maker the the lovely DH made for me! The same sentiment was used on this card.
Saturday, May 14, 2011
Motivated to create!
After attending a great workshop hosted by Sanzi in Auckland, I felt motivated to create again and after popping into a few of the forums and blogs I haven't been looking at lately, found some more inspiration.
This card was motivated by the Card Patterns Sketch 114. The die cuts were from the new Spellbinders dies I bought while in Auckland and the flower is from the stash that was in the goodie bag from the workshop.
I ran the red trim through the swiss dots folder on the Cuttlebug, stamped the flower with a word stamp and added a large crystal that I coloured with alcohol ink and covered with kindiglitz. The sentiment is from a Hero Arts set.
This is the stash I got in the goodie bag. It included 2 Cricut Lite cartridges as well as a large pack of paper and card. I also won a Cricut Tool set and a magazine.
At the workshop, Sanzi had a large number of accessories for sale and I bought several Spellbinders Die sets as well as some Tim Holtz Alterations dies. Altogether a very nice amount of stuff to bring home and play with!
These are some of the things we did at the workshop. It includes cards made with:
It was a very well organised workshop and the presenters were amazing! Thanks Sanzi!
This card was motivated by the Card Patterns Sketch 114. The die cuts were from the new Spellbinders dies I bought while in Auckland and the flower is from the stash that was in the goodie bag from the workshop.
I ran the red trim through the swiss dots folder on the Cuttlebug, stamped the flower with a word stamp and added a large crystal that I coloured with alcohol ink and covered with kindiglitz. The sentiment is from a Hero Arts set.
![]() |
| Goodie Bag stash |
This is the stash I got in the goodie bag. It included 2 Cricut Lite cartridges as well as a large pack of paper and card. I also won a Cricut Tool set and a magazine.
![]() | |
| This is the stash I bought |
At the workshop, Sanzi had a large number of accessories for sale and I bought several Spellbinders Die sets as well as some Tim Holtz Alterations dies. Altogether a very nice amount of stuff to bring home and play with!
These are some of the things we did at the workshop. It includes cards made with:
- acetate,
- printed papers done on the Cricut Imagine
- pop- up cut with a die
- die cut card (grand spellbinders die)
- cut-outs using the Cricut Gypsy
- Cuttlebug embossing folders and inks.
It was a very well organised workshop and the presenters were amazing! Thanks Sanzi!
Wednesday, April 6, 2011
Crafty Girls Samples
Last week, we had a crafty girls get together and we did some wax resist and inked toppers for cards.
I saw the technique on Gina K's Stamp TV a couple of weeks ago and loved the idea, so thought we could have a play with it.This card was made with a digital stamp from Background Fairy. A piece of wax paper was embossed using an oriental lantern folder then laid on top of the image and pressed between newsprint with a hot iron. Distress ink applied over the wax resist image then cut with a nestie and layered on another card also cut with a nestie and embossed with the CB. The sentiment (from Tanda) was stamped then cut with a Spellbinders die.
Birthday card made using the wax resist technique. The backing layer was embossed with the same folder as that used to emboss the wax paper.
I am loving this technique.
It can produce some very interesting results.
I saw the technique on Gina K's Stamp TV a couple of weeks ago and loved the idea, so thought we could have a play with it.This card was made with a digital stamp from Background Fairy. A piece of wax paper was embossed using an oriental lantern folder then laid on top of the image and pressed between newsprint with a hot iron. Distress ink applied over the wax resist image then cut with a nestie and layered on another card also cut with a nestie and embossed with the CB. The sentiment (from Tanda) was stamped then cut with a Spellbinders die.
Birthday card made using the wax resist technique. The backing layer was embossed with the same folder as that used to emboss the wax paper.
![]() |
| Close up of image on birthday card showing the resist. |
I am loving this technique.
It can produce some very interesting results.
Monday, January 31, 2011
Friends
Friends need to be valued! Our theme for the CMW Monthly Challenge for February is Friendship/Love with a red and black colour scheme.
I made the embellishments for this card using my Cricut. The heart image was from the Make the Cut Gallery. I cut the red layer, then made a shadow for the bottom layer then off-centred the layers when I put them together to show a narrow band of black beneath the heart. I used Kindiglitz to highlight the swirls cut from the heart. The key was from SCAL and I added the word to it, welding it so that it cut together with the key. I added a shadow layer for the key as well.
The base card is white and I added a black layer then overlaid a red layer, half of the rectangle cut on the diagonal with fancy scissors. I then ran it through the Cuttlebug with the Swiss dots folder. The ribbon was added just below the edge of the top layer. To finish, I added some bling to the top right corner.
The second card was made from a black base to which I added a red layer, run through the Cuttlebug (Swiss Dots again!) and overlaid with a black spotted ribbon.
The image is from Montarga, stamped with Versafine Black ink. I cut the image with a Nestabilities die, embossed it then inked the edges with weathered wood distress ink while it was still in the die cutter. This produced a nice clean edge to the image which stands out against the black background.
I used the same technique with the die cut for the sentiment. The sentiment tag was attached with square brads.
I made the embellishments for this card using my Cricut. The heart image was from the Make the Cut Gallery. I cut the red layer, then made a shadow for the bottom layer then off-centred the layers when I put them together to show a narrow band of black beneath the heart. I used Kindiglitz to highlight the swirls cut from the heart. The key was from SCAL and I added the word to it, welding it so that it cut together with the key. I added a shadow layer for the key as well.
The base card is white and I added a black layer then overlaid a red layer, half of the rectangle cut on the diagonal with fancy scissors. I then ran it through the Cuttlebug with the Swiss dots folder. The ribbon was added just below the edge of the top layer. To finish, I added some bling to the top right corner.
The second card was made from a black base to which I added a red layer, run through the Cuttlebug (Swiss Dots again!) and overlaid with a black spotted ribbon.
The image is from Montarga, stamped with Versafine Black ink. I cut the image with a Nestabilities die, embossed it then inked the edges with weathered wood distress ink while it was still in the die cutter. This produced a nice clean edge to the image which stands out against the black background.
I used the same technique with the die cut for the sentiment. The sentiment tag was attached with square brads.
Tuesday, December 14, 2010
Happy Birthday Series
I was playing round with my Cuttlebug and a Happy Birthday folder last week. I had embossed a number of pieces of card in different colours and decided to do something with them. I came up with these 6 cards, all of which follow the same basic layout, but with different colours and embellishments. I used Copic markers to colour the images.
Find more photos like this on Card Making World
Enjoy!
Find more photos like this on Card Making World
Enjoy!
Thursday, December 2, 2010
Monthly Challenge for December
Over at Card Making World, we are having a monthly challenge. This month the theme is A Christmas Carol and cards entered must reflect a Christmas Carol in some way.
My first sample card for the challenge was based on the carol, O Little Town of Bethlehem. I copied the music for the carol and reduced it to fit on the card. Then I distressed it using the wrinkle method and coloured it with antique linen DI. I then spritzed it with gold perfect pearls and water in a mister. It I also inked the torn edges of the paper. The stamped image is by Montarga which I embossed with gold and added gold beads to the bottom of it to make it look a bit like sand! I stamped and embossed the image twice and cut some of the buildings out, which I added to the image to give a bit of depth. The sentiment is from a Hero Arts Christmas set. Finished it off with some blue and gold ribbon across the card and gold star brads in the corners.
The second card was made using a Nestabilities die set. I folded the base card the cut it with the largest die, leaving a bit of the die over the folded edge to create a fold.
I cut another single layer the same size to add to the base card, then embossed it in the Cuttlebug. I cut two other layers, one in the same colour and another in silver to provide layers. On the smallest one, I stamped the Partridge in a Pear Tree stamp (again from Montarga) and embossed it with silver. I stitched round the silver layer with the sewing machine (no thread) to provide a little bit more detail. A Christmas greeting is stamped inside the card.
Thanks for looking!
My first sample card for the challenge was based on the carol, O Little Town of Bethlehem. I copied the music for the carol and reduced it to fit on the card. Then I distressed it using the wrinkle method and coloured it with antique linen DI. I then spritzed it with gold perfect pearls and water in a mister. It I also inked the torn edges of the paper. The stamped image is by Montarga which I embossed with gold and added gold beads to the bottom of it to make it look a bit like sand! I stamped and embossed the image twice and cut some of the buildings out, which I added to the image to give a bit of depth. The sentiment is from a Hero Arts Christmas set. Finished it off with some blue and gold ribbon across the card and gold star brads in the corners.
The second card was made using a Nestabilities die set. I folded the base card the cut it with the largest die, leaving a bit of the die over the folded edge to create a fold.
I cut another single layer the same size to add to the base card, then embossed it in the Cuttlebug. I cut two other layers, one in the same colour and another in silver to provide layers. On the smallest one, I stamped the Partridge in a Pear Tree stamp (again from Montarga) and embossed it with silver. I stitched round the silver layer with the sewing machine (no thread) to provide a little bit more detail. A Christmas greeting is stamped inside the card.
Thanks for looking!
Friday, August 27, 2010
Pop up Box Card
Well, after much promising, here is the next video! This time is is a pop up box card! I loved these when I first saw them and have been making a few. I did a demonstration for the Crafty Girls last month and decided it would be useful to have a video along with the written instructions that I gave them.
Hope you can follow this well enough to make the card.
You can also add a plain piece of card to the part that pops up if you want to add a special message, or you can write it on the box itself.
PS Yes Didi the cat made her first appearance on this one too! She was very vocal while I was making the video.
Hope you can follow this well enough to make the card.
You can also add a plain piece of card to the part that pops up if you want to add a special message, or you can write it on the box itself.
PS Yes Didi the cat made her first appearance on this one too! She was very vocal while I was making the video.
Subscribe to:
Posts (Atom)