Showing posts with label canvas. Show all posts

Sunday, July 12, 2015

Happy Anniversary

Last week my son and daughter-in-law celebrated their wedding anniversary.
I thought I would have a go at using the Regal font to make a canvas for them 

I used Design Space to split the capital B and added the name in the centre. Their names and the date of their wedding were added below the split letter.

I cut it out in white vinyl and applied it to a canvas (8"x10") that I had painted black.

Thursday, August 2, 2012

Mixed Media

After taking the class with Tim Holtz a month or so ago, I decided to do some more canvas and mixed media projects.

This is one of the two that I did in one week. I covered the canvas with stamped tissue then coloured it with distress stain and distress ink. I used one of Tim's background stamps with barn door DI on the background after distressing, then added the various items to fit the sewing theme.


This large cotton reel is actually made from card, using a file from the SVGCuts Sew Crafty kit. I added distress ink to the edges of the 'cotton reel' - top and bottom then wound it with wool to simulate the cotton on the reel. I added lots of buttons, some large pins, a ribbon bow and some flowers to finish it off.

The cotton reel is actually a box - the top lifts off to reveal a container to store little bits and pieces in! It actually stands about 5" tall and would be great for keeping all thos offcuts of ribbons that I seem to accumulate!

I am going to enter both of these into the Craft Room Challenge this week as the theme there is buttons and bows.

Friday, July 13, 2012

Wall Hanging

Yesterday I was clearing up my desk and found 4 little canvas' that I had prepared for making something with, so decided I had better do something about them!

Since going to the class with Tim Holtz in Sydney, I have been thinking about other projects along similar lines so decided this would be a good use for these panels.

I didn't have any tissue paper that was printed (as we used in the Fanciful Flight project) so I found some tissue that I could stamp onto. I used several different TH stamps to provide nice backgrounds and attached them to the canvas panels using glue stick. Then I edged them with vintage photo distress ink to give them a slightly grungy look.

I stamped the sentiment onto a glossy card then gave it a background wash with tea bag distress marker then broken china. It does not show up much in the picture, but I wanted subtle colour here. I then took a tab holder and coloured it with vintage photo and walnut stain DI before adding a light layer of rock candy distress crackle paint. This gives a nice rusty look. Added the sentiment to the frame then attached to the canvas. Added ART beads that I coloured using Copic marker, then a fancy button.


I die cut the heart and wings then painted the wings with picket fence crackle paint and edged with vintage photo DI. The heart was done using the faux enamel and tied with some jute twine. Added some colour to the background using distress ink and sequin waste as a mask. Pleated some tissue tape and attached that then added a mini bottle top that I had embellished with a tiny clock face and glossy accents.


I stamped the butterflies onto glossy card then added a wash of spiced marmalade. Tore the edges then attached with a piece of filmstrip tape at the top. Added two tiny washers and a pen nib that I coloured using alcohol inks.


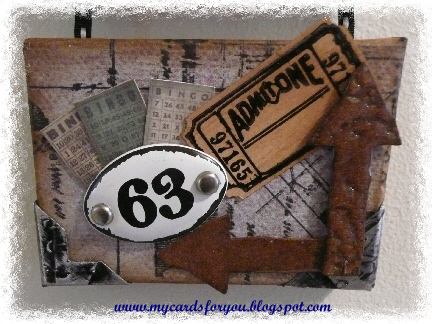
For the final panel, I cut some tiny BINGO card pictures from TH paper, attached then behind the number plaque that I fixed on with Glossy Accents and the two brads. Added a tiny ticket and two arrows die cut then inked and embossed.

The corners were made from metal foil attached to cardstock, embossed with found items then inked with black alcohol ink and sanded down before punching with a MS photo corner punch.

I really enjoyed making this.

Thursday, February 2, 2012

February already!

Time does fly - already it is the second month of the year!

Time was the theme for the Monthly Challenge over at Card Making World and Carol and I (the DT) each made a couple of items as samples for the challange.


This card was inspired by the sentiment - Great things take Time! The background was stamped with white chalk ink onto the black card using a damask-type background stamp - reminiscent of old fashioned wall coverings and curtains.
The images on the top layer include a da Vinci pencil sketch stamped onto a page from a novel and a leaning tower stamped onto a piece of music - all of these things relating to the fact that it takes time to write a novel, do a painting, write a piece of music or build a famous landmark.
The text was printed onto card, then the label (from Gina K) stamped over the text and cut out using a Nestabilities die. The colour was introduced by smooching Antique Linen Distress Ink onto the card.


Just to be a little different this month, rather than another card, this is a canvas inspired by time!
The clock, gear wheels and wings were all cut using Tim Holtz Alterations Dies. The clock was given a weathered look by colouring with Vintage Photo Distress Ink then given a coating of Rock Candy Crackle paint. A face image was stamped on the inside part of the clock and inserted into the clock face.
The wings were coloured with Fired Brick Distress Stain then sprayed with a red/gold spray. They were then attached to the back of a clock face.
The gears were painted using a copper paint dabber then a gold one to give some texture and depth of colour. The gold was also used to colour the metal corner pieces.
The word was made from clear letter pieces attached to black card using Glossy Accents and edged with gold paint.All were attached to a canvas board which had been painted black and old music paper layered on top.
Entered this in the Tanda Teaser this week and in the Try it on Tuesday challenge!