This month, Paper Crafting World is having an Anything Goes challenge with Red as a theme. So all you need to do to enter is to make up one of the many gorgeous files available at PCW and use red as one of the featured colours!
My DT entry for this month is a red poinsettia. The file is available here and is very easy to cut with any machine that uses svg files.
I made this poinsettia into a brooch as our singing group needed something a little different for our Christmas entertainments over the next two months and I volunteered to make these brooches for everyone.
I cut the file at 4" wide and it is just under 4" in height. I used a variety of cardstock to get the colours I wanted. When I had cut the layers, I embossed the red layers using the swiss dots folder in my Cuttlebug to give some added texture. I then shaped the petals using a pair of scissors to curve them gently so they give a more 3D look.
I added Kindiglitz to the yellow inner piece to provide some added sparkle and glued the pieces together in the centre and added them to the leaf layer.
To finish the brooch off, I added a brooch clip to the back using hot glue. I think it works well as a decorative brooch for us all to wear!
Pop over to PCW to check out the challange and the wonderful files that are available there.
Thanks for looking at my blog again!
Over the last few years, my interests have changed a little. I have developed an interest in patchwork and quilt making which seems to have overtaken my interest in card making! I still make cards, but not as much as I used to. Hence the change name for this blog.
Showing posts with label PCW challenge. Show all posts
Tuesday, November 3, 2015
Sunday, September 20, 2015
Another beautiful Card from PCW
This week, my contribution to the DT and Anything Goes Challenge is another lovely card cutting file from Paper Crafting World.
This cutting file - Card Flourished Edge 4215 CF - is available from PCW here. The detail in the card is quite amazing and it cut very well on my Cricut Explore. The tent fold card base (in white) is shaped as well as the top layers. The coloured layers and flowers on the card were cut in Hollyhock card from Close to my Heart. There is a total of five layers on the front of the card, including the stamped layer.
The cutting file for the flowers is included with the card file and they are the perfect size for this card which measures 4.5" by 5.75". I added the leaves from a Cricut cartridge - Outdoor Man - to add some additional colour to the card.
The stamp is from a CTMH set - Wavy Blooms (D1651) and was stamped with Slate Exclusive Ink, also from CTMH.
We do hope you will join us for the Anything Goes (with the optional twist to use a stamp) challenge this month. You can add up to 3 entries, which must use files from Paper Crafting World.
Materials Used:
Close to My Heart Cardstock in White Daisy and Hollyhock
Scrap of green for leaves
CTMH stamp set D1651 - Wavy Blooms
CTMH Exclusive Ink - Slate
Close to My Heart items can be purchased from Melin's CTMH shop if you are in the USA or, if you are in New Zealand, from Janet's CTMH on-line shop.
This cutting file - Card Flourished Edge 4215 CF - is available from PCW here. The detail in the card is quite amazing and it cut very well on my Cricut Explore. The tent fold card base (in white) is shaped as well as the top layers. The coloured layers and flowers on the card were cut in Hollyhock card from Close to my Heart. There is a total of five layers on the front of the card, including the stamped layer.
The cutting file for the flowers is included with the card file and they are the perfect size for this card which measures 4.5" by 5.75". I added the leaves from a Cricut cartridge - Outdoor Man - to add some additional colour to the card.
The stamp is from a CTMH set - Wavy Blooms (D1651) and was stamped with Slate Exclusive Ink, also from CTMH.
We do hope you will join us for the Anything Goes (with the optional twist to use a stamp) challenge this month. You can add up to 3 entries, which must use files from Paper Crafting World.
Materials Used:
Close to My Heart Cardstock in White Daisy and Hollyhock
Scrap of green for leaves
CTMH stamp set D1651 - Wavy Blooms
CTMH Exclusive Ink - Slate
Close to My Heart items can be purchased from Melin's CTMH shop if you are in the USA or, if you are in New Zealand, from Janet's CTMH on-line shop.
Saturday, September 12, 2015
Beautiful Card from PCW
Following on from my recent post about re-joining the Design Team for Paper Crafting World, here is my first post for this current design team. It is great to be back
with the team after a break of a couple of years and exciting to be
able to use some of the lovely new cutting files from Paper Crafting
World.
My contribution this week is a card made using the cutting file Card Side Lattice Panel CF
This is a tent fold card which I cut using my Cricut Explore - which cuts svg files beautifully without having to change the size.
I cut all the elements of the card in the cutting file at the size they were uploaded, making a card approximately 5.25" by 5.25". I also cut a square just a little smaller in the Pixie (pink) to attach underneath the front of the card to show off the lattice work.
The flowers were burnished to give them some additional shape and to stand out from the card. I layered the smaller flower on top of the bigger one and attached some black bling to the centre of the flowers.
The label was stamped using Slate Exclusive Ink and a stamp from the Big Hug CTMH stamp set. The layers were glued to each other then attached to the card with foam squares.
We do hope you join us this month for the Anything Goes Challenge with the optional twist to use a stamp in celebration of National Stamping Month.
Materials used:
Close to My Heart cardstock in White Daisy, Pixie and Black
Scrap of green card
Black bling for the flower centres and embellishments
Stamp from CTMH Stamp set D1584 Big Hug
CTMH Exclusive Ink Slate
Close to My Heart items can be purchased from Melin's CTMH shop if you are in the USA or, if you are in New Zealand, from Janet's CTMH on-line shop.
My contribution this week is a card made using the cutting file Card Side Lattice Panel CF
This is a tent fold card which I cut using my Cricut Explore - which cuts svg files beautifully without having to change the size.
I cut all the elements of the card in the cutting file at the size they were uploaded, making a card approximately 5.25" by 5.25". I also cut a square just a little smaller in the Pixie (pink) to attach underneath the front of the card to show off the lattice work.
The flowers were burnished to give them some additional shape and to stand out from the card. I layered the smaller flower on top of the bigger one and attached some black bling to the centre of the flowers.
The label was stamped using Slate Exclusive Ink and a stamp from the Big Hug CTMH stamp set. The layers were glued to each other then attached to the card with foam squares.
We do hope you join us this month for the Anything Goes Challenge with the optional twist to use a stamp in celebration of National Stamping Month.
Materials used:
Close to My Heart cardstock in White Daisy, Pixie and Black
Scrap of green card
Black bling for the flower centres and embellishments
Stamp from CTMH Stamp set D1584 Big Hug
CTMH Exclusive Ink Slate
Close to My Heart items can be purchased from Melin's CTMH shop if you are in the USA or, if you are in New Zealand, from Janet's CTMH on-line shop.
Tuesday, October 30, 2012
Festive and Fun Bingo Terrific Tuesday Challenge
Today's Terrific Tuesday Challenge over at Paper Crafting World is a Festive and Fun Bingo.

The project needs to be done according to a Bingo line.
I chose to do the diagonal line from the top left - Embossing, Die Cut, Ink.
The image I used is the Snowman image from Paper Crafting World. I printed it in colour after adding the Merry Christmas greeting to the bottom.
I used a rectangular die to cut the image out and ined the edges with Weathered Wood Distress ink before removing the card from the die.
The red layer was embossed in the Cuttlebug then layered onto white card. I added some ribbon to these two layers then attached the image layer.
On the base card, I embossed two lines at the top and bottom of the card, then added a strip of gold peel-off in the centre of the double lines.
Please join us this week for this fun challenge and pick up the freebie digi stamp as well.

The project needs to be done according to a Bingo line.
I chose to do the diagonal line from the top left - Embossing, Die Cut, Ink.
The image I used is the Snowman image from Paper Crafting World. I printed it in colour after adding the Merry Christmas greeting to the bottom.
I used a rectangular die to cut the image out and ined the edges with Weathered Wood Distress ink before removing the card from the die.
The red layer was embossed in the Cuttlebug then layered onto white card. I added some ribbon to these two layers then attached the image layer.
On the base card, I embossed two lines at the top and bottom of the card, then added a strip of gold peel-off in the centre of the double lines.
Please join us this week for this fun challenge and pick up the freebie digi stamp as well.
Tuesday, October 23, 2012
PCW Terrific Tuesday Challenge - Candy Treats
It must be getting closer to Halloween because the themes seem to be all about treats at the moment over at the Terrific Tuesday Challenges.
Today's challenge is about Candy Treats - no cards or layouts are to be seen!
For the challenge I used a new cutting file from Melin at Paper Crafting World which is a cute little box with a zig-zag edge and a handle.
I cut the box from a 12" square sheet of cardstock then decorated it with some die cuts from my new Spellbinders lattice set and ribbon on the front and back of the box.
To finish it off, I added some flowers in Autumnal colours made with a Tim Holtz flowers strip die.
In this picture you can see that I made the handle zig zag using an edge punch. It matches the top of the box nicely.
I added a strip of ribbon to the handle as well.
Do go on over to the Paper Crafting World challenge and have a go. See some of the lovely projects that other DT members have done.
Today's challenge is about Candy Treats - no cards or layouts are to be seen!
For the challenge I used a new cutting file from Melin at Paper Crafting World which is a cute little box with a zig-zag edge and a handle.
I cut the box from a 12" square sheet of cardstock then decorated it with some die cuts from my new Spellbinders lattice set and ribbon on the front and back of the box.
To finish it off, I added some flowers in Autumnal colours made with a Tim Holtz flowers strip die.
In this picture you can see that I made the handle zig zag using an edge punch. It matches the top of the box nicely.
I added a strip of ribbon to the handle as well.
Do go on over to the Paper Crafting World challenge and have a go. See some of the lovely projects that other DT members have done.
Tuesday, October 9, 2012
Pink and Sketch Challenge at PCW
This week's challenge is to use the sketch provided for a card or layout and to use the colour pink, in recognition of Breast Cancer Awareness.
I chose to use the card sketch for this challenge.
I used a grey card for the base and added a pink layer that I cut using deckle scissors and edged with London Fog Memento ink.
The focal image is a digi from PCW called Mother's Day Roses and actually came in the pinky sepia tones which worked perfectly. I cut it using a spellbinders deckled die then edged it with Victorian Velvet distress ink while it was still in the die

I die cut 2 white circles and the label for the sentiment and trimmed the sentiment tag to fit the bottom part of the card. The stamp is from a Gina K set and it was stamped with London Fog Memento ink.
I used a pink ribbon and a grey spotted ribbon for the centre of the card.
The finishing touches were the sprigs punched in grey card and the rose at the side of the sentiment.
Hope you enjoy this week's challenge over at PCW!
I chose to use the card sketch for this challenge.
I used a grey card for the base and added a pink layer that I cut using deckle scissors and edged with London Fog Memento ink.
The focal image is a digi from PCW called Mother's Day Roses and actually came in the pinky sepia tones which worked perfectly. I cut it using a spellbinders deckled die then edged it with Victorian Velvet distress ink while it was still in the die

I die cut 2 white circles and the label for the sentiment and trimmed the sentiment tag to fit the bottom part of the card. The stamp is from a Gina K set and it was stamped with London Fog Memento ink.
I used a pink ribbon and a grey spotted ribbon for the centre of the card.
The finishing touches were the sprigs punched in grey card and the rose at the side of the sentiment.
Hope you enjoy this week's challenge over at PCW!
Tuesday, September 18, 2012
It's all about Texture!
Today's PCW Terrific Tuesday challenge is all about texture.
For my DT contribution today, I have chosen the apple box cutting file from PCW to make the base of my textured project.
I cut the apple box base from a 12"x12" piece of Bazzil cardstock along with the top layer of the apples, which I then embossed with the swirly embossing folder and my Cuttlebug.
The stem, leaves and handle were also cut using the file and they were embossed using various folders to give more texture. Aclose up of these is below.
I stamped the sentiment onto cardstock then cut with a new die and coloured with distress ink.
Please do join us this week over at the Terrific Tuesday challenge at Paper Crafting World!
This is the close up view of the stem, leaf and handle of the apple box above!.
Tuesday, September 11, 2012
Its all about the numbers
PCW's Terrific Tuesday Challenge this week is all about Numbers! The DT has come up with some lovely projects for you to look at here!
For this week's challenge, I decided to use the numbers embossing folder as a background. I inked the folder with the green ink then embossed the card as normal. It came out with a lovely green background and the numbers showing in the cream cardstock.
I stamped some little pennants on blue spotted paper and used the same paper for the lower part of the card.
I cut out the pennants and attached them to some bakers twine across the top of the card.
I printed the digi image from PCW here then coloured him in using copic markers. I added some sparkly pen to the sparkler, but it really does not show up here!
I stamped the sentiment using the same ink as the background then die cut it and attached to the card.
For this week's challenge, I decided to use the numbers embossing folder as a background. I inked the folder with the green ink then embossed the card as normal. It came out with a lovely green background and the numbers showing in the cream cardstock.
I stamped some little pennants on blue spotted paper and used the same paper for the lower part of the card.
I cut out the pennants and attached them to some bakers twine across the top of the card.
I printed the digi image from PCW here then coloured him in using copic markers. I added some sparkly pen to the sparkler, but it really does not show up here!
I stamped the sentiment using the same ink as the background then die cut it and attached to the card.
Tuesday, August 28, 2012
Altered Journal
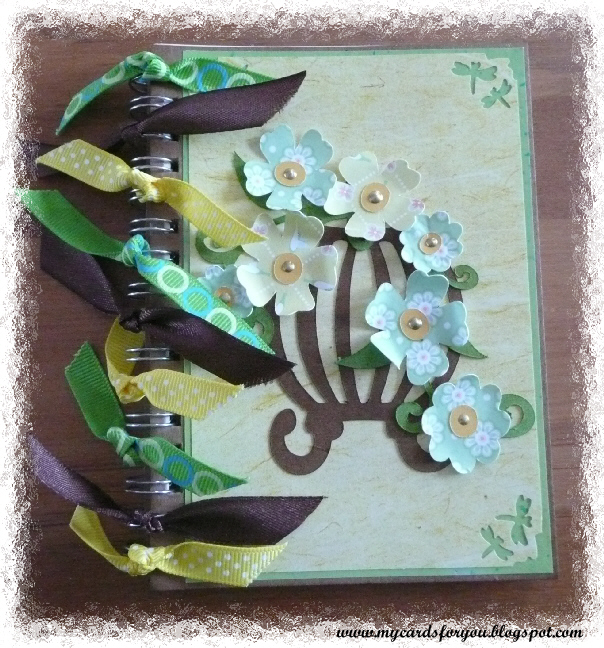
The theme for this week's PCW challenge is Altered Journal.
I have a notebook that I keep by the computer for jotting things down, so I decided it needed a new look!
I cut the birdcage and flowers from the Flowers and Birdcage set available here.
For the background, I used a couple of papers from a freebie set in a magazine that I had stashed away. The bottom layer was a green colour and I overlaid that with the yellow after punching the dragonflies with a corner punch.
To finish it off, I added some colourful ribbons to the binding of the notebook!
Pop over to the Paper Crafting World blog to see the other projects from the talented design team!
I have a notebook that I keep by the computer for jotting things down, so I decided it needed a new look!
I cut the birdcage and flowers from the Flowers and Birdcage set available here.
For the background, I used a couple of papers from a freebie set in a magazine that I had stashed away. The bottom layer was a green colour and I overlaid that with the yellow after punching the dragonflies with a corner punch.
To finish it off, I added some colourful ribbons to the binding of the notebook!
Pop over to the Paper Crafting World blog to see the other projects from the talented design team!
Tuesday, August 21, 2012
Flying High
The challenge for this week over at Paper Crafting World is Let's all fly high.
Melin has a lovely aviator file that is just the thing for those layouts and cards that involve planes or flying.
For my project this week, I made a card using the aviator cutting file and the balloon cutting file from the Key to my heart set.
For the background, I used distress inks and brayered the different colours after I stamped the clouds and masked them.
I stamped a grass stamp from Montarga along the bottom of the card and added the Happy Birthday stamp.
For the Fly High sentiment, I used a gel pen with my Cricut and wrote the letters, then cut out the cloud shape. I used SCAL2 to do this.
Check out the lovely designs from the rest of the design team here.
Melin has a lovely aviator file that is just the thing for those layouts and cards that involve planes or flying.
For my project this week, I made a card using the aviator cutting file and the balloon cutting file from the Key to my heart set.
For the background, I used distress inks and brayered the different colours after I stamped the clouds and masked them.
I stamped a grass stamp from Montarga along the bottom of the card and added the Happy Birthday stamp.
For the Fly High sentiment, I used a gel pen with my Cricut and wrote the letters, then cut out the cloud shape. I used SCAL2 to do this.
Check out the lovely designs from the rest of the design team here.
Tuesday, July 31, 2012
All about parents
The challenge over at Cooking with Cricut this week is All about Parents.
I decided to do a scrapbook layout for this one as we have a new grand daughter and I though it would be nice to start a scrapbook for her.
I got the Bear with Baby digital stamp, using the already coloured version and cut it out using the BCC. I also made a couple of mattes for the photo and the writing using the Funtime oftware and the BCC. I added the words New Parents to the top of one of the mattes and welded them together then cut them out. I also cut the letters separately and glued them to the base layer.
The words on the lower part were also done using the Funtime software and a black gel pen. It did the writing before I cut the shape!
The flowers were cut using the Cricut and SCAL2 software.
Check out the other lovely projects done by the other members of the DT here.
I decided to do a scrapbook layout for this one as we have a new grand daughter and I though it would be nice to start a scrapbook for her.
I got the Bear with Baby digital stamp, using the already coloured version and cut it out using the BCC. I also made a couple of mattes for the photo and the writing using the Funtime oftware and the BCC. I added the words New Parents to the top of one of the mattes and welded them together then cut them out. I also cut the letters separately and glued them to the base layer.
The words on the lower part were also done using the Funtime software and a black gel pen. It did the writing before I cut the shape!
The flowers were cut using the Cricut and SCAL2 software.
Check out the other lovely projects done by the other members of the DT here.
Tuesday, July 24, 2012
Christmas in July Challenge
The challenge over at Cooking with Cricut today is Christmas in July but the catch is that you need to use scraps! Great - I have a large box of scraps underneath my desk that I could use.
I downloaded a nice little Christmas digi stamp from Papercrafting World. It is a gingerbread house that I coloured with copic markers then cut out - by hand this time.
I then die cut a scalloped square from a piece of card that I found in my scraps box, stamped it with the dotty dunes background stamp using London Fog Memento ink, added some glitter pen dots to it to make the snow sparkle and added the sky using Stormy Sky distress ink. The edges of the scalloped square were embossed too.
The background layers were cut from scraps in a box under my computer desk, where I use my electronic cutting machines. I added some white pen decorations to the little red corner squares before attaching them all to the white base card.
I stamped the sentiment in London Fog ink and added glitter pen to the letters to make them sparkle before cutting out with the smaller scalloped square die.
Hop on over to Cooking With Cricut to check out the other lovely ideas from the design team this week.
There are some lovely freebies from Melin here also.
I downloaded a nice little Christmas digi stamp from Papercrafting World. It is a gingerbread house that I coloured with copic markers then cut out - by hand this time.
I then die cut a scalloped square from a piece of card that I found in my scraps box, stamped it with the dotty dunes background stamp using London Fog Memento ink, added some glitter pen dots to it to make the snow sparkle and added the sky using Stormy Sky distress ink. The edges of the scalloped square were embossed too.
The background layers were cut from scraps in a box under my computer desk, where I use my electronic cutting machines. I added some white pen decorations to the little red corner squares before attaching them all to the white base card.
I stamped the sentiment in London Fog ink and added glitter pen to the letters to make them sparkle before cutting out with the smaller scalloped square die.
Hop on over to Cooking With Cricut to check out the other lovely ideas from the design team this week.
There are some lovely freebies from Melin here also.
Tuesday, July 10, 2012
Grin and Bear It
The challenge over at Cooking with Cricut today is titled Grin and Bear it - maker a project that includes a Bear! Melin has some great cutting files and digi stamps over at the PCW on-line shop for you to choose a bear image from too.
For my project, I used the Princess bear digi image. It was pre-coloured so I did a print and cut using my Black Cat Cougar and Make the Cut software.
I cut a base layer from a pink glossy cardstock and embossed it with the Swiss Dots folder. The heart die cut was given to me by a friend from the UK and I coloured the frame with white distress stain then used one of the new seasonal distress inks (Picked Raspberry) to colour it in a slightly distressed looking pink! The white heart was stamped with the sentiment (from Gina K) then overstamped with versamark ink with a dotty stamp (like the swiss dots folder) then brushed with pearl powder in a white shade.
The Princess bear was layered on top with foam dots and some sparkle added to her tiara, wand and ribbon on the dress with Kindiglitz. The entire layer was then attached to a white base card.
Look forward to seeing your take on this challenge for the week.
For my project, I used the Princess bear digi image. It was pre-coloured so I did a print and cut using my Black Cat Cougar and Make the Cut software.
I cut a base layer from a pink glossy cardstock and embossed it with the Swiss Dots folder. The heart die cut was given to me by a friend from the UK and I coloured the frame with white distress stain then used one of the new seasonal distress inks (Picked Raspberry) to colour it in a slightly distressed looking pink! The white heart was stamped with the sentiment (from Gina K) then overstamped with versamark ink with a dotty stamp (like the swiss dots folder) then brushed with pearl powder in a white shade.
The Princess bear was layered on top with foam dots and some sparkle added to her tiara, wand and ribbon on the dress with Kindiglitz. The entire layer was then attached to a white base card.
Look forward to seeing your take on this challenge for the week.
Tuesday, June 19, 2012
Another Challenge - All things Men
The theme for the weekly Tuesday challenge over at Paper Crafting World this week is All things Men - a masculine theme.
I used Melin's cute King of the Grill digi set to make this one. For the background, I created a wood effect by scoring the background card then inking it with several layers of distress inks to produce a stained timber look. I then added a side piece of a printed house and cut a picket fence, which I embossed with a Sizzix Alterations folder. I added distress ink to the fence as well.
The image was colour printed from the digi set here, then I used my Black Cat Cougar to do a print and cut. I was very pleased with the result of the cutting.
The sentiment was included with the digi file so I printed it out separately and cut it then attached it to the top of the card.
Please visit all my DT friends at PWC and Cooking with Cricut to see what they have done for the theme this week.
I used Melin's cute King of the Grill digi set to make this one. For the background, I created a wood effect by scoring the background card then inking it with several layers of distress inks to produce a stained timber look. I then added a side piece of a printed house and cut a picket fence, which I embossed with a Sizzix Alterations folder. I added distress ink to the fence as well.
The image was colour printed from the digi set here, then I used my Black Cat Cougar to do a print and cut. I was very pleased with the result of the cutting.
The sentiment was included with the digi file so I printed it out separately and cut it then attached it to the top of the card.
Please visit all my DT friends at PWC and Cooking with Cricut to see what they have done for the theme this week.
Wednesday, June 6, 2012
PCW Challenge - Wedding theme
The theme for the challenge over at Paper Crafting World this week is Weddings! And wow - this also coincides with my 200th post on my blog!
I found this neat cutting file created by Melin here. I cut the card from white cardstock then cut the layers from pink bazzil cardstock. The decorations on the cake were cut from a deeper shade of pink and I added Kindi glitz to make them sparkle before I attached them to the cake!
I added some pearl strips from Kaiser across the middle layer of the cake to add some extra dimension.
The base of the cake has been embossed with silver embossing powder - I did it a couple of times to add some extra shine. I then added some silver peel-off strips across the very bottom of the base.
The sentiment stamp is from Montarga and I stamped it then cut the fancy tag using a spellbinders die in my Cuttlebug.
Check out some of the other great samples from the rest of the DT over at Cooking With Cricut.
I found this neat cutting file created by Melin here. I cut the card from white cardstock then cut the layers from pink bazzil cardstock. The decorations on the cake were cut from a deeper shade of pink and I added Kindi glitz to make them sparkle before I attached them to the cake!
I added some pearl strips from Kaiser across the middle layer of the cake to add some extra dimension.
The base of the cake has been embossed with silver embossing powder - I did it a couple of times to add some extra shine. I then added some silver peel-off strips across the very bottom of the base.
The sentiment stamp is from Montarga and I stamped it then cut the fancy tag using a spellbinders die in my Cuttlebug.
Check out some of the other great samples from the rest of the DT over at Cooking With Cricut.
Wednesday, May 30, 2012
Paper Crafting World Weekly Challenge
At this time of the year in the Northern Hemisphere, schools are finishing their academic year, and it is time to say thank you to the teacher!
For my project, I used the Bookworm and apple digi stamp from PCW here to make the image. I printed it twice then coloured it with Copic markers. I cut selected parts of the image to layer - the head part of the bookworm and the leaf on the apple. I added glossy accents to the eye glasses of the bookworm to make the eyes stand out a little.
For the words, I used the wording that came with the image and made it into a cutting file using SCAL2, welded the letters then cut them from green card. I embossed the words using embossing ink and clear embossing powder. The image and words were then layered onto white card that I had embossed with the Swiss Dots folder in the Cuttlebug then rounded the corners. This was then layered onto a red card.
Pop on over to the challenge at Cooking with Cricut and see what the other great designers have come up with for this week. Look forward to seeing your entries too!
For my project, I used the Bookworm and apple digi stamp from PCW here to make the image. I printed it twice then coloured it with Copic markers. I cut selected parts of the image to layer - the head part of the bookworm and the leaf on the apple. I added glossy accents to the eye glasses of the bookworm to make the eyes stand out a little.
For the words, I used the wording that came with the image and made it into a cutting file using SCAL2, welded the letters then cut them from green card. I embossed the words using embossing ink and clear embossing powder. The image and words were then layered onto white card that I had embossed with the Swiss Dots folder in the Cuttlebug then rounded the corners. This was then layered onto a red card.
Pop on over to the challenge at Cooking with Cricut and see what the other great designers have come up with for this week. Look forward to seeing your entries too!
Wednesday, May 9, 2012
PCW Mothers Day Challenge Reminder
This is a little reminder post for the PCW Mother's Day Challenge that is currently running here.
For this card, I made a side-opening base card and layered it with white cardstock that I embossed with the Swiss Dots folder in the Cuttlebug and made a fancy edge with scissors. I wrapped this with a fancy ribbon and attached to the card base.
The image is the Cristel Bear holding flowers digi image from Paper Crafting World and I coloured her using copic markers.
The sentiment is stamped on cardstock then cut and embossed using a Spellbinders Labels die using Vintage Photo Distress ink, which I also used around the edge of the die cut before removing it from the die. I layered this on a larger labels die cut and embossed from a bronze coloured cardstock.
The sentiment stamp is by Montarga.
Please go over to the Challenge to see some of the beautiful cards that our other DT members have made.
For this card, I made a side-opening base card and layered it with white cardstock that I embossed with the Swiss Dots folder in the Cuttlebug and made a fancy edge with scissors. I wrapped this with a fancy ribbon and attached to the card base.
The image is the Cristel Bear holding flowers digi image from Paper Crafting World and I coloured her using copic markers.
The sentiment is stamped on cardstock then cut and embossed using a Spellbinders Labels die using Vintage Photo Distress ink, which I also used around the edge of the die cut before removing it from the die. I layered this on a larger labels die cut and embossed from a bronze coloured cardstock.
The sentiment stamp is by Montarga.
Please go over to the Challenge to see some of the beautiful cards that our other DT members have made.
Wednesday, April 25, 2012
Reminder April Showers Challenge
This reminder card for the current challenge over at Paper Crafting World was made using the Bears under Umbrella digi stamp which I coloured using copic markers.
I cut the image using a circle die and layered it on a yellow circle.
The card was made using a scalloped circle die and topped with a black scalloped circle to which I attached the layered image.
The sentiment is from the same image which can be found here at PCW. I cut this with a fancy tag die from Spellbinders and attached it at the bottom of the card.
I entered this one at the Paper Creations Ink Blog as well because their theme related to April Showers!
I cut the image using a circle die and layered it on a yellow circle.
The card was made using a scalloped circle die and topped with a black scalloped circle to which I attached the layered image.
The sentiment is from the same image which can be found here at PCW. I cut this with a fancy tag die from Spellbinders and attached it at the bottom of the card.
I entered this one at the Paper Creations Ink Blog as well because their theme related to April Showers!
Wednesday, April 18, 2012
April Showers
This is my take on the April showers theme for the PCW challenge this fortnight.
The image is a digi stamp (Bears under umbrealla) from PCW which I coloured using copic markers.
I cut the image using a spellbinders labels die and layered it on a larger black card cut with a die from the same set.
The sentiment is from the same digi image which I cut using a tags die from Spellbinders.
The background layer was cut from red card and embossed using the cuttlebug.
The image is a digi stamp (Bears under umbrealla) from PCW which I coloured using copic markers.
I cut the image using a spellbinders labels die and layered it on a larger black card cut with a die from the same set.
The sentiment is from the same digi image which I cut using a tags die from Spellbinders.
The background layer was cut from red card and embossed using the cuttlebug.
Wednesday, April 11, 2012
Reminder post for PCW Easter Challenge
Just a reminder that there is still a week to go in the PCW Easter Challenge!
For this wee reminder card, I downloaded the bunny in overalls digi stamp and coloured it with pencils, using an odourless mineral spirit solvent to smooth out the pencil lines. The result is a very soft colour effect.
I layered the image onto a black die cut oval (Nellie Snellen) and green die cut and added it to an easel card base that I cut with the Cricut. I added faux stitching to the layer and the base card and a ribbon to pick up some of the colours in the image.
Love to see your entries in the challenge! Hop on over to Paper Crafting World to check it out!
For this wee reminder card, I downloaded the bunny in overalls digi stamp and coloured it with pencils, using an odourless mineral spirit solvent to smooth out the pencil lines. The result is a very soft colour effect.
I layered the image onto a black die cut oval (Nellie Snellen) and green die cut and added it to an easel card base that I cut with the Cricut. I added faux stitching to the layer and the base card and a ribbon to pick up some of the colours in the image.
Love to see your entries in the challenge! Hop on over to Paper Crafting World to check it out!
Subscribe to:
Posts (Atom)