Showing posts with label embossing. Show all posts

Wednesday, May 22, 2013

Pink

 Wednesdays seem to come around vry quickly and it is time for another challenge at My Paper Crafting - CWC Wonderful Wednesday.

The theme this week is Pink!


I chose to make this cute little pink elephant using the Paisley cartridge. I used two shades of pink for the layers and purple for the sunglasses. The sentiment is also from the same cartridge.

I added a black layer to make it stand out on the card. I used Kindiglitz to bling up the sunglasses and sentiment.

I embossed the top layer of the background using my Cuttlebug and a Craft Concepts embossing folder.


There are some beautiful projects on the blog this week, so do pop over and take a look. Please enter the challenge as well - some fab prizes up for offer this month.

Monday, January 21, 2013

CWC Cartridge Showcase - Lyrical Letters

Hi everyone. This week's Monday Cartridge Showcase at My Paper Crafting.com features the Lyrical Letters Cartridge. I have bought the cartridge as a digital one through the Cricut Craft Room, which makes it very easy to cut from as you don't need to insert the cartridge in the machine! It is also available right after purchase in the CCR, so you don't need to wait for it to be posted!

 What I really like about this cartirdge is the fact that there are seven different fonts to choose from, each of which has a capital option as well as lower case.

There is a variety of shapes and words available on the cartridge, which again, makes it a very versatile one to have.

I have made 5 different projects to showcase the versatility of the cartridge, and those of you who follow my blog, know that I am not really into scrapbooking much, but I have even done a layout for you to see as well!

 This is a simple Valentine Card that is cut right from the cartridge. I used the Connected font selection and cut the frame at 4". The flowers are part of the frame so it cuts as one piece. I added some clear beads to the centres of the flowers using Glossy Accents.

The stamp is from a Hero Arts words set that I use quite a lot!
 For this card, I used the Connected font again and cut the sentiment at about 5" wide.

The heart and layers were cut from the Craft Room Basic font selection. I embossed the top heart layer then stitched around it with the sewing machine. I did the same with the layer on the card before adding it to a black card, then onto a white base card cut to fit.
 For my scrapbook layout, I used the Spring word from the Baisc font on the Lyrical Letters cartridge and cut the leaf and flower in different colours. The leaf borders were cut from the Jack Sprat shift/lock font. I added some stamped leaves and a journalling block with peeled paint distress ink and added a little picket fence distress marker to the stamped images to highlight them a little. I also added faux stitching to the lettering with a white ink pen.

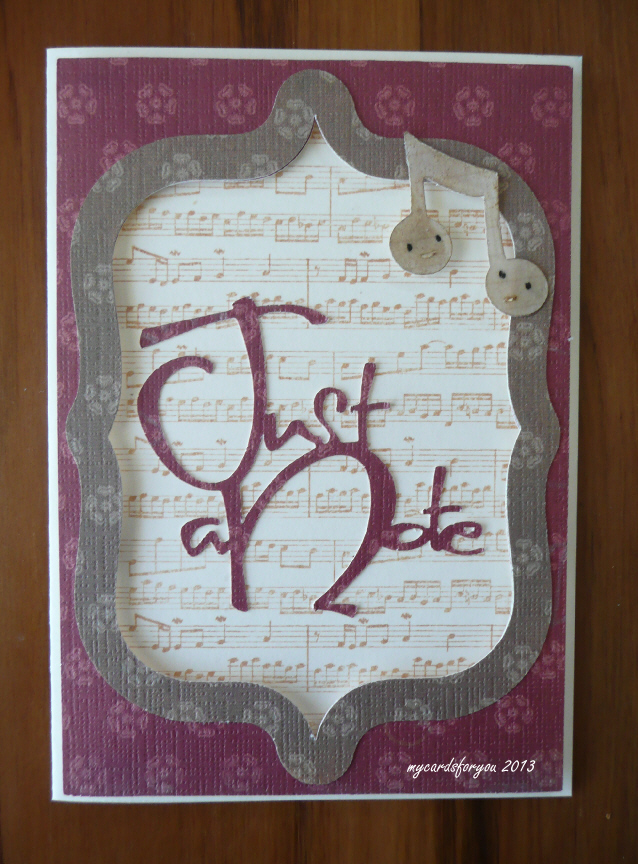
For the Just a Note card, I cut the frames from the Italic Monoline font, the notes and sentiment from Capital font.

I stamped a music background using a Gina K music stamp in Tea Dye distress ink then layered it underneath the frame. The frame is raised from the card using foam dots to give a little depth.

The music notes were coloured a little with Walnut Stain distress ink then coated with Glossy accents and attached to the frame.


The final card was made using the LoopDeeLoo font. I added the letters separately then welded them together before cutting them out.

The layers on the card were cut using  CCR Basic. I stitched around the top layers with the sewing machine and added some flowers, a diecut leaf and some pearl bling to finish it off.


Hope you have enjoyed looking at this showcase using the Lyrical Letters cartridge and that it inspires you to get it or to use it if you already have it!


Wednesday, January 2, 2013

Tags of 2013

Another year and another series of Tags from Tim!

Saw the tag for this month and decided to give it a go. Set myself a challenge to complete all the tags for 2013 - first resolution for the year!!

I didn't have all the embellishments that Tim used in his tag, so I improvised with what I had.

Inks used: Iced Spruce, Stormy Sky, Rusty Hinge and Walnut Stain.
Stamps: all from Tim Holtz sets - pointing hand, clocks and time sentiment.
Embossing Folder: Retro Circles (Sizzix)

Dies: Gadget gears Bigz, ticket strip and mini clock.

Other stuff: metallic distrss stains, filmstrip, seam binding.

And I wrote in my journal as well!

Sunday, December 23, 2012

Day 23 Angels


 Today is Day 23 of the 25 Days crafting showcase and the theme is Angels.


I used my Cricut again today and cut this lovely angel card using the Christmas Cards cartridge for the base card and Joys of the Season for the angel.

I used the Cricut Craft Room to size my images and to cut the scalloped circles for the layers.

I embossed the angel's wings and dress and added some sparkle to her wings and trumpet with Kindiglitz.

I embossed the front of the card using the swiss dots folder then layered the images on top.

The words are peeloffs as I did not have any stamp sentiments that would have fitted where I needed them to go.

Please do check out the rest of the projects from the team over here. While you are there, you can pick up the freebie files for today. The cutting file and the digi image are just so cute!


This is my last post in this 25 Days Year Round and Christmas Showcase. What an amazing journey it has been with the very talented team over at My Paper Crafting. Melin has designed some awesome cutting files and digi files and they are so easy to use as well.
Thanks for having me Melin!


Saturday, December 22, 2012

Day 22 Fast 'n Fabulous

 Today's project for the 25 Days Christmas and Year Round Crafting Showcase over at My Paper Crafting is based on the theme - Fast 'n Fabulous.

I wanted to use a Cricut cartridge for this one so I chose the Tags, Bags, Boxes and More 2 cartridge.
This is one I have used a lot lately and each time I look at the book I see some different ideas.


My project really was fast! It is a holder for a gift card - such a handy present these days when you don't know what to get for that person who has everything.

I cut the shape using the Cricut Craft Room program to size it properly to fit the gift card.

After cutting it, I ran it through the Cuttlebug using a holly leaves embossing folder. I added a digi image from MPC layered on a Spellbinders scalloped circle.


The gift card holder is closed with a ribbon.

It really was Fast 'n Fabulous! I guess it took me all of 10 minutes to make it...

Please go over to the blog at MPC to take a look at the other gorgeous projects made  by the very talented team and leave a comment. You can also get the freebie digital image shown below.


Saturday, December 8, 2012

Day 8 25 Days MPC Showcase

 Today's projects are all about Candles and Lights and Melin has created a beautiful cutting file as a freebie for today. You can get it over at My Paper Crafting and while you are there, please check out all the other beautiful projects created by some of the 30 designers on the team for this showcase.

I used the freebie cutting file to create my project today.

First, I imported the cutting file into SCAL2 and created a shadow layer for the cutting file by leaving all the layers grouped.  This is quite useful as it enables you to get the different pieces in the right place to produce your project.

I will post a tutorial on how to create a shadow layer using Melin's cutting files and SCAL2.


I embossed the top layers of the candles and edged them with weathered wood distress ink.

For the leaves, I created veins on then using an embossing tool and I added glossy accents to the holly berries to give them some shine.

This project is about 8" high and is currently hanging on the edge of my mantlepiece as part of my Christmas decorations.

Friday, December 7, 2012

Day 7 MPC 25 Days Showcase

Today's theme for the 25 Days Showcase over at Paper Crafting World is April - Flowers and Showers.

The free cutting file for today is such a lovely tag that I just had to use it.


I used the cutting file and my Cricut to cut the layers for the tag.

I embossed the tag with the Swiss Dots embossing folder then layered the various coloured layers on top.

For the butterfly, I added some dimensional sparkle to the patterned layer to make it stand out.

To finish this tag off, I intend to add a photo to the centre oval as it is part of a project I am working on. But I am not adding the picture until the project is nearling completion. Check back in a month or so to see the finished project!

To get this free cutting file, head over to My Paper Crafting and check it out. Do take a look at the other beautiful projects for today as well.

Tuesday, December 4, 2012

Day 3 25 Days Showcase

 Here it is, Day 3 of the 25 Days Christmas and Year Round Crafting Showcase from My Paper Crafting. The theme for today is Pretty Poinsettias, Pinecones and Presents.

Melin has created this beautiful cutting file of a poinsettia that I have used to make Christmas decorations for my house.


I  created a shadow layer for the poinsettia using SCAL2. Then I cut the parts of the flower.

After cutting, I embossed all the parts of the flower using the swiss dots embossing folder.

In the centre of the flower, I added gold pearl dots.

The file is a freebie over at MPC today so head on over there to get it.

Wednesday, October 31, 2012

Bingo! Wonderful Wednesday Cricut Challenge

 This week's Wonderful Wednesday Challenge is a Festive and Fun Bingo.


 I chose the vertical line in the centre of the grid for my card today.

I used flowers (cut with the Cricut and rolled), ribbon (around the layer on the card) and embossing (on the card).


I used acetate to make the card and embossed it with the Cuttlebug, I rounded the corners to remove the sharpness.

The layers were cut using the Cricut then edged with Victorian Velvet distress ink.

The flowers were rolled then the petals were rounded to provide some additional shape to the flowers. I added some distress ink to these as well. The leaves were die cut from hand made paper.

I made a bow with my bow maker and attached it to the ribbon.

Please join us over at Crafting with Cutters this week for this challenge and pick up the freebie for the week as well.

Tuesday, October 30, 2012

Festive and Fun Bingo Terrific Tuesday Challenge

Today's Terrific Tuesday Challenge over at Paper Crafting World is a Festive and Fun Bingo.


The project needs to be done according to a Bingo line.

I chose to do the diagonal line from the top left - Embossing, Die Cut, Ink.


The image I used is the Snowman image from Paper Crafting World. I printed it in colour after adding the Merry Christmas greeting to the bottom.

I used a rectangular die to cut the image out and ined the edges with Weathered Wood Distress ink before removing the card from the die.

The red layer was embossed in the Cuttlebug then layered onto white card. I added some ribbon to these two layers then attached the image layer.

On the base card, I embossed two lines at the top and bottom of the card, then added a strip of gold peel-off in the centre of the double lines.

Please join us this week for this fun challenge and pick up the freebie digi stamp as well.

Tuesday, September 18, 2012

It's all about Texture!


Today's PCW Terrific Tuesday challenge is all about texture.

For my DT contribution today, I have chosen the apple box cutting file from PCW to make the base of my textured project.


I cut the apple box base from a 12"x12" piece of Bazzil cardstock along with the top layer of the apples, which I then embossed with the swirly embossing folder and my Cuttlebug.

The stem, leaves and handle were also cut using the file and they were embossed using various folders to give more texture. Aclose up of these is below.

I stamped the sentiment onto cardstock then cut with a new die and coloured with distress ink.

Please do join us this week over at the Terrific Tuesday challenge at Paper Crafting World!

This is the close up view of the stem, leaf and handle of the apple box above!.

Tuesday, July 10, 2012

Grin and Bear It

The challenge over at Cooking with Cricut today is titled Grin and Bear it - maker a project that includes a Bear! Melin has some great cutting files and digi stamps over at the PCW on-line shop for you to choose a bear image from too.

For my project, I used the Princess bear digi image. It was pre-coloured so I did a print and cut using my Black Cat Cougar and Make the Cut software.
I cut a base layer from a pink glossy cardstock and embossed it with the Swiss Dots folder. The heart die cut was given to me by a friend from the UK and I coloured the frame with white distress stain then used one of the new seasonal distress inks (Picked Raspberry) to colour it in a slightly distressed looking pink! The white heart was stamped with the sentiment (from Gina K) then overstamped with versamark ink with a dotty stamp (like the swiss dots folder) then brushed with pearl powder in a white shade.

The Princess bear was layered on top with foam dots and some sparkle added to her tiara, wand and ribbon on the dress with Kindiglitz. The entire layer was then attached to a white base card.

Look forward to seeing your take on this challenge for the week.

Monday, June 25, 2012

Some new cards

Got busy over the last couple of days and did a few cards.

This card is a centre step card that I made as a retirement card for a friend who finishes work at the end of this week.

I cut the base card using the Black Cat and a file I did using the Funtime software. I then cut the card layers to fit and topped with a couple of layers cut with Spellbinders Labels dies. The bottom one was embossed with the swiss dots embossing folder. I cut the words using the Cricut and SCAL 2 from pink Bazzil Bling card. I stamped a floral stamp on the top layer using bundled sage distress ink.

The flowers were made using a new Spellbinders cut and fold die that I bought last weekend at the craft show in Sydney. Finished the card off with some pearl bling added to the flowers and the bottom of the card.

 This is a special birthday card made for a friend of my mother. I used kraft resist cardstock to make the top layer. I stamped it with one of the new Tim Holtz stamps that I won as a prize at the class I went to in Sydney (with his lordship Tim) then embossed it with white embossing powder. I stamped flowers across the bottom of the card with black then laid a strip of cream lace across the card.

The butterflies were stamped onto glossy card with a Stamp-it stamp (that I also got at the class)then coloured using a couple of pink distress markers and water brush. Added some black bling to the centre of the butterflies after cutting them out.

To finish it off, I added some pink card candy to the corners, three little paper roses and a sentiment cut from kraft card and coloured with distress ink.


This card used the same basic techniques and materials. However, I used a different sentiment stamp and die cut and left off the roses.

Both cards were layered with black onto a pink base card.


Tuesday, June 19, 2012

Another Challenge - All things Men

The theme for the weekly Tuesday challenge over at Paper Crafting World this week is All things Men - a masculine theme.

I used Melin's cute King of the Grill digi set to make this one. For the background, I created a wood effect by scoring the background card then inking it with several layers of distress inks to produce a stained timber look. I then added a side piece of a printed house and cut a picket fence, which I embossed with a Sizzix Alterations folder. I added distress ink to the fence as well.

The image was colour printed from the digi set here, then I used my Black Cat Cougar to do a print and cut. I was very pleased with the result of the cutting.

The sentiment was included with the digi file so I printed it out separately and cut it then attached it to the top of the card.


Please visit all my DT friends at PWC and Cooking with Cricut to see what they have done for the theme this week.

Wednesday, May 30, 2012

Paper Crafting World Weekly Challenge

At this time of the year in the Northern Hemisphere, schools are finishing their academic year, and it is time to say thank you to the teacher!

For my project, I used the Bookworm and apple digi stamp from PCW here to make the image. I printed it twice then coloured it with Copic markers. I cut selected parts of the image to layer - the head part of the bookworm and the leaf on the apple. I added glossy accents to the eye glasses of the bookworm to make the eyes stand out a little.

For the words, I used the wording that came with the image and made it into a cutting file using SCAL2, welded the letters then cut them from green card. I embossed the words using embossing ink and clear embossing powder. The image and words were then layered onto white card that I had embossed with the Swiss Dots folder in the Cuttlebug then rounded the corners. This was then layered onto a red card.

Pop on over to the challenge at Cooking with Cricut and see what the other great designers have come up with for this week. Look forward to seeing your entries too!

Wednesday, March 14, 2012

Terrific Tuesday Die Cut and Stamp Challenge Reminder

Just a reminder that the Terrific Tuesday Die Cut and Stamp Challenge over at PCW ends next week.
The theme for the fortnight has been Dr Suess and Reading and Melin has created some wonderful digital stamps and cutting files that you can get here.

I made this cute pop-up box card using a Sam I Am digital stamp that had been pre-coloured (you can download them coloured). I cut the image out and attached it to the pop-up piece of the card.

I cut the card using a cutting file I designed using Funtime 2010 software and cut it out using the Black Cat. I also cut the layers on the cut with the Black Cat then embossed them using the Cuttlebug. Added some dimension with distress inks.

The top layer on the pop-up piece was stamped with a bubble wrap stamp from Kaisercraft that I bought on Saturday. Edged the piece with distress inks before attaching it to the back.

I printed the sentiment using word art then cut it with a circle die and cut a backing using a scalloped circle. Embossed the edges of both before adding a bit of distress ink.


The card folds down flat for posting, as shown in the picture to the left. To open it up, simply pull the stand up piece out from the centre of the box.

I have done a video on making the pop-up box card and you can see it here.

I really encourage you to pop over to Paper Crafting World to have a look at the lovely files (and a freebie as well) that Melin has created to celebrate Reading and Dr Suess' birthday. She has also done some great St Patrick's day files.

Friday, October 28, 2011

Calendar Challenge Week 7

This week, the challenge for the Craft Barn Calendar Challenge was to use purple/lilac and dry embossing.

For the tag this week, I used a craft concepts emboissing folder on the tag then coloured it with milled lavender and dusty concord distress inks.

The butterfly is a die cut from Marianne Creations and was cut from a heavy silver paper. I bent the wings up a little and added purple rhinestones to the centre for the body.

I cut the flourishes from silver card using the elegant flourishes die from Tim Holtz. The ribbon was coloured using the dusty concord distress ink.

Only 5 more to go!

When I have finished the 12 tags, I plan to mount them on a canvas as a calendar for 2012!

Friday, July 8, 2011

Experiments

Over the last week or so, I have been experimenting with some different ideas.

This card is made from acetate that was folded then embossed using a textiles folder in the Cuttlebug.

The flower is a Montarga stamp that I coloured using my Copic markers. (They have been having a rest lately!) The shapes for the front of the card were cut with the Cricut. I added some pearl dots at the top of the frame to add a little something!
The sentiment was stamped on a Spelbinders Tag die then attached with foam dots to the bottom of the frame.

The card was finished off with a narrow red ribbon that I attached to the inside of the card with DS tape then covered it with the ribbon on the outside.

This card I made after watching a neat video from stampTV on double embossing.
The blue layer on the left side of the card was embossed with the Alterations Gridlock folder. I then brayered Versamark ink on the top of the embossing and added clear embossing powder. After heating, it came up with the really cool pattern. It really makes the embossing stand out.

Added some paper from my stash to the other side of the card, a black ribbon down the centre and topped it with one of my favourite gentleman stamps from Hero Arts. The Happy Birthday stamp is from Montarga.

I like this technique and will try it out on more cards over the next few weeks.

Thursday, December 2, 2010

Monthly Challenge for December

Over at Card Making World, we are having a monthly challenge. This month the theme is A Christmas Carol and cards entered must reflect  a Christmas Carol in some way.
My first sample card for the challenge was based on the carol, O Little Town of Bethlehem. I copied the music for the carol and reduced it to fit on the card. Then I distressed it using the wrinkle method and coloured it with antique linen DI. I then spritzed it with gold perfect pearls and water in a mister. It I also inked the torn edges of the paper. The stamped image is by Montarga which I embossed with gold and added gold beads to the bottom of it to make it look a bit like sand! I stamped and embossed the image twice and cut some of the buildings out, which I added to the image to give a bit of depth. The sentiment is from a Hero Arts Christmas set. Finished it off with some blue and gold ribbon across the card and gold star brads in the corners.

The second card was made using a Nestabilities die set. I folded the base card the cut it with the largest die, leaving a bit of the die over the folded edge to create a fold.

I cut another single layer the same size to add to the base card, then embossed it in the Cuttlebug. I cut two other layers, one in the same colour and another in silver to provide layers. On the smallest one, I stamped the Partridge in a Pear Tree stamp (again from Montarga) and embossed it with silver. I stitched round the silver layer with the sewing machine (no thread) to provide a little bit more detail. A Christmas greeting is stamped inside the card.

Thanks for looking!

Sunday, September 12, 2010

LTD Swaps

Hilda, from Lots to Do revisited, is hosting an ATC and Tag swap at the moment. 

The theme for the tag swap is Letters. For these tags, I embossed them in one of my new TH embossing folders (Collage) because it has lots of words on it. I then used distress inks to colour the tags.

Stamped letters on cards then punched out and layered on the tags.


The theme for the ATCs was Pen and Ink. I found some lovely card with writing on that I used for 2 of the ATCs. I found one of my old rubber stamps of a fountain pen that I used on two of the ATCs, I coloured the images then covered them with glossy accents. The bottom ATC used a stamp that included the pen with the images. Again, coloured these and used GA on the pen image.

The edges of the cards were coloured using distress inks.