It has been a very long time since I posted anything here, so as I had made a few cards at the weekend, I decided I should post them to show I have been doing something!
This is a design I made using an article from a recent Craft Stamper magazine. I realised I had the stamp set used so gave the technique a try. It is a masking technique and worked out really well. I take no credit for the design whatsoever!
It does look lovely though!
This is a card made using some background paper from my stash, which I have decided that I need to start using up. I have so much paper for scrapbooking and card making that it is really time to use it all. I do love keeping it to look at though! The stamp is from a Kaisercraft set.
Again, another card using background paper from my stash. These papers are so nice, they need very little further embellishment.
The technique used in this card is also from a Craft Stamper recent edition. I used distress paints and sponge to swipe the paint across the card, then embellished it with a stamped image from the CS magazine. The words are another freebie stamp set from an Australian card making magazine.
Enjoy!
Over the last few years, my interests have changed a little. I have developed an interest in patchwork and quilt making which seems to have overtaken my interest in card making! I still make cards, but not as much as I used to. Hence the change name for this blog.
Showing posts with label Craft Stamper Magazine. Show all posts
Monday, October 6, 2014
Friday, January 4, 2013
Inspiration
Have been inspired in the last couple of days by articles that I have read or have seen on the web.
In the December Craft Stamper magazine, there was an article by a lady from France in which she showed how to use distress stains with templates to produce rather delicious designs on cards.
I had a play, using the same colours as she did and this is the result:
I used Tim Holtz stamps for the sentiment and flourishes and drew around the template for the inked lines.
The colours I used were Dusty Concord, Mustard Seed and Barn Door distress stains.
The flowers were from my stash that I really need to use up!
I also made a birthday card for a friend using Tim Holtz ideas and distress inks and stamps.
I used peeled paint, faded jeans and frayed burlap to colour the background, then spritzed with water and dried it off. This gives a lovely mottled looking background. Stamped the nibs and men using Stazon Timber Brown and added the words on the background with pumice stone.
I stamped the sentiment with distress embossing ink and used vintage photo distress EP to give it texture. Added some colour using the same as the background.
Finished it off with card candy coloured with walnut stain and a brown ribbon.
In the December Craft Stamper magazine, there was an article by a lady from France in which she showed how to use distress stains with templates to produce rather delicious designs on cards.
I had a play, using the same colours as she did and this is the result:
I used Tim Holtz stamps for the sentiment and flourishes and drew around the template for the inked lines.
The colours I used were Dusty Concord, Mustard Seed and Barn Door distress stains.
The flowers were from my stash that I really need to use up!
I also made a birthday card for a friend using Tim Holtz ideas and distress inks and stamps.
I used peeled paint, faded jeans and frayed burlap to colour the background, then spritzed with water and dried it off. This gives a lovely mottled looking background. Stamped the nibs and men using Stazon Timber Brown and added the words on the background with pumice stone.
I stamped the sentiment with distress embossing ink and used vintage photo distress EP to give it texture. Added some colour using the same as the background.
Finished it off with card candy coloured with walnut stain and a brown ribbon.
Monday, August 20, 2012
Butterflies
I was inspired recently by an article in a Craft Stamper magazine and a Split Coast Stampers newsletter to make some butterfly cards.
This card is a circular foldout card. The layers of the card twist out to form a long card that can be hung (see below).
I used Spellbinders Nestabilities dies to cut all the circles from various papers and card and a Creatables die for the butterfly.
I used stamps from a variety of sets for the stamped images.
To hang it, I used a narrow ribbon.
The butterfly die is a beautiful one, but can be frustrating to get out of the die once it has been cut. I always use waxed paper between the die and the paper, then it all comes out very easily. You can use the waxed paper die cut as well as the paper one!
This card was inspired by the CS magazine article.
I stamped the butterfly images onto card twice. For the layer on the card, I trimmed it to fit across the card base. For the cut out images, I stamped them with a dotty stamp using bundled sage distress ink, then coloured the wings with a bundled sage distress marker. Used the marker to draw the lines across the white layer top and bottom then added to the striped base layer.
For this one, I had a black butterfly peel off that I wanted to try s added it to a circle die cut from white cardstock. Coloured it with Copic markers.
Die cut 3 fancy tags and cut in half then attached them to the back of the circle, before attaching to the base card layered with black gingham paper and yellow spotted paper and a black gingham ribbon.
Sentiment stamps are from Gina K.
I am entering these into the challenge over at Ruby's Rainbow this week. The theme there is butterflies!
This card is a circular foldout card. The layers of the card twist out to form a long card that can be hung (see below).
I used Spellbinders Nestabilities dies to cut all the circles from various papers and card and a Creatables die for the butterfly.
I used stamps from a variety of sets for the stamped images.
To hang it, I used a narrow ribbon.
The butterfly die is a beautiful one, but can be frustrating to get out of the die once it has been cut. I always use waxed paper between the die and the paper, then it all comes out very easily. You can use the waxed paper die cut as well as the paper one!
This card was inspired by the CS magazine article.
I stamped the butterfly images onto card twice. For the layer on the card, I trimmed it to fit across the card base. For the cut out images, I stamped them with a dotty stamp using bundled sage distress ink, then coloured the wings with a bundled sage distress marker. Used the marker to draw the lines across the white layer top and bottom then added to the striped base layer.
For this one, I had a black butterfly peel off that I wanted to try s added it to a circle die cut from white cardstock. Coloured it with Copic markers.
Die cut 3 fancy tags and cut in half then attached them to the back of the circle, before attaching to the base card layered with black gingham paper and yellow spotted paper and a black gingham ribbon.
Sentiment stamps are from Gina K.
I am entering these into the challenge over at Ruby's Rainbow this week. The theme there is butterflies!
Tuesday, July 17, 2012
Going to the beach
The challenge for this week over at Cooking with Cricut is themed - Let's go to the beach. Well, here in New Zealand, it is not really going to the beach weather but I still managed to do a wee card for this week's challenge.
Melin has done some more lovely digi stamps and cutting files relating to the Beach theme and you can access them here.
For my card this week, I layered a blue spotted background paper onto cardstock then added a layer of "sand" - card that I coloured with Antique Linen Distress ink, then stamped with the Dotty Dunes stamp in scattered straw DI.
I printed and cut the image of the Bear boy with a sand castle and layered it on top of the sand. The shells are small stamps that I stamped then cut from shrink plastic then shrunk the plastic - perfect size for this card.
The sun is a double layer of a flower stamp which was a freebie from the Craft Stamper Magazine some time ago. For the sentiment, I stamped the letters onto card then cut them out and attached to the background layer.
Really enjoying working with these digi files, especially now that I have worked out how to get a good print and cut image!
Tuesday, February 14, 2012
Inspiration
I was inspired by some articles in the last Craft Stamper (March 2012) magazine. One of the articles by Judy Laing, was about using markers and she produced some beautiful cards for the article.
I used her examples to make the two cards on this post. They were so easy to make!
For this card, I used sheet music that I cut with a spellbinders deckled rectangle and layered onto black card. Added some distressink to age it a bit more and layered onto craft card to which I had added a border punched piece. Stamped the butterfly and distressed it then cut it out. The flourish is a die cut from my elegant flourishes die by Tim Holtz. The sentiment is a new stamp I got recently from Gina K.
For this card I stamped the craft layer with 3 different flower stamps then white embossed them. The butterflies were stamps from a Graphics 45 set which I coloured using copic markers then cut out and attached. The sentiment is a Hero Arts stamp that I use a lot. Attached the sentiment then added some little blue pearl bling.
I used her examples to make the two cards on this post. They were so easy to make!
For this card, I used sheet music that I cut with a spellbinders deckled rectangle and layered onto black card. Added some distressink to age it a bit more and layered onto craft card to which I had added a border punched piece. Stamped the butterfly and distressed it then cut it out. The flourish is a die cut from my elegant flourishes die by Tim Holtz. The sentiment is a new stamp I got recently from Gina K.
For this card I stamped the craft layer with 3 different flower stamps then white embossed them. The butterflies were stamps from a Graphics 45 set which I coloured using copic markers then cut out and attached. The sentiment is a Hero Arts stamp that I use a lot. Attached the sentiment then added some little blue pearl bling.
Sunday, January 22, 2012
Another Challenge
The email with the latest Card Patterns sketch arrived today and it was quite lovely. Since I had just downloaded the latest freebie from SVG Cuts as well, I thought that this was an opportunity!
I used one of the scalloped shapes from SVG Cuts Scalloped Circles to make a base card. I welded two circles together and cut them to make a folded base then cut another slightly bigger scalloped circle for the top layer. A red circle completed the cutting!
I used the dune stamp designed by Sue Law to stamp around the edge of both layers, then stamped a heart using the freebie from the Craft Stamper magazine this month. I cut this one out and covered it with 3 layers of UTEE, with a sprinkle of gold on the top layer.
I added ribbon and lace to the centre of the circle then attached the ribbon roses and leaves.
The sentiment is from a Hero Arts words collection that I use a lot. I attached the heart with foam dots to make it stand out a little from the rest of the card.
I used one of the scalloped shapes from SVG Cuts Scalloped Circles to make a base card. I welded two circles together and cut them to make a folded base then cut another slightly bigger scalloped circle for the top layer. A red circle completed the cutting!
I used the dune stamp designed by Sue Law to stamp around the edge of both layers, then stamped a heart using the freebie from the Craft Stamper magazine this month. I cut this one out and covered it with 3 layers of UTEE, with a sprinkle of gold on the top layer.
I added ribbon and lace to the centre of the circle then attached the ribbon roses and leaves.
The sentiment is from a Hero Arts words collection that I use a lot. I attached the heart with foam dots to make it stand out a little from the rest of the card.
Thursday, January 19, 2012
Card Patterns Sketch 148 Challenge
I loved the look of this sketch at the Card Patterns blog when I saw it, so thought I would have a go with the challenge - along with lots of others!!
I wanted to make a card that had a sewing theme and had some lovely vintage type papers as well as a neat set of Toodle Binks sewing themed stamps that I received as a free gift for subscribing to Craft Stamper recently.
I cut the strips from the vintage themed card and stitched them to a backing layer, which I had cut along one side of with pinking shears to provide a zig zag edge. I used a zig zag stitch around the strips to complement this.
I stamped a rectangular card using vintage sepia Versafine ink and stitched the buttons to it. The lace was applied across the centre of the card before attaching the button card. Finished it off with the sentiment stamped with vintage sepia and a button attached with embroidery floss.
I wanted to make a card that had a sewing theme and had some lovely vintage type papers as well as a neat set of Toodle Binks sewing themed stamps that I received as a free gift for subscribing to Craft Stamper recently.
I cut the strips from the vintage themed card and stitched them to a backing layer, which I had cut along one side of with pinking shears to provide a zig zag edge. I used a zig zag stitch around the strips to complement this.
I stamped a rectangular card using vintage sepia Versafine ink and stitched the buttons to it. The lace was applied across the centre of the card before attaching the button card. Finished it off with the sentiment stamped with vintage sepia and a button attached with embroidery floss.
Monday, January 31, 2011
Butterflies
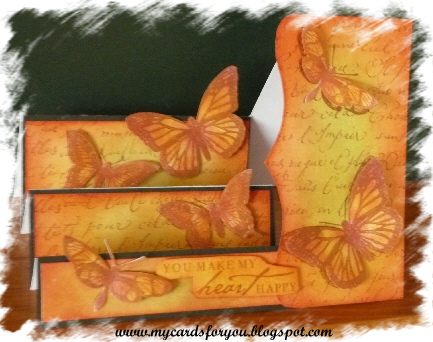
I was going through some of my Craft Stamper magazines the other day and found this card. I thought I would try it out because I liked the idea of using the different colours of distress inks together, but needed to do something with it.
I cut the base card (step card), then cut the layers. The layer on the side was cut with a Tim Holtz Edge die.
I used Bundled Sage DI to colour the centre of each of the layer pieces, then Wild Honey and Rusty Hinge, followed by Fired Brick on the edges. I love the way the colours blend so well and the red on the edges makes the rest of the colour really stand out.
I stamped the layers with a word background stamp and Rusty Hinge DI. The butterflies were from a Tanda Stamp set I bought last year. I stamped them on the layers then on another sheet and cut them out and coloured them with the same inks. The sentiment is from Hero Arts.
I layered the coloured card with black before attaching to the base card.
I cut the base card (step card), then cut the layers. The layer on the side was cut with a Tim Holtz Edge die.
I used Bundled Sage DI to colour the centre of each of the layer pieces, then Wild Honey and Rusty Hinge, followed by Fired Brick on the edges. I love the way the colours blend so well and the red on the edges makes the rest of the colour really stand out.
I stamped the layers with a word background stamp and Rusty Hinge DI. The butterflies were from a Tanda Stamp set I bought last year. I stamped them on the layers then on another sheet and cut them out and coloured them with the same inks. The sentiment is from Hero Arts.
I layered the coloured card with black before attaching to the base card.
Subscribe to:
Posts (Atom)