Today's challenge over at My Paper Crafting with CWC is Chilly Celebrations. While people in the Northern Hemisphere are chilling out, we, in the Southern Hemisphere, are enjoying the best summer weather we have had for some years, it seems!
For this card, I used the Christmas Cards cartridge and my Cricut Expression to cut all the pieces.
All of the elements on the card were from the cartridge and I embellished the central layer by making holes around the edge to add a little more interest!
I also used the Christmas Cards cartridge for this one, cutting the layers at different sizes.
The stamp is from a Gina K Designs set I recently purchased, as is the sentiment.
For the colour on the snowman's hat and scarf, I paper pieced these, stamping the same image onto blue paper and cutting it out then attaching to the snowman.
For contrast, I added a blue spotted ribbon from American Crafts across the top layer.
Enjoy the challenge this week. Hope to see lots of people participating.
Over the last few years, my interests have changed a little. I have developed an interest in patchwork and quilt making which seems to have overtaken my interest in card making! I still make cards, but not as much as I used to. Hence the change name for this blog.
Showing posts with label Cricut Expression. Show all posts
Wednesday, January 30, 2013
Monday, October 1, 2012
Market Fresh Mondaze Cartridge Showcase
Today's Market Fresh Mondaze Cartridge Showcase over at Cooking with Cricut features the Everyday Pop-up Cards cartridge.
I bought this cartridge a month or so ago and have been playing with it a bit since then.
There are some wonderful ideas on the cartridge, both for pop-up cards and flat cards as well as some great words and images that you can use on different types of projects.
The first cards I made with the cartridge were all done using the pop-up features. Each of the images has a number of different layers associated with it, some have more than others. There is usually an image with a layer and shadow, as well as a phrase, phrase layer and pop-up. Some images have 2 different pop-up layers and you can choose which you want to use. Each image also has a card which you can cut to the size you want. All the cards have different edges to them.
This card has a cute little plane that pops up when you open it.
I loved the images for this one and it lends itself to adding extra texture. I did this by embossing the box layer and adding a ribbon. The flowers were glazed with Kindiglitz to make them sparkle.
I also added some texture to the background by embossing the base layer and using a die cut scalloped oval which I added some shading to with distress ink.
For the inside of the card, I used the pop-up phrase, which is multi-layered. To make the letters stand out, I added some faux stitching to some of them
This note card was fun to do. I cut the bird and added some texture to his wing by embossing it with my favourite swiss dots folder. The card has a wavy edge so I cut it three times in different card to get a layered effect on the edge.
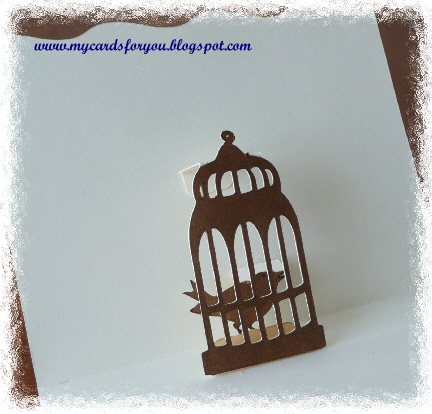
The inside of the card has a little bird inside a bird cage that pops up when you open it.
After I tried using the the pop-up features, I decided to play with some of the images and do some creative things using the Cricut Craft Room.
For this card, I took the owl image and made it into a shaped card. Then I cut the top layer using the same image and added the various layers.
I inked the edges of the shapes with distress ink and added a little die cut heart with a stamp on it.
For my last card, I used the butterfly image and cut it at 2.5" using matching card for the upper and lower layers of the butterfly. I then placed the card layer on the mat and added the shadow butterfly in the centre of the card.
I added toning card to the back of the hole cut in the card then layered the butterfly on top of that after folding the wings upward slightly to give some dimension. The bling was added to the body of the butterfly.
I found this cartridge to have some great ideas for projects, not just cards, but images for layouts as well. You are only limited by your own imagination!
I did find it a little frustrating that there are not clear instructions included with the cartridge for putting the pop-up pieces together. There is a PDF available at the Cricut Support website with some indications of how the pop-ups work, but it would be great if there was more detail with it. You can do a class on-line but that has a cost.
I bought this cartridge a month or so ago and have been playing with it a bit since then.
There are some wonderful ideas on the cartridge, both for pop-up cards and flat cards as well as some great words and images that you can use on different types of projects.
The first cards I made with the cartridge were all done using the pop-up features. Each of the images has a number of different layers associated with it, some have more than others. There is usually an image with a layer and shadow, as well as a phrase, phrase layer and pop-up. Some images have 2 different pop-up layers and you can choose which you want to use. Each image also has a card which you can cut to the size you want. All the cards have different edges to them.
This card has a cute little plane that pops up when you open it.
I also added some texture to the background by embossing the base layer and using a die cut scalloped oval which I added some shading to with distress ink.
For the inside of the card, I used the pop-up phrase, which is multi-layered. To make the letters stand out, I added some faux stitching to some of them
This note card was fun to do. I cut the bird and added some texture to his wing by embossing it with my favourite swiss dots folder. The card has a wavy edge so I cut it three times in different card to get a layered effect on the edge.
After I tried using the the pop-up features, I decided to play with some of the images and do some creative things using the Cricut Craft Room.
For this card, I took the owl image and made it into a shaped card. Then I cut the top layer using the same image and added the various layers.
I inked the edges of the shapes with distress ink and added a little die cut heart with a stamp on it.
For my last card, I used the butterfly image and cut it at 2.5" using matching card for the upper and lower layers of the butterfly. I then placed the card layer on the mat and added the shadow butterfly in the centre of the card.
I added toning card to the back of the hole cut in the card then layered the butterfly on top of that after folding the wings upward slightly to give some dimension. The bling was added to the body of the butterfly.
I found this cartridge to have some great ideas for projects, not just cards, but images for layouts as well. You are only limited by your own imagination!
I did find it a little frustrating that there are not clear instructions included with the cartridge for putting the pop-up pieces together. There is a PDF available at the Cricut Support website with some indications of how the pop-ups work, but it would be great if there was more detail with it. You can do a class on-line but that has a cost.
Wednesday, September 26, 2012
Wonderful Wednesday Challenge
Here we are back with the Wonderful Wednesday Challenge. The theme this week is Apples or Honey and we had to use a Cricut cartridge to make our project.
I chose to use the Preserves cart that I purchased recently and it had a great apple and word file on it that I decided to use.
I cut my apple and word from cardstock and layered them up.
For the background layer, I embossed the card with the swiss dots embossing folder, using a diffuser to ensure a circle was left un-embossed. I used a spellbinders scalloped circle die to get the edge around the clear part of the card and layered the apple onto this part of the card.
Wrapped a ribbon around the top layer and added the bow. The rest of the sentiment was stamped using alphabet stamps and red Memento ink (Ladybug) then highlighted with green pen.
Check out the rest of the offerings from the DT this week here at Cooking With Cricut.
I chose to use the Preserves cart that I purchased recently and it had a great apple and word file on it that I decided to use.
I cut my apple and word from cardstock and layered them up.
For the background layer, I embossed the card with the swiss dots embossing folder, using a diffuser to ensure a circle was left un-embossed. I used a spellbinders scalloped circle die to get the edge around the clear part of the card and layered the apple onto this part of the card.
Wrapped a ribbon around the top layer and added the bow. The rest of the sentiment was stamped using alphabet stamps and red Memento ink (Ladybug) then highlighted with green pen.
Check out the rest of the offerings from the DT this week here at Cooking With Cricut.
Wednesday, September 19, 2012
Texture and 3D Challenge
Today's challenge is about texture!
I was exploring my new Tags Bags Boxes and More 2 Cartridge recently and decided that I needed a new holder for my business cards. I found one right at the back of the handbook!
I cut the holder in pink cardstock then folded it all together to make the box. I love how it has the upright back on it to hold the cards up straight!
Before completely folding the box, I stamped the front of the box and the upright piece with a swirly stamp and embossed it with silver detail embossing powder.
The flowers are from Melin's rolled flowers cutting file and the green swirls are from the swirly hearts cutting files available in the PCW on-line shop.
I attached these to the front of the box to add some texture.
Please do join us today at Cooking with Cricut for this great challenge. The DT has done a fab job with their examples this week!
Wednesday, September 5, 2012
CWC Colour Combo Challenge

I am excited to have joined the Cooking with Cricut Design Team for this current term and am looking forward to challenging myself each week to use my Cricut in interesting ways, as well as getting more use out of the cartridges that I currently own.
The challenge this week is a colour combo one, and I have used the colours along with the Art Nouveau cartridge to create this card.
I bought the cart quite a while ago and have not used it a lot, so this was my first challenge to myself! I enjoyed putting it together and now think I need to use it more!
I used two different red colours on the rose part of the decoration and coloured one of the reds with a sparkly gel pen to make it stand out a little.
Please join us over at Cooking with Cricut for the challenge this week!
Tuesday, July 31, 2012
All about parents
The challenge over at Cooking with Cricut this week is All about Parents.
I decided to do a scrapbook layout for this one as we have a new grand daughter and I though it would be nice to start a scrapbook for her.
I got the Bear with Baby digital stamp, using the already coloured version and cut it out using the BCC. I also made a couple of mattes for the photo and the writing using the Funtime oftware and the BCC. I added the words New Parents to the top of one of the mattes and welded them together then cut them out. I also cut the letters separately and glued them to the base layer.
The words on the lower part were also done using the Funtime software and a black gel pen. It did the writing before I cut the shape!
The flowers were cut using the Cricut and SCAL2 software.
Check out the other lovely projects done by the other members of the DT here.
I decided to do a scrapbook layout for this one as we have a new grand daughter and I though it would be nice to start a scrapbook for her.
I got the Bear with Baby digital stamp, using the already coloured version and cut it out using the BCC. I also made a couple of mattes for the photo and the writing using the Funtime oftware and the BCC. I added the words New Parents to the top of one of the mattes and welded them together then cut them out. I also cut the letters separately and glued them to the base layer.
The words on the lower part were also done using the Funtime software and a black gel pen. It did the writing before I cut the shape!
The flowers were cut using the Cricut and SCAL2 software.
Check out the other lovely projects done by the other members of the DT here.
Tuesday, June 12, 2012
A New Challenge
The theme for the challenge over at Paper Crafting World this week is vacations. What better way of spending one's vacation than at the beach?
I used Melin's Playing in the Sand cutting files to create this scrapbook layout. If you have been following my blog for the past couple of years, you will know that I don't do scrapbooking, but I decided to give it a go for this week's challenge!
The sand coloured pieces were all cut from Bazzill Bling and were edged with pumice stone distress ink before layering them up together.
The little girl bear was cut from Bazzill Basic (Pinecone) and edged with vintage photo before putting together.
All the elements were cut with the Cricut Expression using SCAL2.
Please go over to the challenge which is here, and have a look at the other DT examples and have a go at the challenge as well!
I used Melin's Playing in the Sand cutting files to create this scrapbook layout. If you have been following my blog for the past couple of years, you will know that I don't do scrapbooking, but I decided to give it a go for this week's challenge!
The sand coloured pieces were all cut from Bazzill Bling and were edged with pumice stone distress ink before layering them up together.
The little girl bear was cut from Bazzill Basic (Pinecone) and edged with vintage photo before putting together.
All the elements were cut with the Cricut Expression using SCAL2.
Please go over to the challenge which is here, and have a look at the other DT examples and have a go at the challenge as well!
Sunday, May 20, 2012
Paper Crafting World Blogaversary Blog Hop
Welcome to Paper Crafting World (http://www.papercraftingworld.com) and Cooking With Cricut’s (http://www.cookingwithcricut.com)
Blogaversary Blog Hop! Our Design Teams are so excited to bring you a
two-day hop that focuses on projects honoring a second
anniversary…..cloth, crystal and or glass.
We think you will be blown away by some of the super creative
inspiration and interpretation of our designers. So be sure to come back
both days as each day will be a different set of designers and
projects!
PLUS, this hop is the kick off of our week long celebration! Each day
for a whole week we will be brining your fabulous projects made by our
designers and each day we will be giving away free vintage graphics,
digital printables and or electronic cutting files! So you will want to
make CWC-PCW (http://www.cookingwithcricut.com) a daily stop for the next week!
You should have arrived here from visiting Jessica at The Creative Stamper Spot. If you’ve joined us in mid-Hop and would like to check out all
the other fantastic projects head on over to CWC-PCW (http://www.cookingwithcricut.com) and start at the beginning.
My project for the bloghop is a little screen. I cut the gothic arches using my Cricut Expression and SCAL2. The Birdcage is a cutting file from Paper Crafting World and I sized it to fit inside the centre screen. I cut two arches with the centres removed for the centre panel and added two layers of acetate with the cage sandwiched between them. I then fixed the two arches together on top of and behind the acetate sandwich to make a clear window! Glossy Accents makes a wonderful glue for acetate!
For the other two panels, I cut smaller arches and two frames for each piece. I glued the frames together to make the edges a bit deeper. For all of the frames, I gave the edges a vintage look by inking them with vintage photo distress ink DTP then distress embossing ink and clear embossing powder. The frames have a textured look to them which is slightly rusty looking.
For the backgrounds of the side arches, I inked the panels with worn lipstick, faded jeans and chipped sapphire distress inks then stamped the sentiments with archival ink. I cut acetate pieces to fit the side panels and stamped the bird images on the acetate with Stazon ink.
The flowers were cut using spiral cutting files on the cricut and the leaf swirls are also from the birdcage cutting file. I spritzed the leaves and flowers with green and gold mist sprays to give them some sparkle!
The sentiment on the centre panel was stamped on cardstock which had been coloured using the same inks as in the side panels and cut out with deckle edging scissors.
All of the stamps are from Stampers Anonymous - Tim Holtz sets.
There are several prizes to be won so be sure to head over and join the fun at CWC-PCW (http://www.cookingwithcricut.com).
There is a “cloth, crystal or glass” challenge you can enter to win
as well as other super blog candy just for being a follower and
commenting, so don’t miss out!
Please do leave a comment - I enjoy reading them! Also, I would love to have you join my lovely group of followers.
Tuesday, January 3, 2012
New Year 2012
Already it is three days into the New Year of 2012 and I have started my card making with a real bang! On Boxing Day - I made 17 Christmas Cards!!
SVG Cuts came out with a lovely new set recently - Everyday Cards. I loved it and have made four of the cards from the set.
Mary has designed the cards to fit together really well and the frills and scallops are well structured so they do not grab and rip the paper - this is a bit of a problem sometimes with the Black Cat as the blade does not swivel quickly when it is cutting scalloped shapes.
I also found recently, some lovely cardstock sets from First Edition Papers. They are great for cutting with the Black Cat and with the Cricut.
The base cards are also cut from the files and they are all a little bit different.
The Hello You card is a nice one. The centre part is actually cut out and has a layer underneath, instead of on top! The shape of the front is also cut as part of the base card file.
SVG Cuts came out with a lovely new set recently - Everyday Cards. I loved it and have made four of the cards from the set.
![]() |
| Happy Birthday with 3D letters. |
![]() |
| 3 D letters add some dimension |
Mary has designed the cards to fit together really well and the frills and scallops are well structured so they do not grab and rip the paper - this is a bit of a problem sometimes with the Black Cat as the blade does not swivel quickly when it is cutting scalloped shapes.
I also found recently, some lovely cardstock sets from First Edition Papers. They are great for cutting with the Black Cat and with the Cricut.
The base cards are also cut from the files and they are all a little bit different.
The Hello You card is a nice one. The centre part is actually cut out and has a layer underneath, instead of on top! The shape of the front is also cut as part of the base card file.
![]() |
| Love the layered frilly look! |
![]() |
| The flower centres are cut through all layers. |
Friday, December 24, 2010
Two more Tags
I have now finished 7 of the 12 Tags of Christmas for this year!
This tag was firstly swiped with white paint dabber along the edges and allowed to dry. I then coloured the background using Tumbled glass and Broken China. The ink was wiped off the painted bits to retain the white colour. The snowman was cut from grunge paper using the Cricut. The hat, arms and nose were cut from another snowman and coloured using distress inks then attached to the white snowman (coloured with white paint dabber and edged with Pumice Stone DI. Merry Christmas stamped on the snowman's body.
The top layer is heavy acetate (an old package, recycled and cut to shape) and was embossed with the snowflakes folder in the Cuttlebug. Attached to the bottom layer with brads.
The Merry Christmas stamp is from a Hero Arts collection.
This tag was layered with Christmas Carol paper then coloured using Rusty Hinge and Vintage Photo distress inks. The rosette was cut from the same paper and edged with vintage photo DI. The embellishments are from a Tim Holtz collection. The words were cut using the Cricut and MTC software then attached and covered with Glossy Accents. The buttons are from my stash! The brads along the bottom were attached, then hammered to produce a vintage look. The bead embellishments attached to the top were put together from my stash of beads and findings.
Enjoy!
Have a wonderful, safe and happy Christmas and a prosperous New Year.
This tag was firstly swiped with white paint dabber along the edges and allowed to dry. I then coloured the background using Tumbled glass and Broken China. The ink was wiped off the painted bits to retain the white colour. The snowman was cut from grunge paper using the Cricut. The hat, arms and nose were cut from another snowman and coloured using distress inks then attached to the white snowman (coloured with white paint dabber and edged with Pumice Stone DI. Merry Christmas stamped on the snowman's body.
The top layer is heavy acetate (an old package, recycled and cut to shape) and was embossed with the snowflakes folder in the Cuttlebug. Attached to the bottom layer with brads.
The Merry Christmas stamp is from a Hero Arts collection.
This tag was layered with Christmas Carol paper then coloured using Rusty Hinge and Vintage Photo distress inks. The rosette was cut from the same paper and edged with vintage photo DI. The embellishments are from a Tim Holtz collection. The words were cut using the Cricut and MTC software then attached and covered with Glossy Accents. The buttons are from my stash! The brads along the bottom were attached, then hammered to produce a vintage look. The bead embellishments attached to the top were put together from my stash of beads and findings.
Enjoy!
Have a wonderful, safe and happy Christmas and a prosperous New Year.
Thursday, October 7, 2010
CMW Monthly Challenge
Carol and I decided to try to revive the Card Making World Monthly Challenge group recently, so we chose the theme SPORT for October. Given that the Commonwealth Games are on in India at the moment and the Ryder Cup for golf has just finished, it seemed appropriate.
As part of the DT for this group, I made a couple of sporty cards to get ideas stimulated for the group. The first card is a golf inspired one. I have had this cutting file for some time (from SCAL) and have not had the inspiration to use it, so this was a perfect opportunity.
The golf bag was cut in the various parts using the Cricut Expression.
The oval backgrounds cut from a Nestabilities oval set. The top oval was run through one of my Cuttlebug folders and the edges of both ovals were inked.
The photo corners were punched using a Martha Stewart punch.
The surfer card was inspired by the digital image - hang ten Kody - (from Some Odd Girl) coloured with Copic markers.
The top layer of the card was cut with a Nestabilities Oval die and the "waste" used as the background. The lines around the edge are peel-offs which I coloured using a felt pen. Attached the lines then masked them and the outside edges before stamping the swirly stamp around the edges of the layer.
The digital image was attached to the back of the top layer then all attached to the card. The sentiment was stamped on a separate card and attached with foam squares, after inking the edges to make it stand out a little more.
This card was also a good one for this week's Tanda Teaser!
Really enjoying my Copics!
As part of the DT for this group, I made a couple of sporty cards to get ideas stimulated for the group. The first card is a golf inspired one. I have had this cutting file for some time (from SCAL) and have not had the inspiration to use it, so this was a perfect opportunity.The golf bag was cut in the various parts using the Cricut Expression.
The oval backgrounds cut from a Nestabilities oval set. The top oval was run through one of my Cuttlebug folders and the edges of both ovals were inked.
The photo corners were punched using a Martha Stewart punch.
The surfer card was inspired by the digital image - hang ten Kody - (from Some Odd Girl) coloured with Copic markers.
The top layer of the card was cut with a Nestabilities Oval die and the "waste" used as the background. The lines around the edge are peel-offs which I coloured using a felt pen. Attached the lines then masked them and the outside edges before stamping the swirly stamp around the edges of the layer.
The digital image was attached to the back of the top layer then all attached to the card. The sentiment was stamped on a separate card and attached with foam squares, after inking the edges to make it stand out a little more.
This card was also a good one for this week's Tanda Teaser!
Really enjoying my Copics!
Sunday, August 29, 2010
Cricut Day
Yesterday I had a Cricut day. I spent most of the afternoon playing with the programs on the computer - Cricut Design Studio (DS), Sure Cuts a Lot (SCAL) and Make the Cut (MTC) - then cutting some of the files with the Cricut Expression. How I love my Cricut!
I used the Songbird cartridge to cut the bird cages out of kraft card. Really pleased with these as I will be able to colour them a bit more with distress inks then paint with distress crackle to give a rusty, grungy look.
The frogs I cut with a SCAL cutting file. It is two different bits that make up the frog - the face and legs are cut in lighter card and the base in a slightly darker. The hardest thing is piecing them together! They do look cute though!
I cut some tags out of a manila folder. Cheaper than buying them and you can get different sizes as well!
I have to make a couple of Spring cards soon, so used the Walk in my Garden Cartridge to do the daffodils. These are a bit fiddly because you need to cut the tops out and then stick them together. each flower has 3 different parts to stick! The word was from a SCAL file.
The hearts border was a file I had for MTC. I thought it looked really cool in white against the red background.
I used SCAL again to do the gears. I used what was left of the kraft card to cut these out. The beauty of using the computer to design the cuts is that you can place them exactly where you want them on the sheet then cut them.
I used the Songbird cartridge to cut the bird cages out of kraft card. Really pleased with these as I will be able to colour them a bit more with distress inks then paint with distress crackle to give a rusty, grungy look.
The frogs I cut with a SCAL cutting file. It is two different bits that make up the frog - the face and legs are cut in lighter card and the base in a slightly darker. The hardest thing is piecing them together! They do look cute though!
I cut some tags out of a manila folder. Cheaper than buying them and you can get different sizes as well!
I have to make a couple of Spring cards soon, so used the Walk in my Garden Cartridge to do the daffodils. These are a bit fiddly because you need to cut the tops out and then stick them together. each flower has 3 different parts to stick! The word was from a SCAL file.
The hearts border was a file I had for MTC. I thought it looked really cool in white against the red background.
I used SCAL again to do the gears. I used what was left of the kraft card to cut these out. The beauty of using the computer to design the cuts is that you can place them exactly where you want them on the sheet then cut them.
Subscribe to:
Posts (Atom)