Hi again, I am back with another design from Paper Crafting World.
Today, I am showcasing the chevron tag cutting file available here.
I loved the simplicity of this card - I don't really do fancy!
To
make the card, I used a tent fold base and layered it with Juniper card
(from Close to my Heart) then one of the papers from the Jackson
Collection (now retired).
The base for the tag and the
stars was cut from Cocoa cardstock and the top layer of the tag and the
stars were cut from Colonial White cardstock. I used Juniper again for
the rectangles on which I placed the Cocoa letters.
It is hard to see in this photo but I have used foam dots for the stars so they stand away from the tag.
A wonderfully easy card to make using another great cutting file from PCW!
Over the last few years, my interests have changed a little. I have developed an interest in patchwork and quilt making which seems to have overtaken my interest in card making! I still make cards, but not as much as I used to. Hence the change name for this blog.
Thursday, June 16, 2016
Tuesday, June 7, 2016
Father's Day
Somewhere in the world, Father's Day is looming! In New Zealand, Father's Day is celebrated in September, so this is an early Father's Day reminder.
The Printable Craft Shop has some wonderful cutting files for those of you who own an electronic cutting machine. There are also cutting options for those who do not have a cutting machine, so everyone is covered here. Today, I have chosen to showcase the Fathers Day insert cutting file, available here. This cutting file is the inside of the card, which is great because it will allow you to make your own design for the outside of the card.
For the front of my card, I chose papers from a CTMH collection called Pathfinding. I designed and cut the lettering in Cricut Design Space and with my Cricut Explore.
The cutting file is the inner part of the card and I sized it to approximately 5.5 inches wide.
I then brought in a rectangle for the base card and sized that so the inner fitted with about 1/4 inch around all sides. I included a fold line on the base card and centred it.
In the cutting file that you download, the fold lines are made with small cuts. Because the card I was using is not too heavy, I decided to change the fold lines to scored instead of cut, which actually resulted in a better card as there were no perforations on the end result.
To finish off the card, I added some bronze Stickles to the Dad in the centre of the card and stamped an image on the bottom part of the card.
The cutting files available from the Printable Craft Shop are really good and I do recommend them. To get the best results though, I would definitely change the perforated fold lines to scored lines instead of cut lines as it does give a much better finish to the card.
Do check out the other posts from the talented Design Team.
The Printable Craft Shop has some wonderful cutting files for those of you who own an electronic cutting machine. There are also cutting options for those who do not have a cutting machine, so everyone is covered here. Today, I have chosen to showcase the Fathers Day insert cutting file, available here. This cutting file is the inside of the card, which is great because it will allow you to make your own design for the outside of the card.
For the front of my card, I chose papers from a CTMH collection called Pathfinding. I designed and cut the lettering in Cricut Design Space and with my Cricut Explore.
The cutting file is the inner part of the card and I sized it to approximately 5.5 inches wide.
I then brought in a rectangle for the base card and sized that so the inner fitted with about 1/4 inch around all sides. I included a fold line on the base card and centred it.
In the cutting file that you download, the fold lines are made with small cuts. Because the card I was using is not too heavy, I decided to change the fold lines to scored instead of cut, which actually resulted in a better card as there were no perforations on the end result.
To finish off the card, I added some bronze Stickles to the Dad in the centre of the card and stamped an image on the bottom part of the card.
The cutting files available from the Printable Craft Shop are really good and I do recommend them. To get the best results though, I would definitely change the perforated fold lines to scored lines instead of cut lines as it does give a much better finish to the card.
Do check out the other posts from the talented Design Team.
Monday, May 16, 2016
Baby Shower
Yesterday, we had a baby shower for my daughter who is expecting her first baby in a few weeks.
I have always loved this castle from SVG Cuts, which is part of the Tiny Miracle set available here.
I also love the Georgie paper pack from Close to my Heart! This pack has some adorable double sided papers in it and is so appropriate for a baby album or something like this project.
I used toning plain cardstock from CTMH as well as the patterned sheets from the Georgie pack. It is so versatile - I have also made a mini album for my daughter to put in her words of wisdom about child care from her friends!
Would you believe, this castle used 70 disposable nappies - enough to keep Junior going for a while!
I really recommend SVG Cuts as a great place to access the most wonderful and varied cutting files for very reasonable prices. You can go there directly by clicking the affiliate link on the right hand side of this page, just below this post.
Update: Baby Max was born on Monday June 6. Mum and baby are doing well and Dad is over the moon!
Labels:
#ctmhgeorgie,
#svgcuts
Location:
Christchurch, New Zealand
Saturday, May 14, 2016
Card with Tag
I just love cards with tags on them as you can arrange them in different ways, layering, pop dotting and so on.
This lovely card with a tag and a floral embellishment is another available at PCW here.
The card file comes with several layers and elements, making it very easy to cut with your electronic cutter and to put together.
The base card is cut from Close to my Heart Glacier cardstock and Lagoon and Pacific for the top layers. The tags were cut from Glacier and the scalloped circle from Lagoon. I used White Daisy for the circles and Pixie and Pear for the floral embellishments.
To finish off the card, I used sparkling dots on the flower and top tag.
Saturday, May 7, 2016
Another card from PCW
Hello there. It is past time for me to do this post for Paper Crafting World, and life has a habit of catching up with you.
I chose this card from PCW, available here. I just love the edge of the card and how it is layered, giving you the opportunity to use multiple colours on the card.
The cardstock I used is from Close to my Heart and is an ideal layering weight card without adding too much bulk or weight for posting.
The base card was cut in Crystal Blue, while the top layer was cut in Glacier. The darker layer, which is attached on the inside of the card, is cut from Lagoon. I used Lagoon, Crystal Blue and White Daisy for the topper layers on the front of the card. The flowers were cut from Pixie and Pear cardstock. I added some tiny sparkles to the flowers and the bottom of the sentiment layer to finish the card off.
Check out the bargains available at PCW at the moment. Melin has reduced prices for a short time, and it is worth a visit to find some great cutting files and print files.
I chose this card from PCW, available here. I just love the edge of the card and how it is layered, giving you the opportunity to use multiple colours on the card.
The cardstock I used is from Close to my Heart and is an ideal layering weight card without adding too much bulk or weight for posting.
The base card was cut in Crystal Blue, while the top layer was cut in Glacier. The darker layer, which is attached on the inside of the card, is cut from Lagoon. I used Lagoon, Crystal Blue and White Daisy for the topper layers on the front of the card. The flowers were cut from Pixie and Pear cardstock. I added some tiny sparkles to the flowers and the bottom of the sentiment layer to finish the card off.
Check out the bargains available at PCW at the moment. Melin has reduced prices for a short time, and it is worth a visit to find some great cutting files and print files.
Monday, May 2, 2016
Another Shelf Card
Yesterday, I told you about the wonderful All About Shelf Cards Mega Bundle available from the Printable Craft Shop and showed the Just Bee Cause card that I made.
Today, I want to share with you how I used my Cricut Explore Print to Cut feature to cut out the elements of the Cowboy Card Kit.
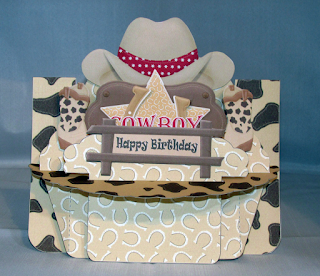
Fussy cutting is not something I do a lot of as I don't think I am very good at it - probably because I don't do enough of it! So I thought that there must be a way of cutting out all the elements of the kit using my wonderful electronic cutting machine - my Cricut Explore. This will be useful to those of you who would really love to make lots of these cards but do not have the time to do the necessary fussy cutting.
Because the Cricut will only cut images of a limited size (approximately 8 1/2" by 5"), it is necessary to do some editing of the image pages for this to work properly. Below, I will outline the steps you need to take in preparing the images to make the card.
1. Print the base card onto A4 card and cut it out manually. You will need to do this because it is too big for the Print to Cut feature and you also need it so you can make sure the other parts of the card are the right size before you cut them out.
2. Open your Design Space software and upload the first image. I brought in the page with the shelf piece on it first so I could make sure I sized it to fit the spaces on the base card.
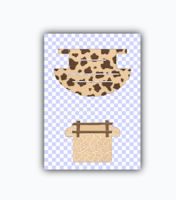
3. Using the select & erase function, clean the image so the outlines of the image are clear with no background. Make sure to erase the background from the slots as well! The picture on the right shows how the image looks when you have erased the background and any other pictures on the page that you do not need. Save the image then repeat for the other pages you need to complete your card.
4. Insert the image to your mat. The image will show on the mat at a reduced size. Measure the slot on the base card. This is the size you will need to make the width of the straight sides of the shelf to fit through the slot. Enlarge the imported image to 6.5" wide. The widest part of the shelf should then be the same width as the base card.
5. Now you need to slice your image by placing a rectangle over one of the images on the page. Select both the rectangle and the images and slice. This will break the two images and you can delete the pieces you do not need. Wait until the images show in colour before you do this!
6. Bring in the next page and work through the same steps - resizing and slicing. Make sure you save your project as you go.
7. When you have completed the process, you will have each part of the card as a separate piece on the screen, sized exactly to fit the base card, as in the picture below. SAVE THE PROJECT AGAIN!
8. To complete the Print to Cut, you will need to print and cut images individually as most will not fit two to a page. Hide the images you do not want to print and click the Go button. The image you want to print will then show on the print screen. Follow the instructions to print, then cut the image on your machine. Do this for each of the images. The smaller ones will fit two or three to a page, so select these and go to the print page. It will tell you if these will not fit on the print area and you can go back and change your selections.
9. Once you have completed the cutting process, put your card together. I used foam dots to layer up the hat, boots and greetings to give a more 3D look to the card.
This process seems like a lot to do and may take some time the first time you work through it, but as you become more familiar with your machine, you will be able to complete it quite quickly.
Please leave a comment below if you do try it out and it works for you. Also, if you have a problem, ask a question below and I will endeavour to answer it for you!
Today, I want to share with you how I used my Cricut Explore Print to Cut feature to cut out the elements of the Cowboy Card Kit.
Fussy cutting is not something I do a lot of as I don't think I am very good at it - probably because I don't do enough of it! So I thought that there must be a way of cutting out all the elements of the kit using my wonderful electronic cutting machine - my Cricut Explore. This will be useful to those of you who would really love to make lots of these cards but do not have the time to do the necessary fussy cutting.Because the Cricut will only cut images of a limited size (approximately 8 1/2" by 5"), it is necessary to do some editing of the image pages for this to work properly. Below, I will outline the steps you need to take in preparing the images to make the card.
1. Print the base card onto A4 card and cut it out manually. You will need to do this because it is too big for the Print to Cut feature and you also need it so you can make sure the other parts of the card are the right size before you cut them out.
2. Open your Design Space software and upload the first image. I brought in the page with the shelf piece on it first so I could make sure I sized it to fit the spaces on the base card.
3. Using the select & erase function, clean the image so the outlines of the image are clear with no background. Make sure to erase the background from the slots as well! The picture on the right shows how the image looks when you have erased the background and any other pictures on the page that you do not need. Save the image then repeat for the other pages you need to complete your card.4. Insert the image to your mat. The image will show on the mat at a reduced size. Measure the slot on the base card. This is the size you will need to make the width of the straight sides of the shelf to fit through the slot. Enlarge the imported image to 6.5" wide. The widest part of the shelf should then be the same width as the base card.
5. Now you need to slice your image by placing a rectangle over one of the images on the page. Select both the rectangle and the images and slice. This will break the two images and you can delete the pieces you do not need. Wait until the images show in colour before you do this!
6. Bring in the next page and work through the same steps - resizing and slicing. Make sure you save your project as you go.
7. When you have completed the process, you will have each part of the card as a separate piece on the screen, sized exactly to fit the base card, as in the picture below. SAVE THE PROJECT AGAIN!
8. To complete the Print to Cut, you will need to print and cut images individually as most will not fit two to a page. Hide the images you do not want to print and click the Go button. The image you want to print will then show on the print screen. Follow the instructions to print, then cut the image on your machine. Do this for each of the images. The smaller ones will fit two or three to a page, so select these and go to the print page. It will tell you if these will not fit on the print area and you can go back and change your selections.
9. Once you have completed the cutting process, put your card together. I used foam dots to layer up the hat, boots and greetings to give a more 3D look to the card.
This process seems like a lot to do and may take some time the first time you work through it, but as you become more familiar with your machine, you will be able to complete it quite quickly.
Please leave a comment below if you do try it out and it works for you. Also, if you have a problem, ask a question below and I will endeavour to answer it for you!
Sunday, May 1, 2016
New Design Team!
Today I am proud to post my first post for a new Design Team. The Printable Craft Shop has established a design team to showcase its wonderful crafting products, including some fabulous printable card sets and superb cutting files.
The first task for the design team was to take one or two cards from the All About Shelf Cards Mega Bundle available here and to make them up to show how easy it is to put them together.
The first card I made was the Just Bee Cause card. Shelf cards are new to me and I found it interesting to put together - and very quick, once the cutting out is done.
The first task is to print the 5 relevant pages that have the parts required to make the card up.
It is recommended that you use a fairly heavy cardstock 250 - 300gsm for your cards so they will stand up well. My own printer will not take card this heavy and I used a lighter weight for printing onto. If you need to do this, I suggest that you glue your printed sheet onto another one the same weight to give you additional strength.
Cut out all of the layers, including the individual images for layering onto your card. This will take about 60 minutes or so, depending on how good you are at fussy cutting!
Instructions are included with the bundle explaining how the card fits together. I found these instructions particularly good.
You can also print out the envelope included with the set and when this is put together, makes a nice box-type envelope for your card to fit into, ready to be given to the lucky recipient!
The All About Shelf Cards Mega Bundle is a new one to the Princtable Craft Shop and is sure to be a hit with those of you who enjoy making these printable cards. There are 15 different cards in the bundle, which makes it a very good value purchase.
The first task for the design team was to take one or two cards from the All About Shelf Cards Mega Bundle available here and to make them up to show how easy it is to put them together.
The first card I made was the Just Bee Cause card. Shelf cards are new to me and I found it interesting to put together - and very quick, once the cutting out is done.
![]() |
| The end result is a gorgeous multi-layered, 3D card. |
It is recommended that you use a fairly heavy cardstock 250 - 300gsm for your cards so they will stand up well. My own printer will not take card this heavy and I used a lighter weight for printing onto. If you need to do this, I suggest that you glue your printed sheet onto another one the same weight to give you additional strength.
Cut out all of the layers, including the individual images for layering onto your card. This will take about 60 minutes or so, depending on how good you are at fussy cutting!
Instructions are included with the bundle explaining how the card fits together. I found these instructions particularly good. You can also print out the envelope included with the set and when this is put together, makes a nice box-type envelope for your card to fit into, ready to be given to the lucky recipient!
The All About Shelf Cards Mega Bundle is a new one to the Princtable Craft Shop and is sure to be a hit with those of you who enjoy making these printable cards. There are 15 different cards in the bundle, which makes it a very good value purchase.
Labels:
PCS DT post,
shelf card
Location:
Christchurch, New Zealand
Subscribe to:
Posts (Atom)


