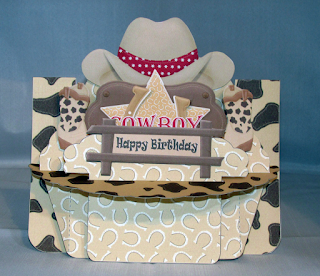
Today, I want to share with you how I used my Cricut Explore Print to Cut feature to cut out the elements of the Cowboy Card Kit.
 Fussy cutting is not something I do a lot of as I don't think I am very good at it - probably because I don't do enough of it! So I thought that there must be a way of cutting out all the elements of the kit using my wonderful electronic cutting machine - my Cricut Explore. This will be useful to those of you who would really love to make lots of these cards but do not have the time to do the necessary fussy cutting.
Because the Cricut will only cut images of a limited size (approximately 8 1/2" by 5"), it is necessary to do some editing of the image pages for this to work properly. Below, I will outline the steps you need to take in preparing the images to make the card.
1. Print the base card onto A4 card and cut it out manually. You will need to do this because it is too big for the Print to Cut feature and you also need it so you can make sure the other parts of the card are the right size before you cut them out.
2. Open your Design Space software and upload the first image. I brought in the page with the shelf piece on it first so I could make sure I sized it to fit the spaces on the base card.
 3. Using the select & erase function, clean the image so the outlines of the image are clear with no background. Make sure to erase the background from the slots as well! The picture on the right shows how the image looks when you have erased the background and any other pictures on the page that you do not need. Save the image then repeat for the other pages you need to complete your card.
4. Insert the image to your mat. The image will show on the mat at a reduced size. Measure the slot on the base card. This is the size you will need to make the width of the straight sides of the shelf to fit through the slot. Enlarge the imported image to 6.5" wide. The widest part of the shelf should then be the same width as the base card.
5. Now you need to slice your image by placing a rectangle over one of the images on the page. Select both the rectangle and the images and slice. This will break the two images and you can delete the pieces you do not need. Wait until the images show in colour before you do this!
6. Bring in the next page and work through the same steps - resizing and slicing. Make sure you save your project as you go.
7. When you have completed the process, you will have each part of the card as a separate piece on the screen, sized exactly to fit the base card, as in the picture below. SAVE THE PROJECT AGAIN!
8. To complete the Print to Cut, you will need to print and cut images individually as most will not fit two to a page. Hide the images you do not want to print and click the Go button. The image you want to print will then show on the print screen. Follow the instructions to print, then cut the image on your machine. Do this for each of the images. The smaller ones will fit two or three to a page, so select these and go to the print page. It will tell you if these will not fit on the print area and you can go back and change your selections.
9. Once you have completed the cutting process, put your card together. I used foam dots to layer up the hat, boots and greetings to give a more 3D look to the card.
This process seems like a lot to do and may take some time the first time you work through it, but as you become more familiar with your machine, you will be able to complete it quite quickly.
Please leave a comment below if you do try it out and it works for you. Also, if you have a problem, ask a question below and I will endeavour to answer it for you!

2 comments:
I have just got a scanNcut would it be possible to cut these out on there?
I do not have a Scan'n'Cut but my understanding of the machine is that you can cut any image that has been printed onto card. So all you need to do is to print your images then put them through the machine. Much easier!
Post a Comment