Wednesday, October 17, 2012

Terrific Tuesday Challenge- Pumpkins and Circles

 Today's Terrific Tuesday challenge over at PCW is to use pumpkins and circles or dots. There is a great cutting file freebie of a pumpkin on the challenge blog as well so head on over there to claim it as soon as possbile!


 My card for this challenge was made using a digital stamp from PCW of a scarecrow boy sitting on a pumpkin. I coloured it with Copic markers then cut it out. It was mounted on the background card with foam pads.

I had prepared the background by using two different papers then stitching them to the card using a sewing machine. The ribbon was added before attaching to the base card.

The sentiment was stamped (using a stamp from a set I have forgotten the name of) with wild honey distress ink then edged with the same ink as well as rusty hinge. I added some orange card candy to the corners for my circles or dots!


This is the freebie cutting file that you can get from PCW this week.

Look forward to seeing your entries to the challenge!

Tuesday, October 16, 2012

Some Lovely Stash!


Look at this lovely stash I just got from Gina K Designs! It was posted on 10 October and arrived today. That is fast from the USA!
Two of the sets were freebies from the sale they were having a couple of weeks ago. Great value and thanks Gina K Designs. Can't wait to try them all out.


- Posted using BlogPress from my iPad

Saturday, October 13, 2012

Design Team Call

Melin, over at Cooking with Cricut, has posted a design team call for a 25 Day Christmas Crafting showcase.

It will be a great showcase opportunity and the bonus is that you can also get access to all of Melin's wonderful cutting files and digi stamps to be found at Paper Crafting World. 

Please hop on over to Cooking with Cricut here to check out the DT call.

Tuesday, October 9, 2012

Pink and Sketch Challenge at PCW

This week's challenge is to use the sketch provided for a card or layout and to use the colour pink, in recognition of Breast Cancer Awareness.

I chose to use the card sketch for this challenge.

I used a grey card for the base and added a pink layer that I cut using deckle scissors and edged with London Fog Memento ink.

The focal image is a digi from PCW called Mother's Day Roses and actually came in the pinky sepia tones which worked perfectly. I cut it using a spellbinders deckled die then edged it with Victorian Velvet distress ink while it was still in the die


I die cut 2 white circles and the label for the sentiment and trimmed the sentiment tag to fit the bottom part of the card. The stamp is from a Gina K set and it was stamped with London Fog Memento ink.

I used a pink ribbon and a grey spotted ribbon for the centre of the card.

The finishing touches were the sprigs punched in grey card and the rose at the side of the sentiment.

Hope you enjoy this week's challenge over at PCW!

Wednesday, October 3, 2012

COOKING WITH CRICUT Colour challenge

Today we have another colour challenge over at Cooking with Cricut.

The theme colours were quite autumnal with a touch of pale green and we had to use string or twine.

This is the card I did for the DT this week.


I used two digi stamps from Melin's Paper Crafting world and laid one on top of the other (using PNG) files, then printed it and cut it out.

The card and the top layer were cut with the Cricut using the Everyday Pop-up cards cart. I added faux stitching around some of the edges. The sentiment was cut from the Preserves cart and using the Cricut Craft room, I made a shadow layer for it as well.

Pop on over to www.cookingwithcricut.com to check out the other projects from the DT.

Thanks for looking at my blog this week.


Posted using BlogPress from my iPad

Tuesday, October 2, 2012

Terrific Tuesday Colour Challenge

Today's challenge over at PCW is a colour challenge, using all the colours shown in the swatch here as well as string, twine, hemp etc.

Putting these colours all together proved to be a bit of a challenge but I managed with the help of a lovely digi image from Melin at PCW.


I used pale blue for the base card and made a gatefold card. That ScorPal is such a great tool!

I added a layer of cream that I embossed with my favourite swiss dots folder.

I cut the image and the backing card, the sentiment and its backing card with Spellbinders dies and edged the image and sentiment with antique linen distress ink.

I finished it all off with a bow made from natural coloured raffia.

I think I managed to cover all the colours in the swatch reasonably well!

Pop on over to join the rest of the team at the PCW Terrific Tuesdays Challenge and leave some lovely comments for the girls! Thanks for looking here as well.

Monday, October 1, 2012

Market Fresh Mondaze Cartridge Showcase

Today's Market Fresh Mondaze Cartridge Showcase  over at Cooking with Cricut features the Everyday Pop-up Cards cartridge.
I bought this cartridge a month or so ago and have been playing with it a bit since then.
There are some wonderful ideas on the cartridge, both for pop-up cards and flat cards as well as some great words and images that you can use on different types of projects.

The first cards I made with the cartridge were all done using the pop-up features. Each of the images has a number of different layers associated with it, some have more than others. There is usually an image with a layer and shadow, as well as a phrase, phrase layer and pop-up. Some images have 2 different pop-up layers and you can choose which you want to use. Each image also has a card which you can cut to the size you want. All the cards have different edges to them.

This card has a cute little plane that pops up when you open it. 

 I loved the images for this one and it lends itself to adding extra texture. I did this by embossing the box layer and adding a ribbon. The flowers were glazed with Kindiglitz to make them sparkle.

I also added some texture to the background by embossing the base layer and using a die cut scalloped oval which I added some shading to with distress ink.
 For the inside of the card, I used the pop-up phrase, which is multi-layered. To make the letters stand out, I added some faux stitching to some of them

 This note card was fun to do. I cut the bird and added some texture to his wing by embossing it with my favourite swiss dots folder. The card has a wavy edge so I cut it three times in different card to get a layered effect on the edge.
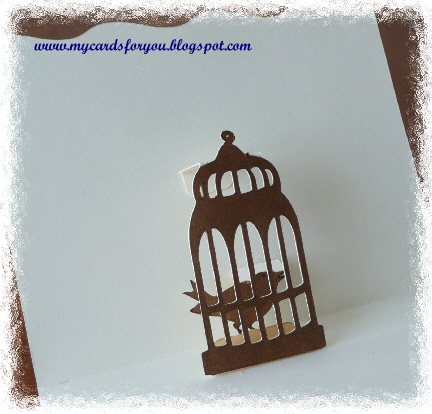
 The inside of the card has a little bird inside a bird cage that pops up when you open it.


After I tried using the the pop-up features, I decided to play with some of the images and do some creative things using the Cricut Craft Room.

For this card, I took the owl image and made it into a shaped card. Then I cut the top layer using the same image and added the various layers.

I inked the edges of the shapes with distress ink and added a little die cut heart with a stamp on it.


For my last card, I used the butterfly image and cut it at 2.5" using matching card for the upper and lower layers of the butterfly. I then placed the card layer on the mat and added the shadow butterfly in the centre of the card.

I added toning card to the back of the hole cut in the card then layered the butterfly on top of that after folding the wings upward slightly to give some dimension. The bling was added to the body of the butterfly.

I found this cartridge to have some great ideas for projects, not just cards, but images for layouts as well. You are only limited by your own imagination!

I did find it a little frustrating that there are not clear instructions included with the cartridge for putting the pop-up pieces together. There is a PDF available at the Cricut Support website with some indications of how the pop-ups work, but it would be great if there was more detail with it. You can do a class on-line but that has a cost.