Friday, July 8, 2011

Card Class Cards

This month, the theme for the class at The Scrappin' Patch will be Fancy Folds including a tri-shutter card, a pyramid card and a twisted easel card.

We are going to do the twisted easel card because the class last month did not run (it must be too cold for people to come out!!). This, I made from Bazzill basics pale blue for the base card and the dotty Bazzill in a slightly darker shade of blue. The flowers were cut from the Tattered Flowers Alterations die (from Tim Holtz) and the leaf from the Tattered Leaves Alterations die. I embossed these with the Cuttlebug then layered them up and finished off with a diamante bling. The labels were cut using  Spellbinders Nestabilities dies and embossed around the edges.
Before attaching the embellishments to the top part of the card, I embossed double lines along the side and bottom of the top layer, just to give a bit more zing! The embellishments were added to the top layer then that was attached to the front of the card.

The tri-shutter card is a favourite of mine, but I don't make it that often. It is a good card for formal occasions but this time I have made it a less formal card, just to try it out really!! (I like to try things out!!)

I used a white base card and layered it with pale blue card then paper from my stash. The flowers were cut with the cricut and edged with pen. The buttons were glued in the centres to link into the colours of the paper used on the layers.
I used a scalloped oval Nellie Snellen die to cut the white shape on the front then layered that with one of the fancy tags from Spellbinders. The top layer is a label die fromSpellbinders.


The third card for the class is a pyramid card for which I got the idea from one of my many crafting magazines. (I will add it when I find it again!)
The base card is cut from some blue card that I picked up at a stationery store on the West Coast a few weeks ago. I just love the tonings of the card and it has a lovely texture to it as well. The top layer is paper from my stash (I have had it so long...).
The rosette is cut using an Alterations rosette die (Tim Holtz again!) and is edged with faded jeans distress ink.

The sentiment is cut with a Nestabilities Tag die and I cut the centre part with my Cricut. The stamp is from one of the Art Deco sets from Tanda. It fits this die perfectly!

I do hope we get lots of people for this class! I love these cards!

Wednesday, June 29, 2011

Peony Cottage

SVG Cuts came out with this gorgeous little cottage (designed by Mary Rudakas) recently and I loved it when I saw it - so I bought the file. Had it sitting on my computer for a few weeks then decided to do something with it - and here it is!

Using my Cricut Expression, I cut the base cottage from kraft card to make it reasonably strong. The wall coverings were cut from paper that I had in my stash for so long - I can't remember where it came from even!! The roof is cut from dark green Bazzil card and the tiles were embossed with the Swiss Dots folder in the Cuttlebug.  I embossed the roof facing with the D'vine Swirls folder.

I wanted to add a fence to the house so I found a file on my Songbird cartridge that had a fence with a bird on it. I welded three together and cut them out with the Cricut then removed the birds from the fence. I cut from the same cartridge a sign with a bird on top and inserted the word HOME using George and Basic Shapes.

I coloured the fence with Distress Stain (Vintage Photo) then attached the leaves and flowers to the fence instead of the house - as it was in the original house.

All it needs is lace curtains to finish it off!! 
Thanks Mary and Leo for this great design!

Birthday time

Yes, it is that time of the year when the birthdays in the family start to come around again. The first one since March!!

My mother turned 86 yesterday and I made this card for her. I wanted it to be a bit special so I found a photo of her when she was about 18. I printed onto copy paper, tore the edges and layered it onto card using melted beeswax. I scraped away some wax from the centre of the card, then heated it a little and stamped a music stamp around the edges where the wax melted. I inked the whole piece with sepia archival ink.

The background is a tapestry paper from DCMW and I layered some old sheet music on top of this.

The roses were made from 6 petal flowers that I punched and made into roses then covered them with melted thick embossing powder which made them look semi-transparent in parts - quite a vintage effect. I layered these onto the lace trim that I coloured using distress stain (vintage photo) and threaded a pale blue ribbon through the lace.

The tag is a grommet tag from Spellbinders that I stamped with the sentiment using archival ink.

Mum thought the card was lovely and showed it to all her friends. She also had a lovely birthday!

Thursday, June 23, 2011

Easel Cards

I am going to be running some card making classes for Adrienne at the Scrappin' Patch over the next few months, so I thought it would be nice to put up some pictures of the sort of cards we will be making.

The first class will focus on easel cards, starting with a simple easel card, similar to this one.


These two cards are made using Nestabilities Labels dies and Cuttlebug folders.

The shape of these cards makes them look really special.


The final example is a Twisted Easel card. This one was made for a card swap with a white on white theme, but it looks very effective in other tomes as well.

I used Tim Holtz Tattered florals die for the flower and the Elegant Flourishes die for the flourish. The text is a cuttlebug folder and I used the Swiss Dots folder to emboss the flower.

I hope the class enjoy making these cards. I also plan to do some classes on cards made with fancy folds, tri-shutter cards and 6-fold cards.

Monday, June 13, 2011

Steampunk

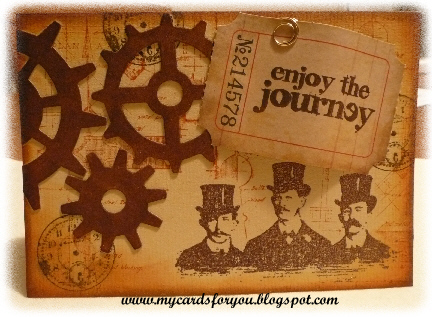
Sue's challenge over at the Tanda Teaser a couple of weeks ago was "Steampunk". It just so happened that I had just purchased the Stampers Anonymous Steampunk set designed by his lordship, Tim! So, since I was in the craft room this afternoon tidying up after yet another major aftershock ( a 6.0 magnitude earthquake), I decided to have a play with the set!!

I had a grungy looking base card that I stamped the three gentlemen on and embossed with Ultra Chocolate embossing powder. I then masked that image and overstamped in Rusty hinge a stamp that looks like a blueprint. I used a clock face from another set to stamp with walnut stain.
The gears were cut from Tim's gadget gears and stained with vintage photo distress stain.
The ticket is from a set of tickets and stamped with a sentiment from the steampunk set.

This was a fun card to make. I think there will be more steampunk soon...

Y and Z ATCs

This month sees the end of our Alphabet Themed ATC swap over at the CMW NZ Crafters ATC Swap. For over a year, a group of about 8 people have been swapping ATCs with an alphabet theme and we have seen some really interesting ATCs.

For the Yin Yang ATC, I made the symbol using a MTC file on the Cricut. I cut it in both black and white and layered onto a circle.

The background is made from heavy card off cut which was coloured a jade green. I stamped it with Pumice Stone distress ink and a nice Grunge stamp from Kaiser then overstamped with an oriental lettering stamp (also from Kaiser) which I embossed with detail silver.

I then edged the ATC with Black Soot DI.


My Z ATC used a zebra stripe stamp from Tanda Stamps. I have had it for ages and had not used it before!

I stamped the zebra strip on the whote card then embossed it with black. I used Crushed Olive, Bundled Sage and Forest Moss to stamp the grassy backgrounds - again a Tanda grass stamp for the bottom and a "sticks and balls" stamp that I got from The Stamp Attic last year.

The sky is stamped with Faded Jeans and Stormy Sky DI. I used the dotty background stamp designed by Sue Law for this.
It will be interesting to see what other people come up with for the swap! 

White on White

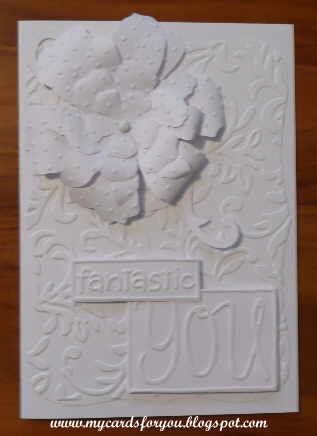
The CMW NZ Crafters card swap this month is White on White. Haven't ever done this before so it was interesting to have a play with some different techniques.

I wanted to try out a twisted easel card so thought this was a good chance to experiment. I used a big script folder to emboss the bottom layer. The flower is made using the tattered florals die from Tim Holtz and the swirl is also a TH die. I embossed the flowers with the Swiss Dots folder and layered them together with a brad.

The piece on the inside of the card was cut with a Spellbinders labels die and topped with a die cut sentiment which I covered with KindiGlitz.


This card uses a large labels die that I embossed with the Victorian folder. The flower is the tattered florals die which I embossed again with the Swiss Dots folder.

The swirl is made with the elegant flourishes die.

I ran some card through a words embossing folder (You) and cut out the words I wanted to use. I layered these  onto the card to provide a 3-D effect.

I do like the white on white effect!